
Introduction
Hola, cariño readers. I hope you all are doing good and safe. In this blog post, I will walk you through creating an EC2 Instance on AWS and then installing and setting Gophish instance on the same manually from scratch. After that we’ll look into how we could automate everything from creating and setting ec2 instance till installing and running gophish on our created instance with terraform. I am a firm believer that you can’t learn anything well unless you do it. So, I would want everyone to follow along with me because you don’t learn by learning, you learn by doing :P . Okay so enough with my ugly philosophies, let’s get started. I am going to be assuming that you have an account on AWS, if not you can go and create one account now, it won’t take much time and on top of that it’s free(limited resources/usage) for an year although it asks for credit card information for confimation. Rest of the tools we’ll install as we go.
Manual Approach
Creating EC2 Instance
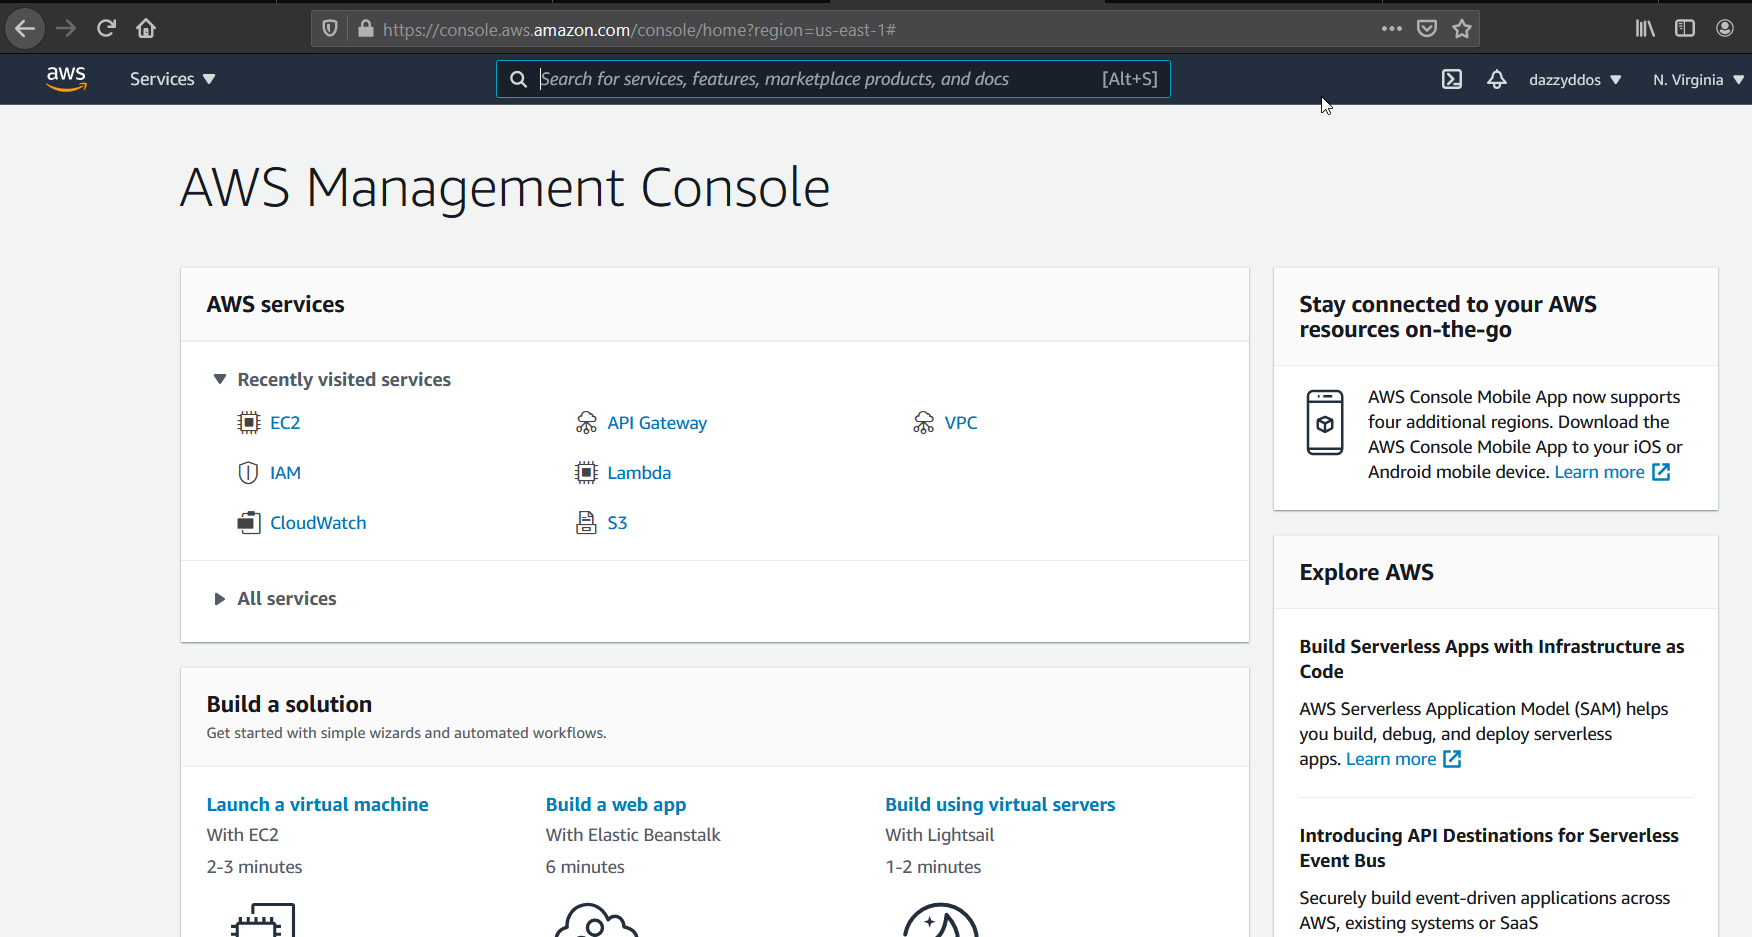
With that being said, let’s get going with creating our EC2 instance on which we’ll run our gophish. If you know how to create an ec2 instance, you can skip this part. When we visit console.aws.amazon.com we get presented with this Dashboard. It might change in future.
Click on EC2 to go to the EC2 Dashboard. 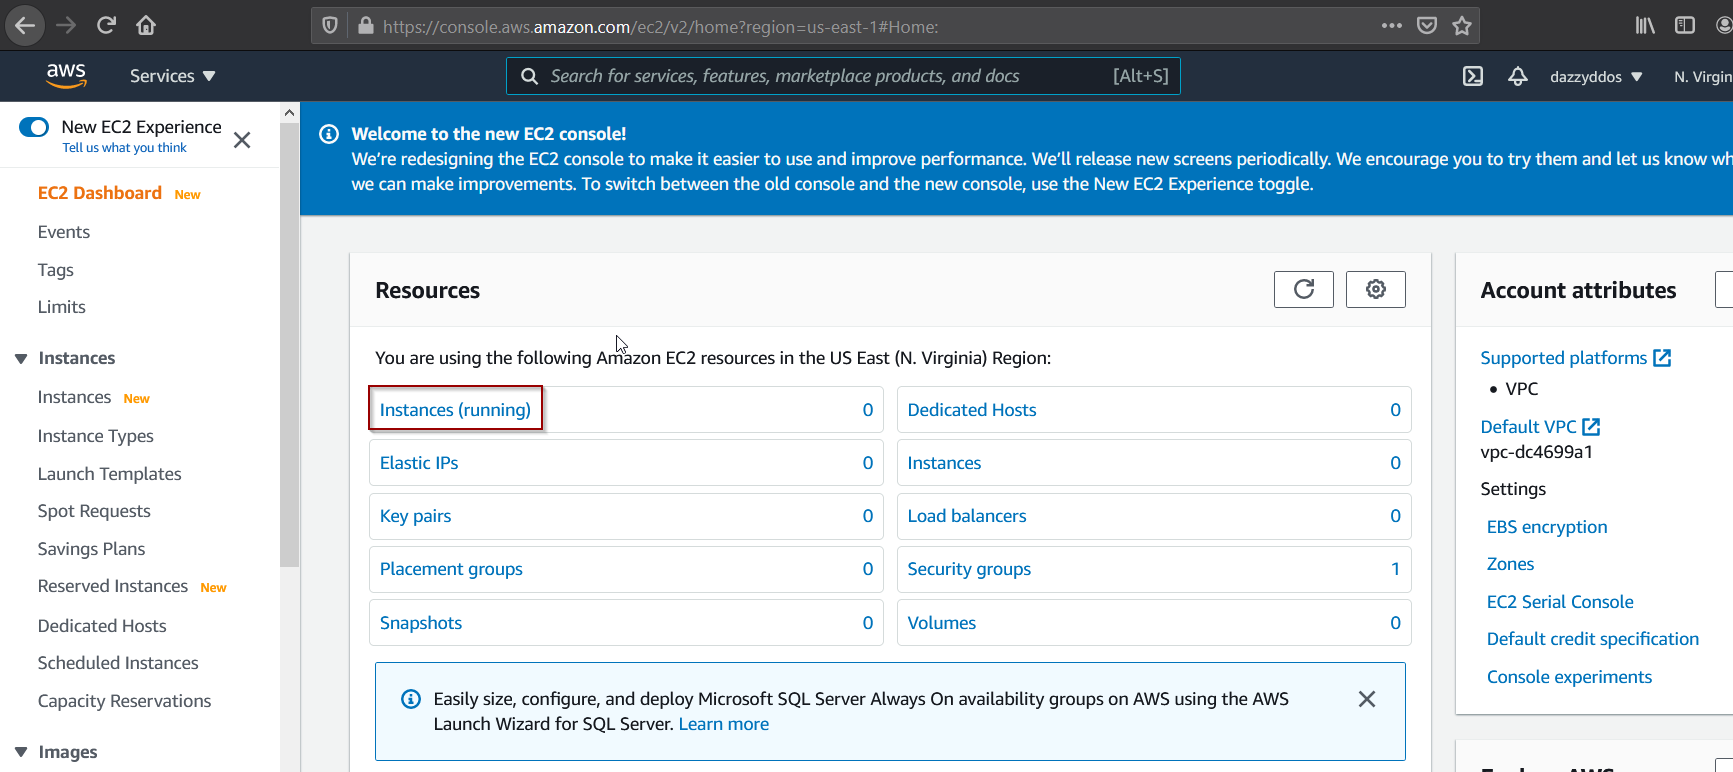
Click on instances. By default it’ll show only those instances which are running. You can need to remove the running tab to see all Instances. 
If you haven’t created any instances, it would be empty for you regardless. Click on Launch instances 
Now here select free tier box to list only those images which comes under free tier subscription. 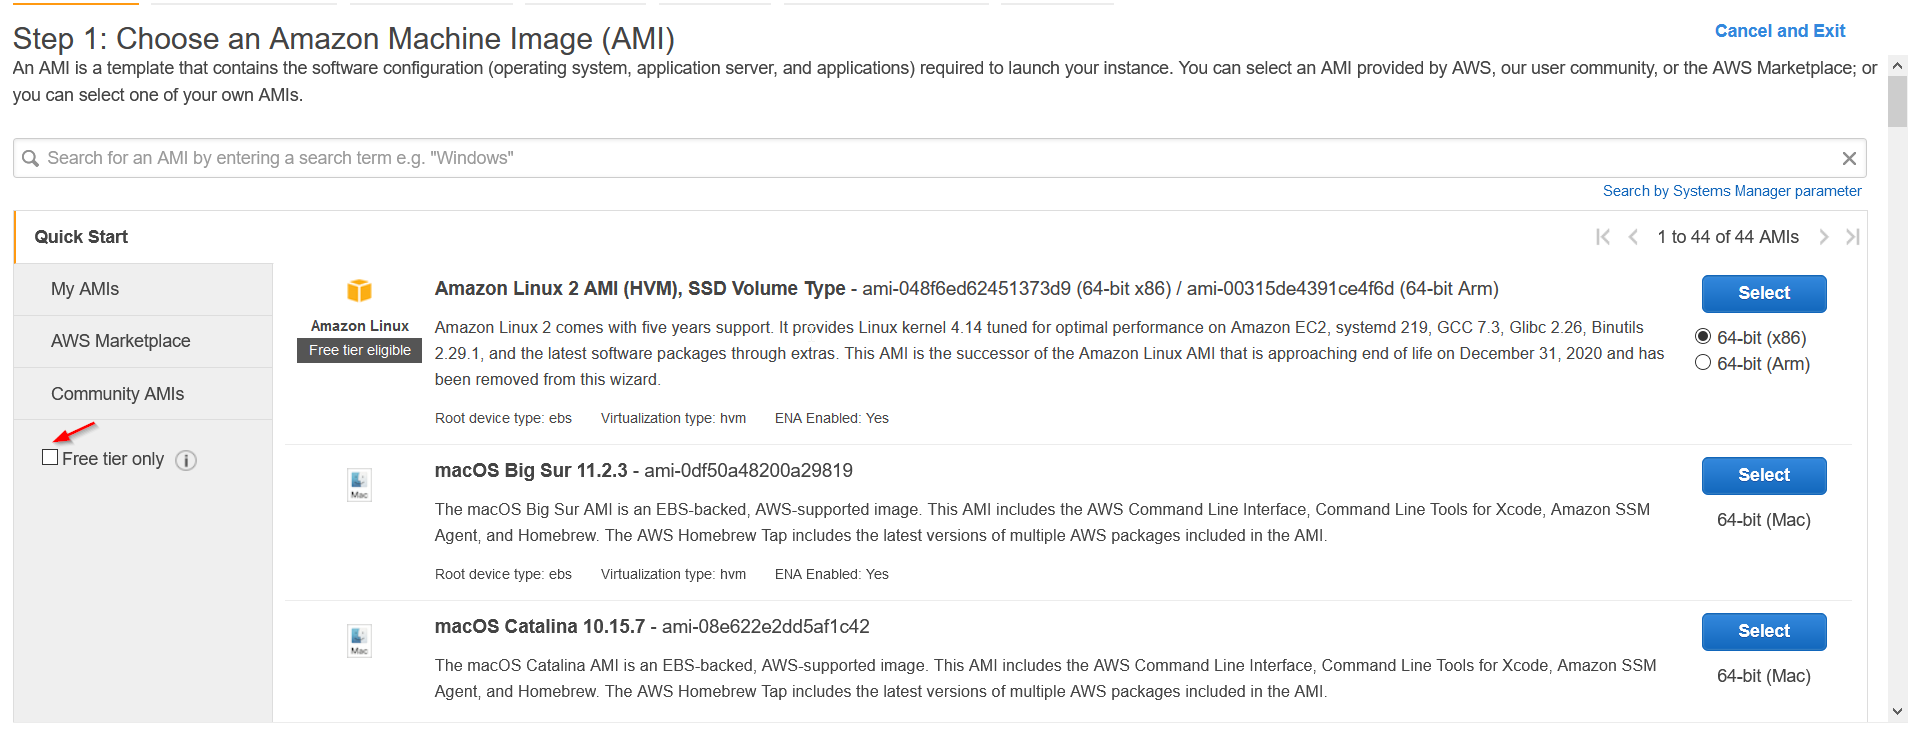
I’m going to be choosing the first image i.e., Amazon Linux 2 AMI (HVM) .You can choose any image. At next make sure you select t2.micro. 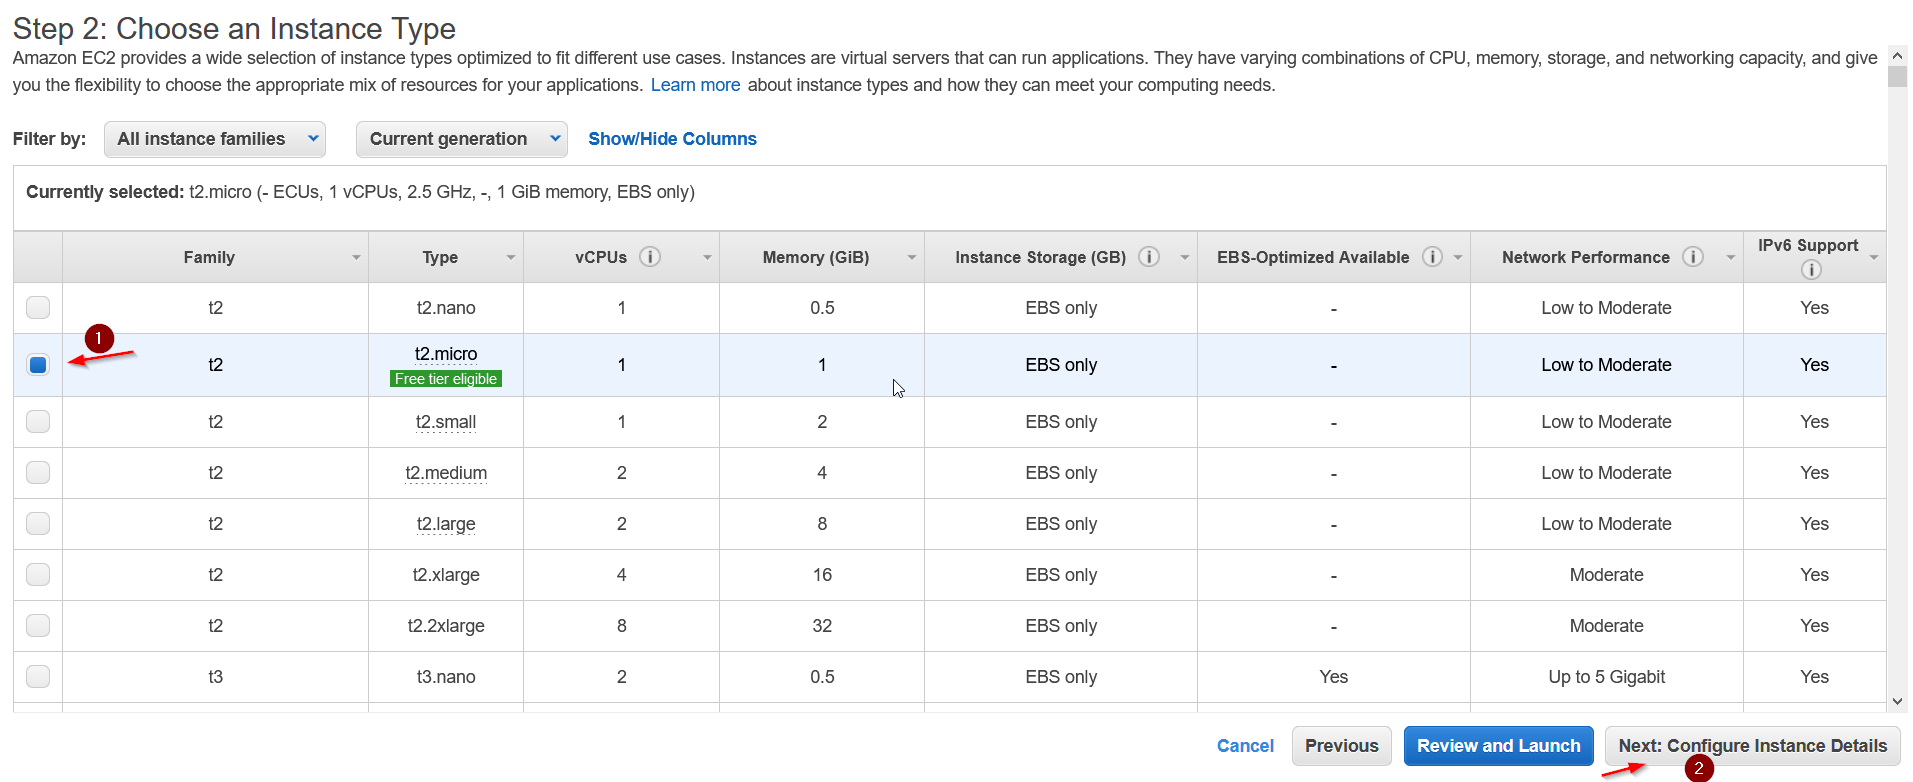
At next step, you add some configuration to your EC2 instance if you want like if you want to place it inside any particular VPC you have created or want to attach any IAM role to it if it needs to access any other AWS resource and so on. For our case, we don’t need to do any configuration at this stage so we’ll move to next stage. 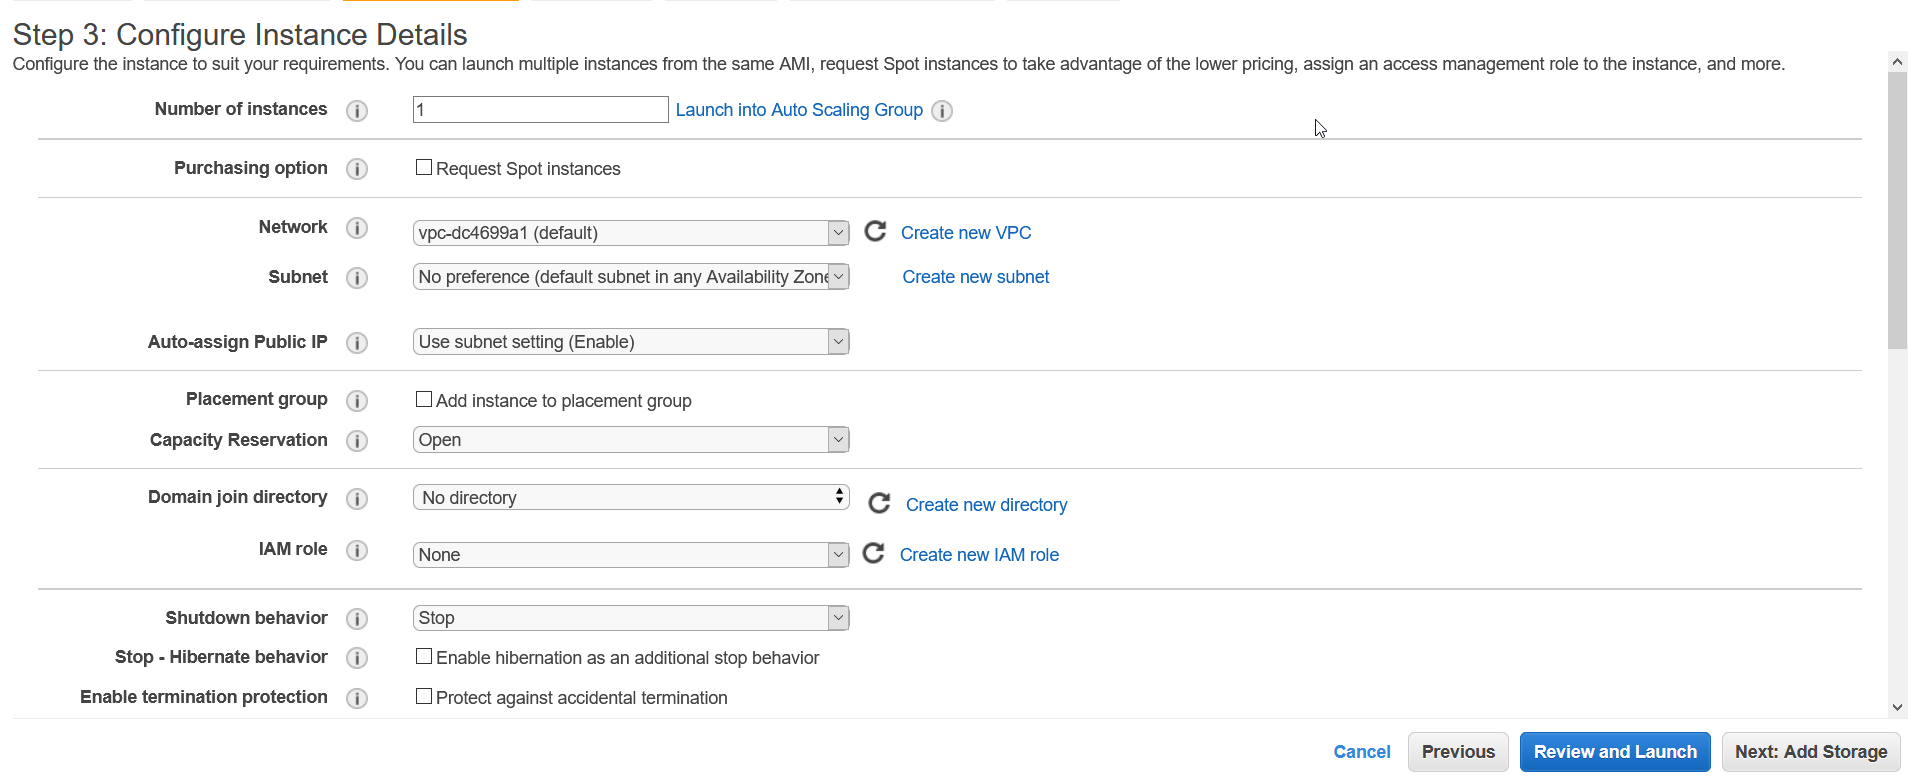
At next step, we can add/modify storage. Note that free tier is only eligible for 30 Gigs of SSD storage. 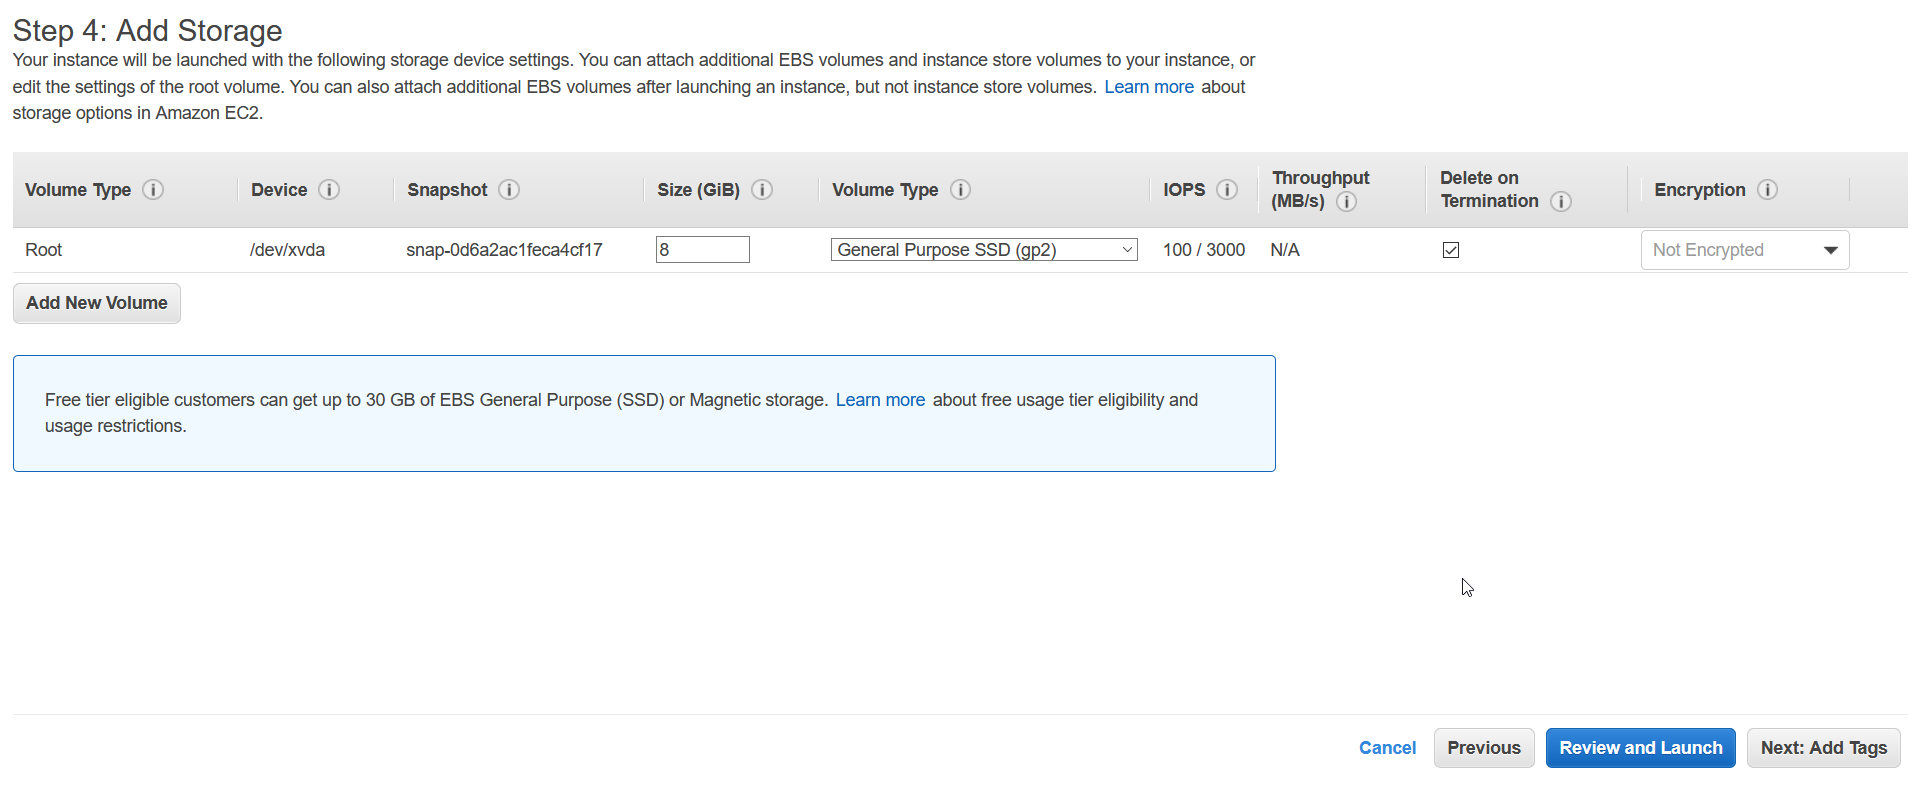
We’ll move to next step where we asked if we want to add any tag to our ec2 instance. Think of tag as just a label which consists of key and value pair that we add to AWS resources to organize them. Note that each tag must be unique. 
For now we don’t want to add any tag so we’ll move to next step. Next comes security groups where we specify firewall rules (allow/deny inbound/outbound traffic). For now, we don’t want to open any outbound connection although while setting up gophish, we’ll have to open some ports that we’ll do it later while setting up. 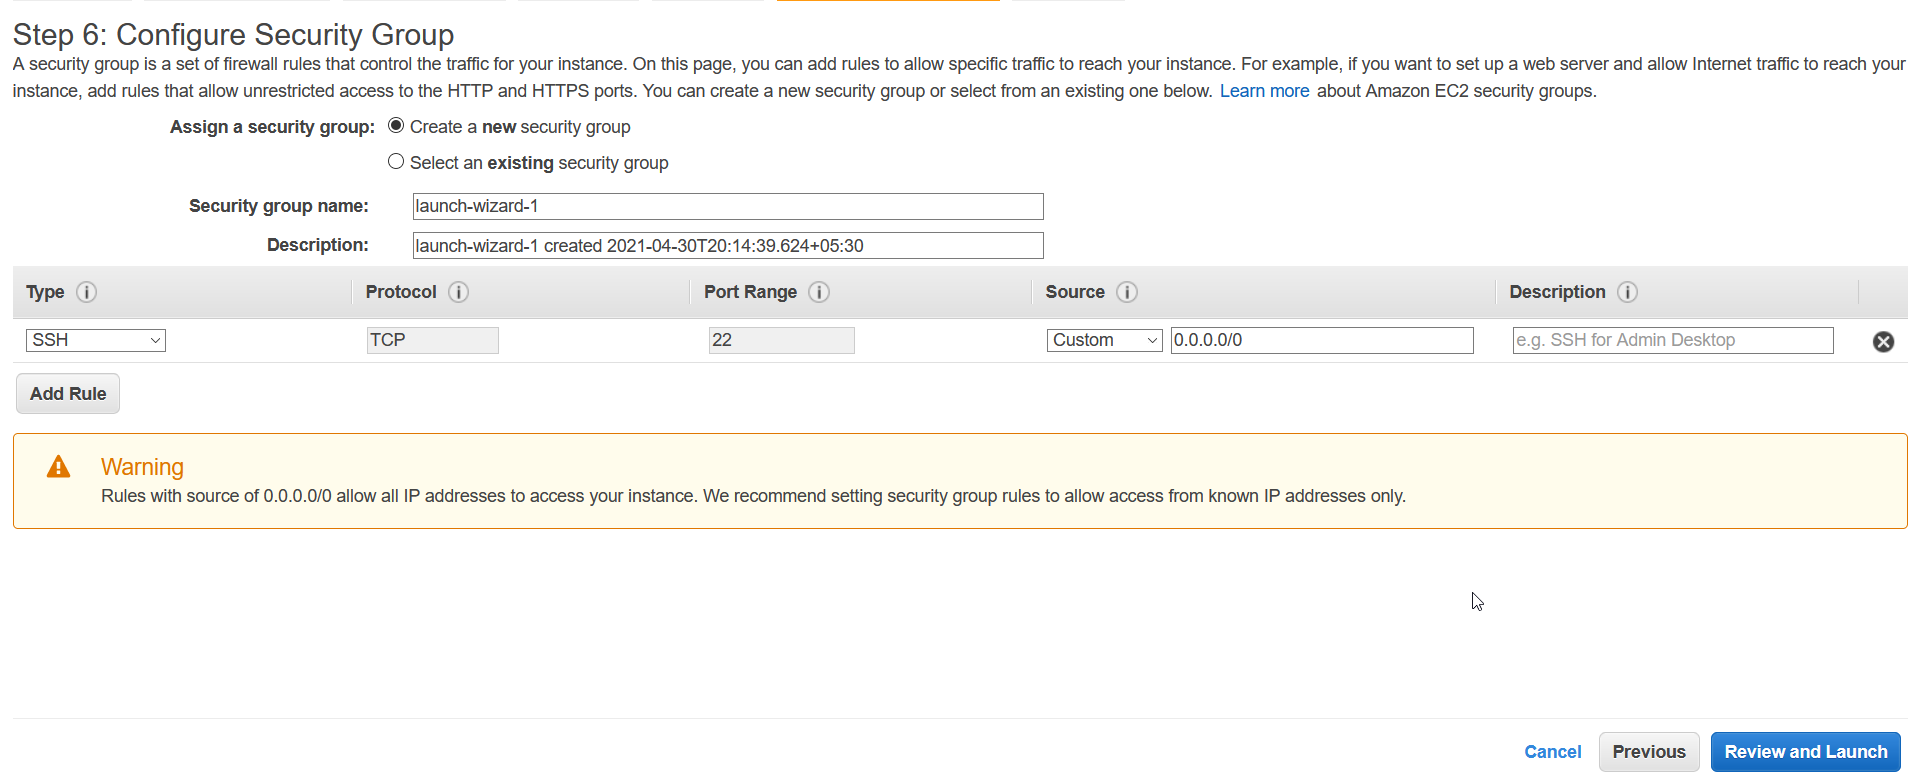
So, finally let’s click on Review and Launch. We need to create a new ssh keys so that we can ssh into our instance once it has started. 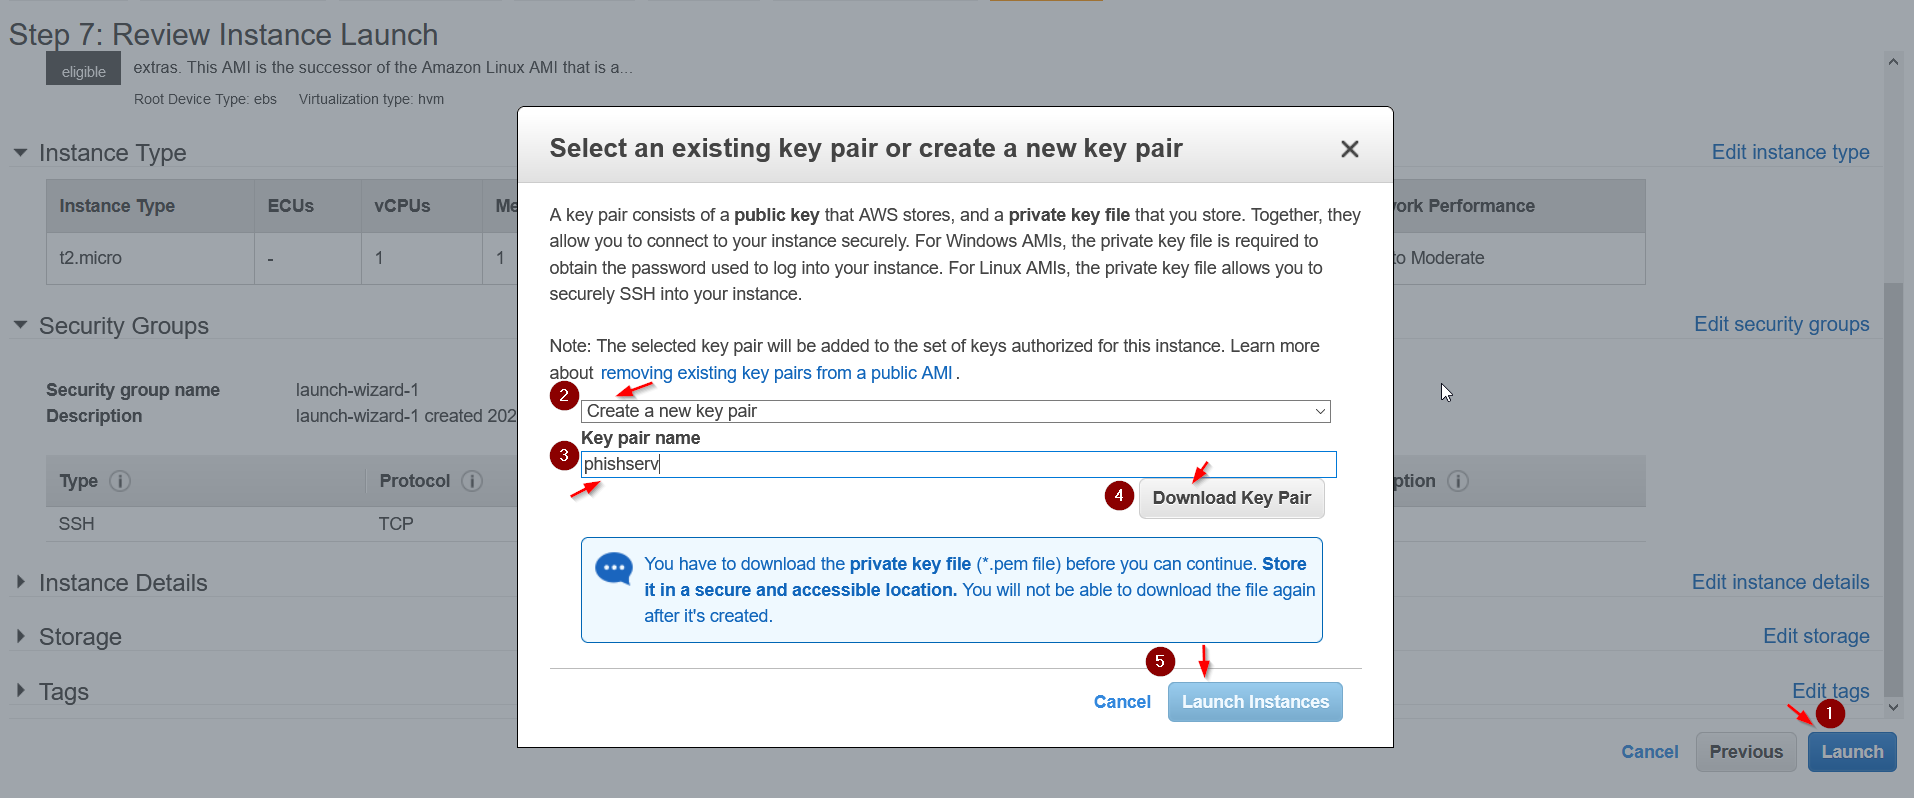
Yayyy our instance is running. When clicking on the instance name, we’ll be taken back to the instances dashboard. 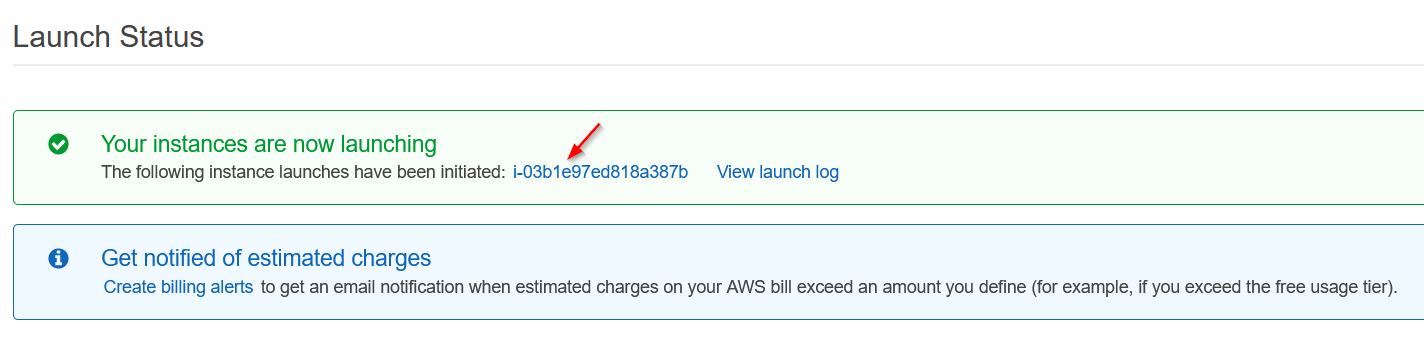

Let’s SSH into it. Right click on the instance name and click on connect. 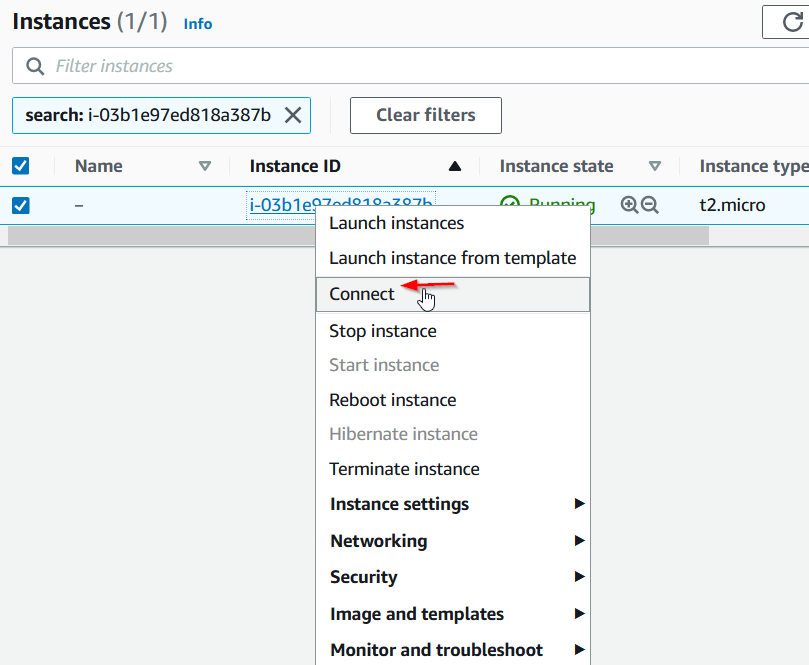
Clicking on the SSH Client tab, we can see the instruction to connect to our instance. Let’s do it.
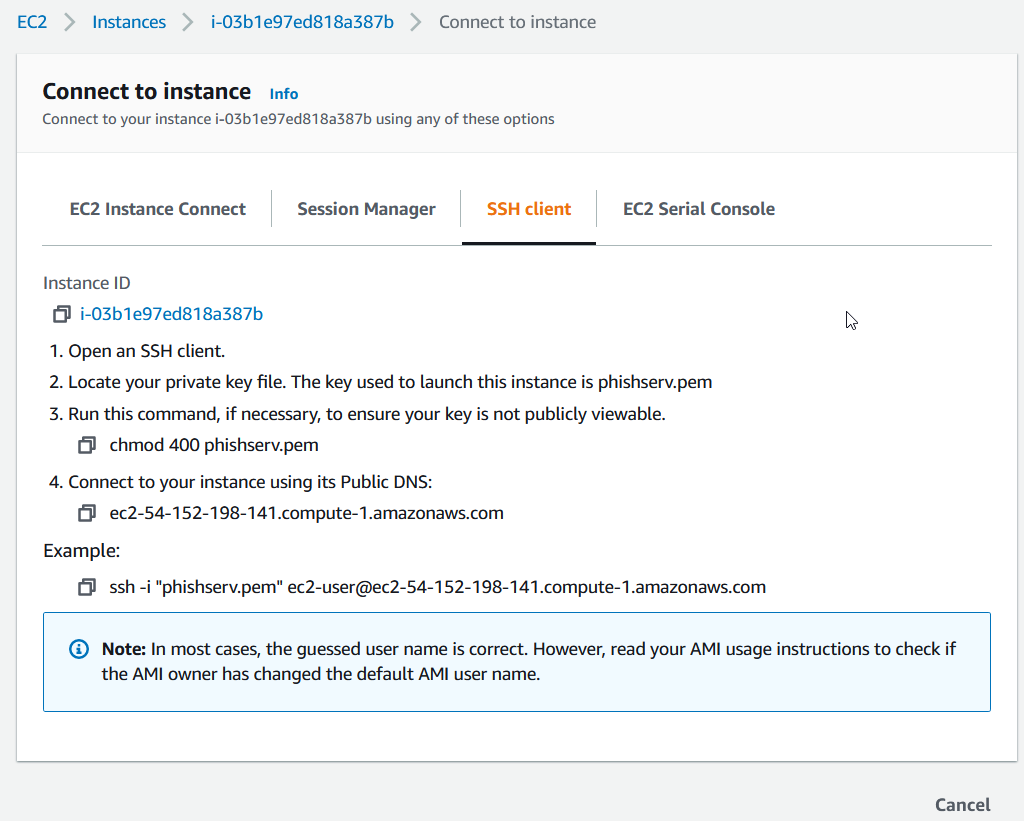
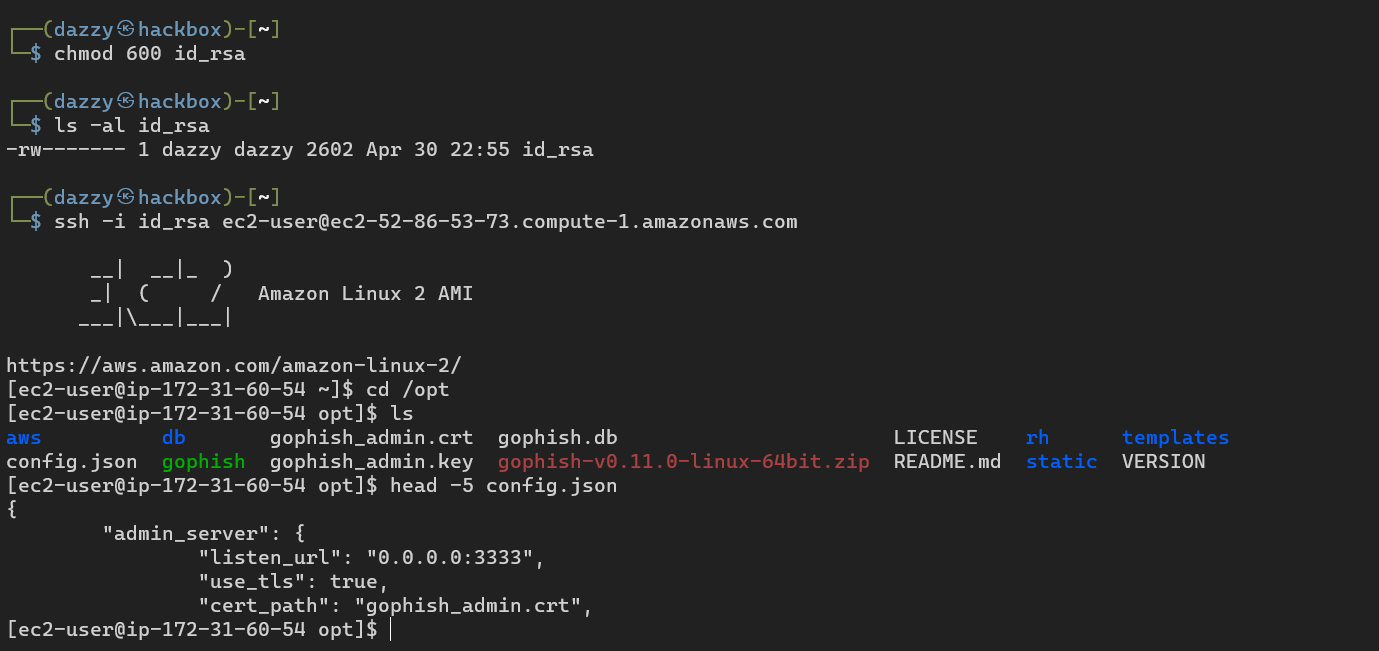
Make sure to change your permission of the private key before ssh yells at you. 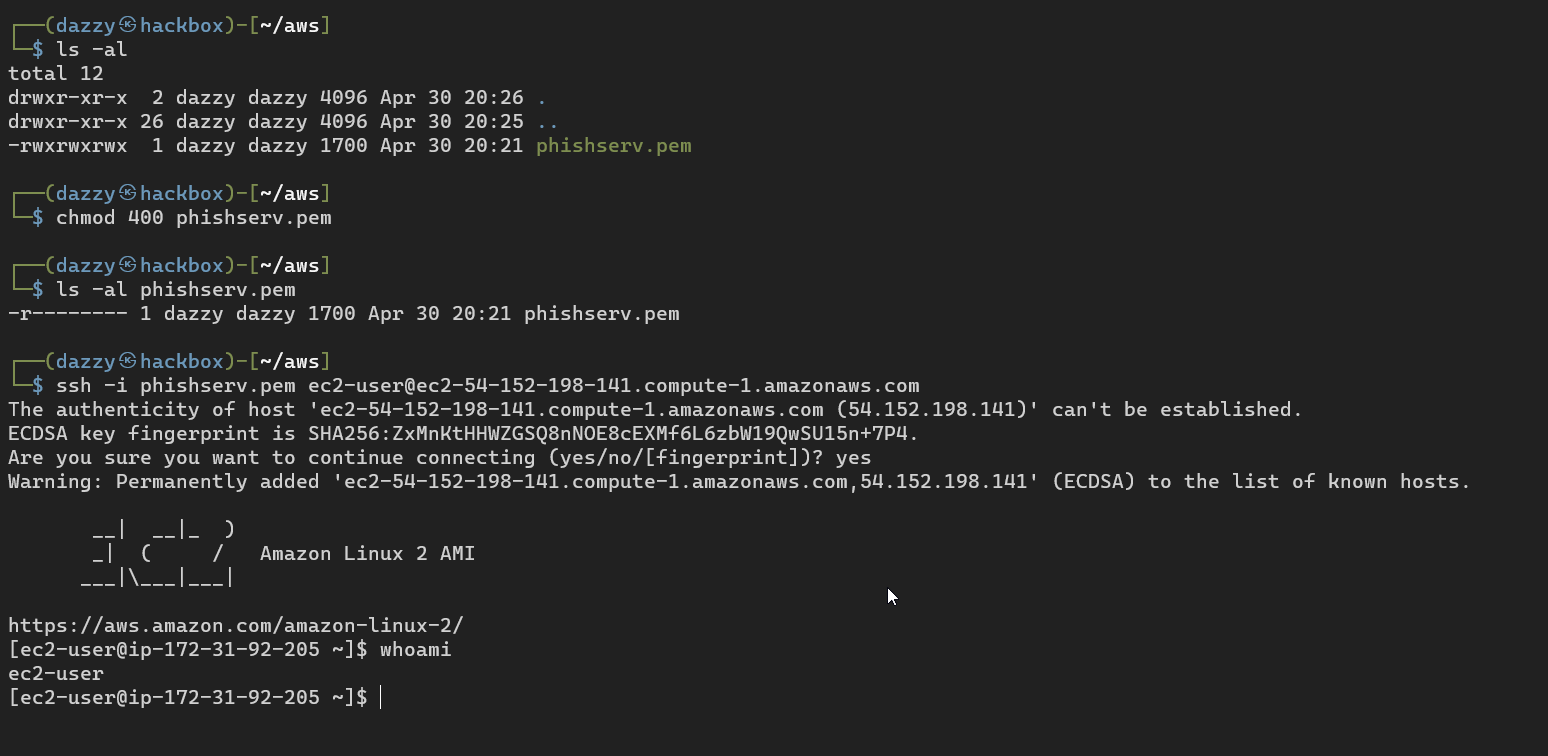
Installing Gophish on Linux VMI EC2 Instance
Now that we have created and connected to our ec2 instance, all that’s left to do is to download and setting up gophish.
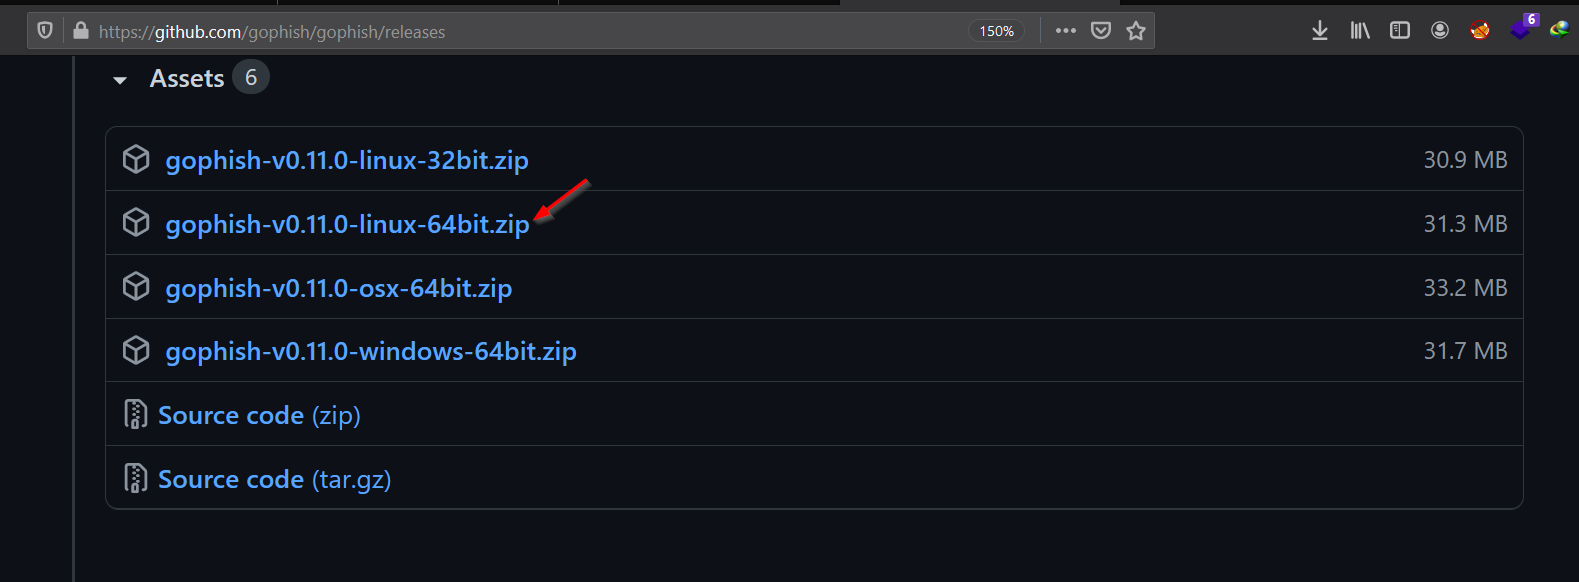
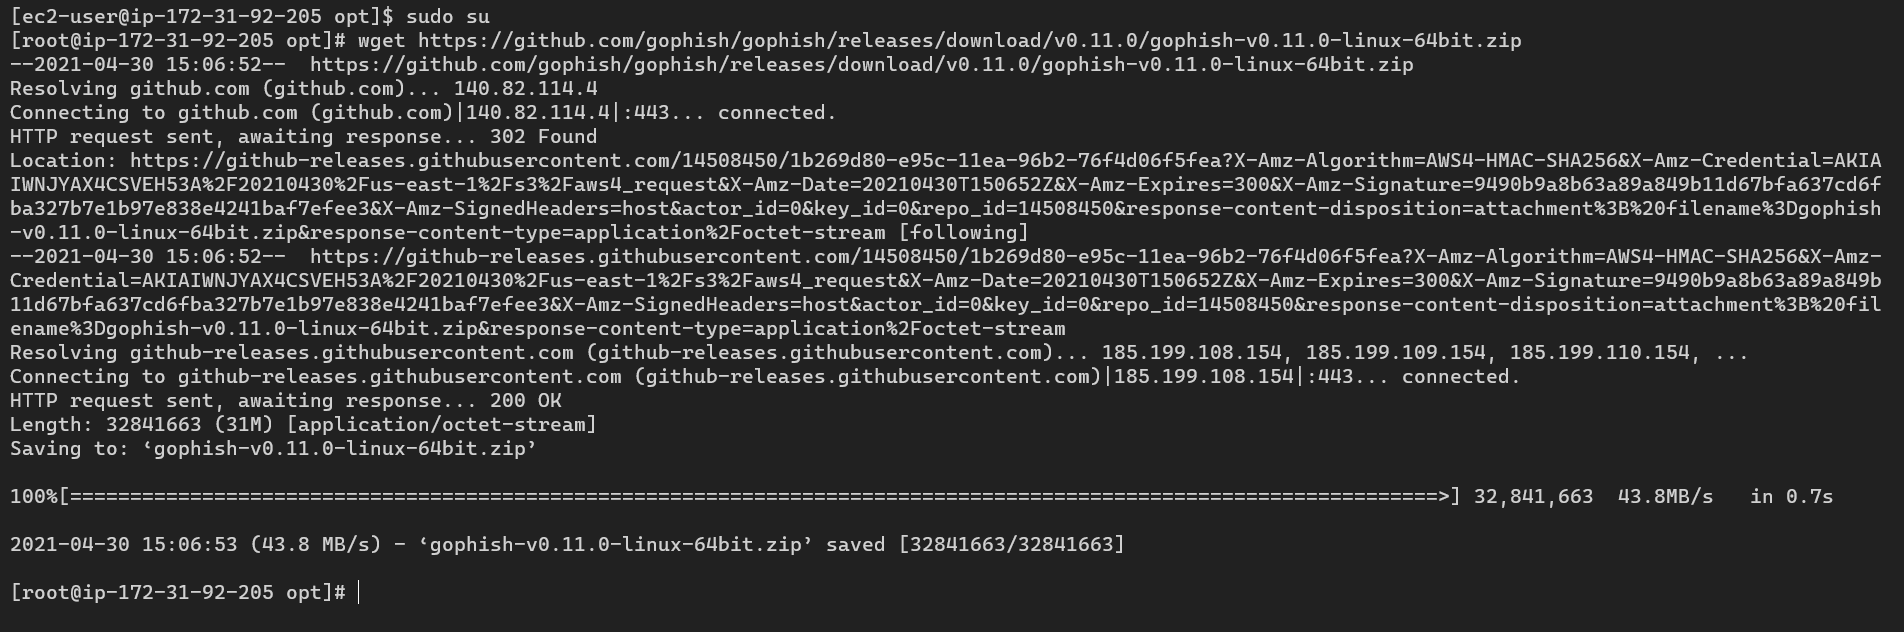
Right click and copy the link and come back to the instance and download the zip file using wget. I am going to download it to the /opt directory for which I need to su to root first. The current user we are running as has permission to run sudo. So by just doing sudo su we’ll be presented with root shell.
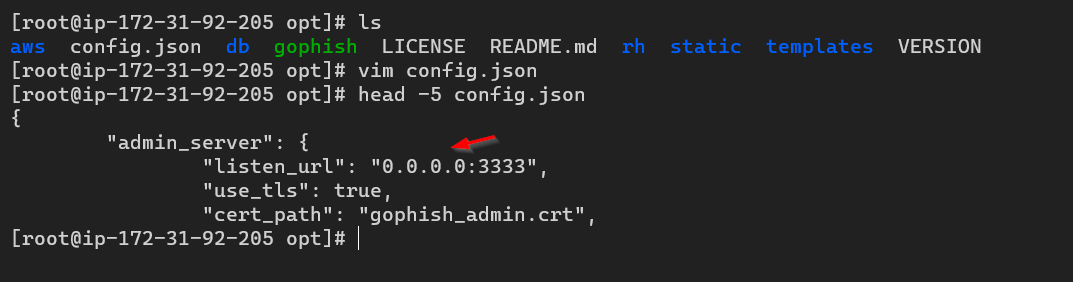
After unzipping the file, we just need to set the executable permission on the program. Before running the gophish program, we need to do a very small change in the config.json. Currently by default gophish will only run on localhost IP, we need to set 0.0.0.0 so that it listens on all interfaces including public interface so that we can access it from the internet. We can also do Local Port Forwarding to access it from our machine but for now let’s make it accessible from internet.
Now let’s run the gophish. You should be seeing the below log if everything was fine till here. 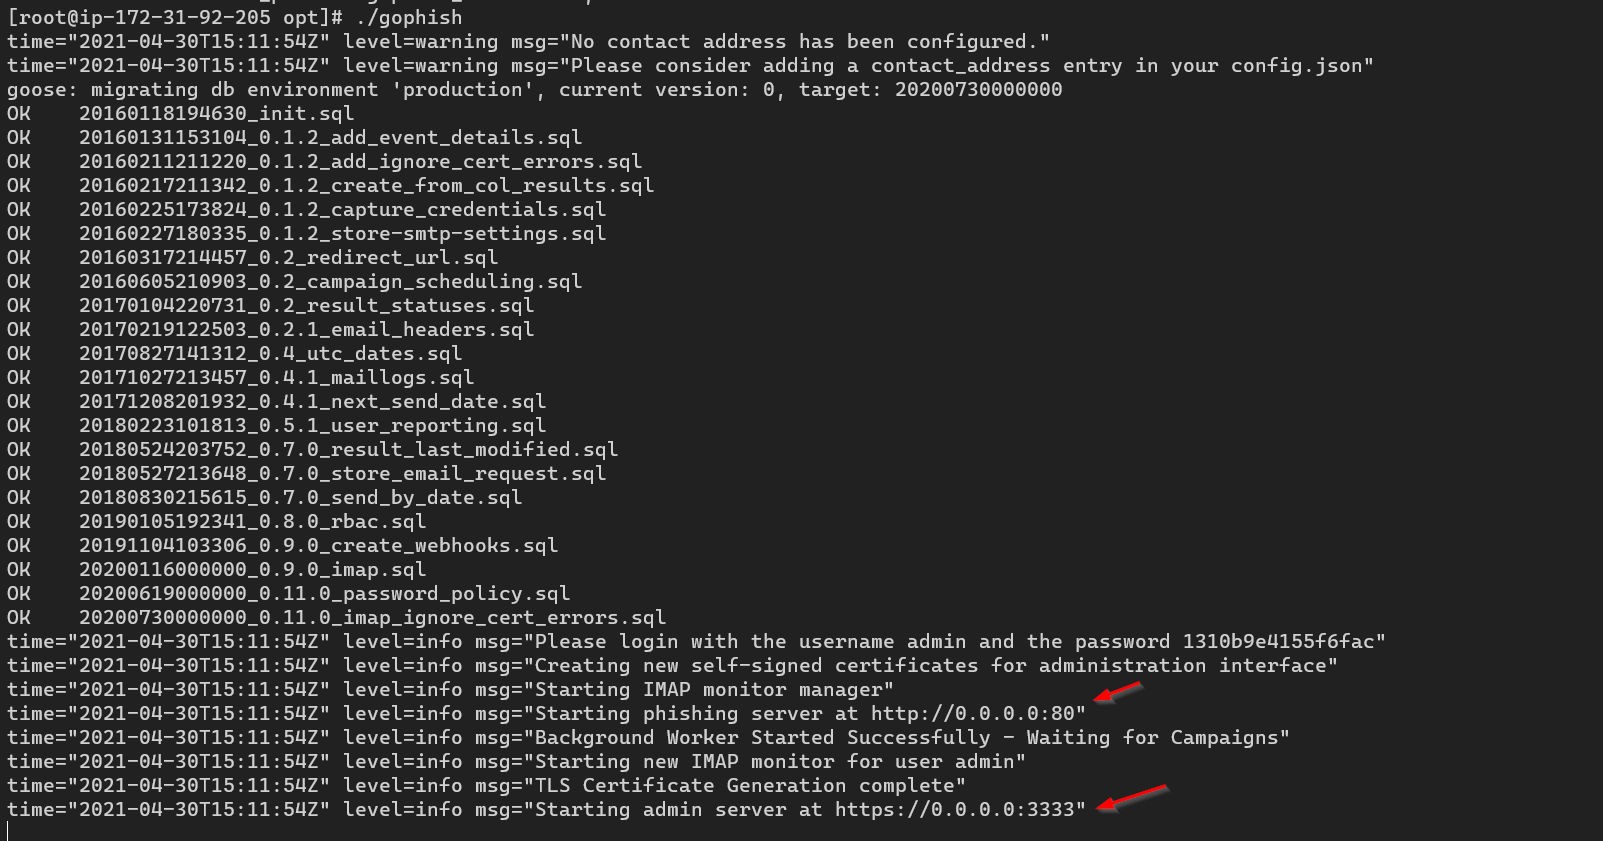
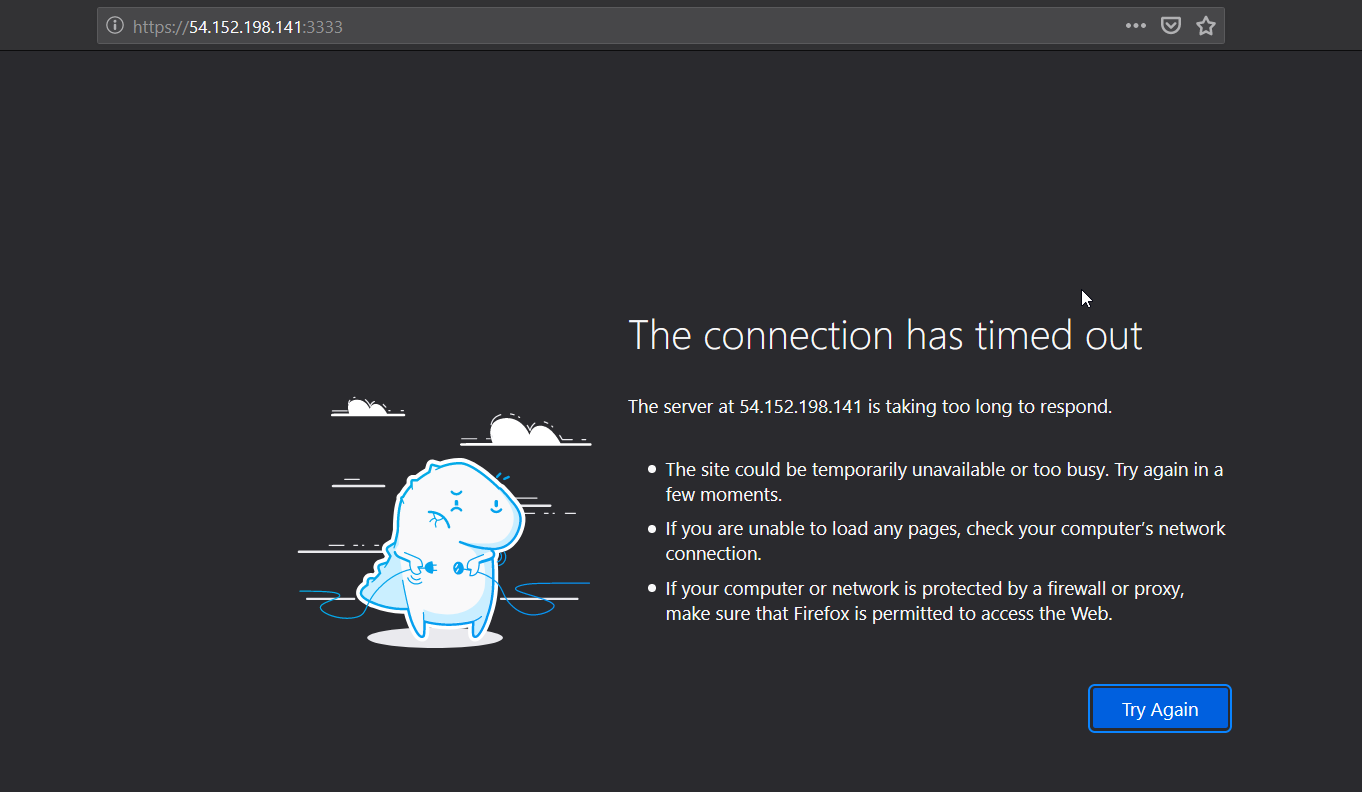
We have the public IP Address of our instance from the connect dashboard, let’s try to access our gophish instance from internet.
Adding Inbound connections
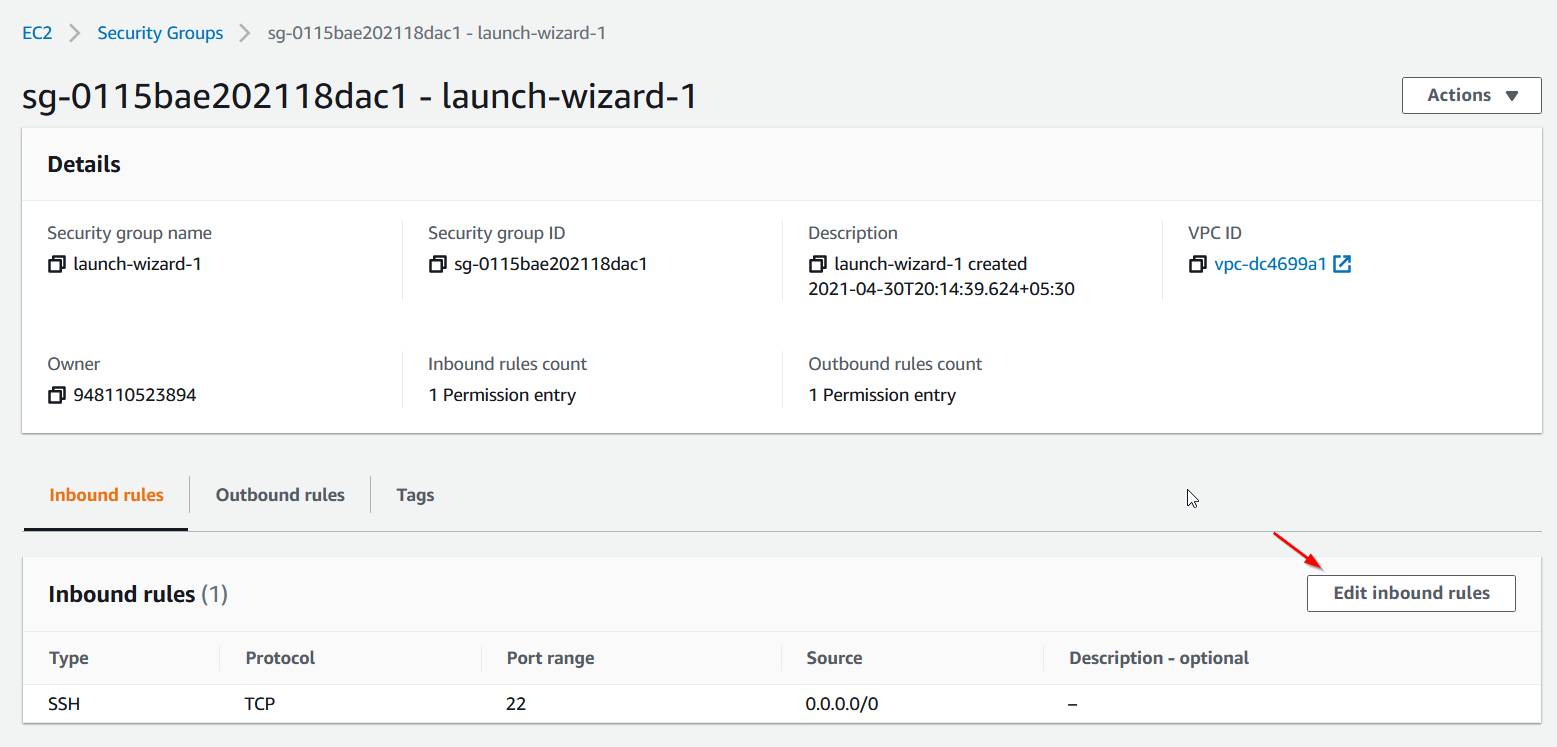
Mmmmm strange, isn’t it. No it’s not strange at all you baaka. We have not opened inbound ports (3333 and 80) during the security groups step. So, let’s do it now. When you scroll down from the left panel of instance dashboard, you can see the option for security groups. 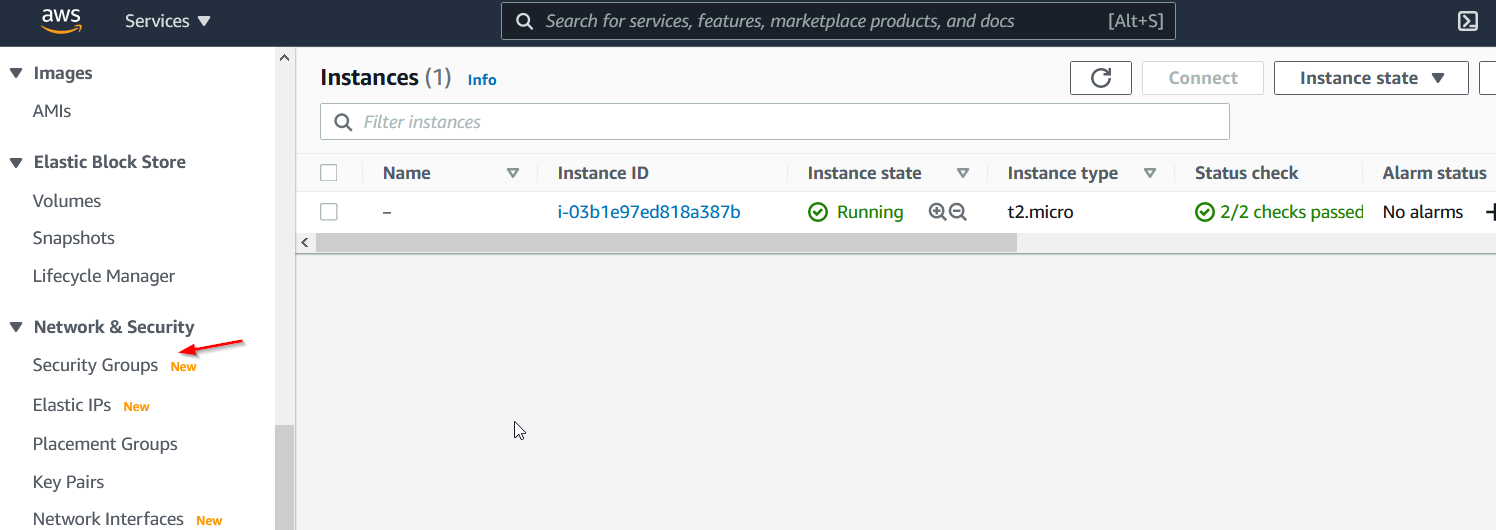
When you visit the security groups, you can see all the security groups present out of which you need to select the one your ec2 is part of. 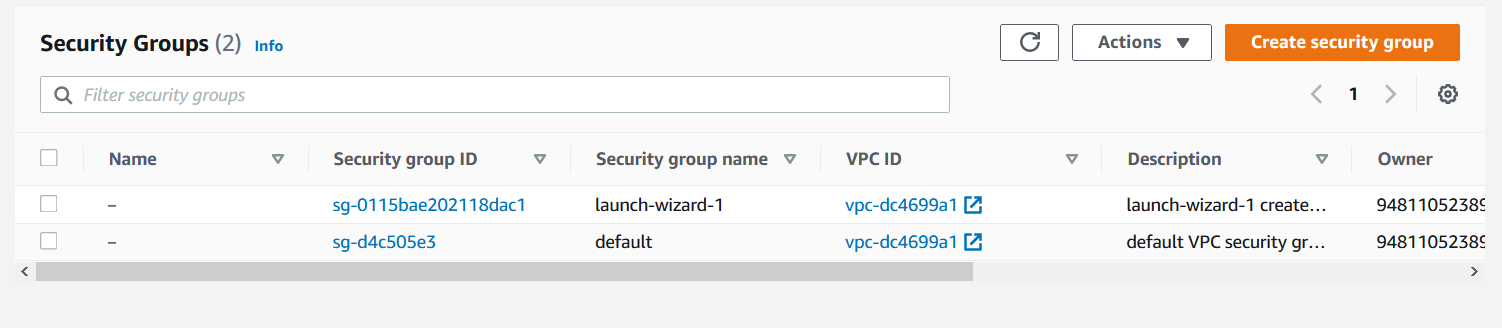
You can see your group id by visiting the security tab of your ec2 instance. 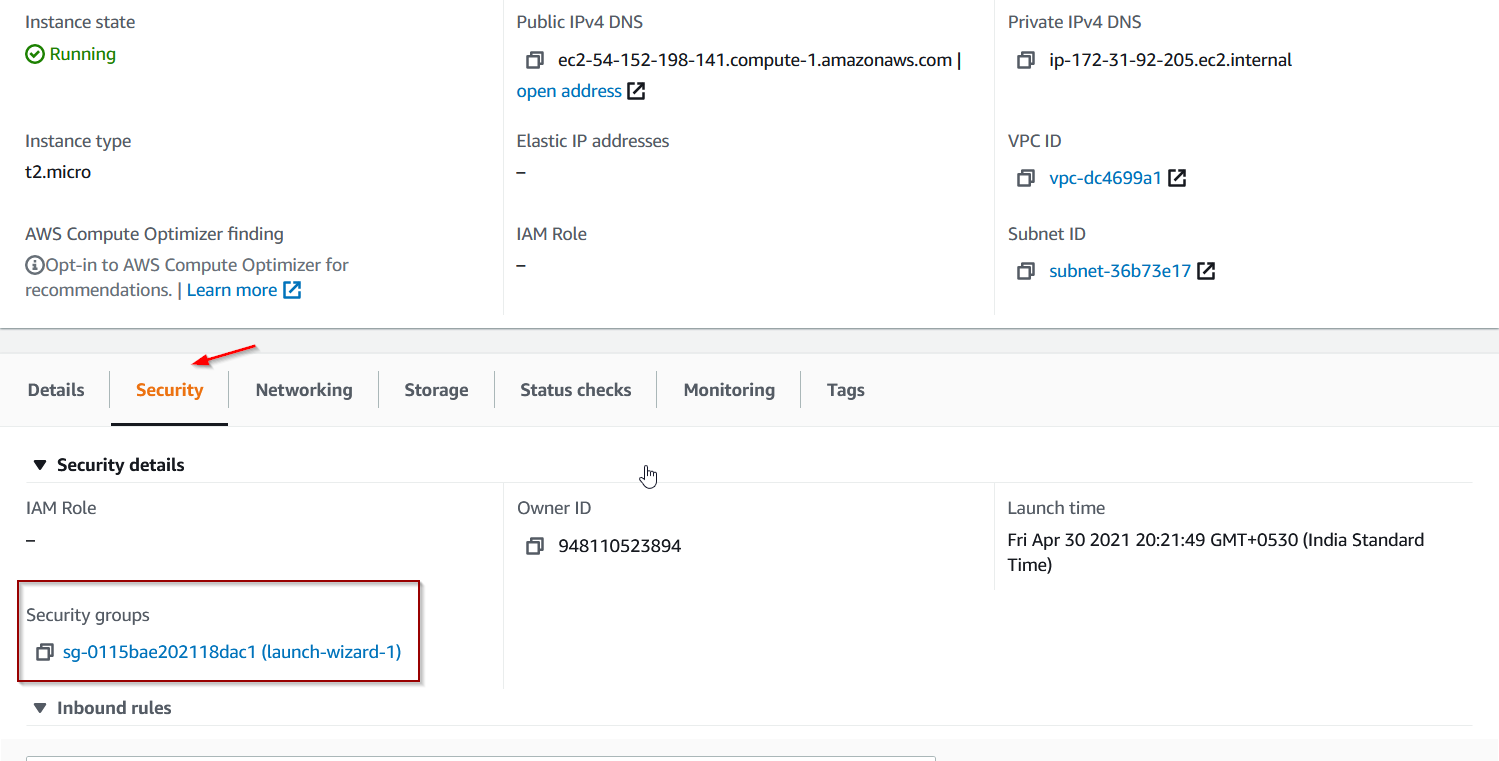
Let’s go back to the security groups option and select our security group id.
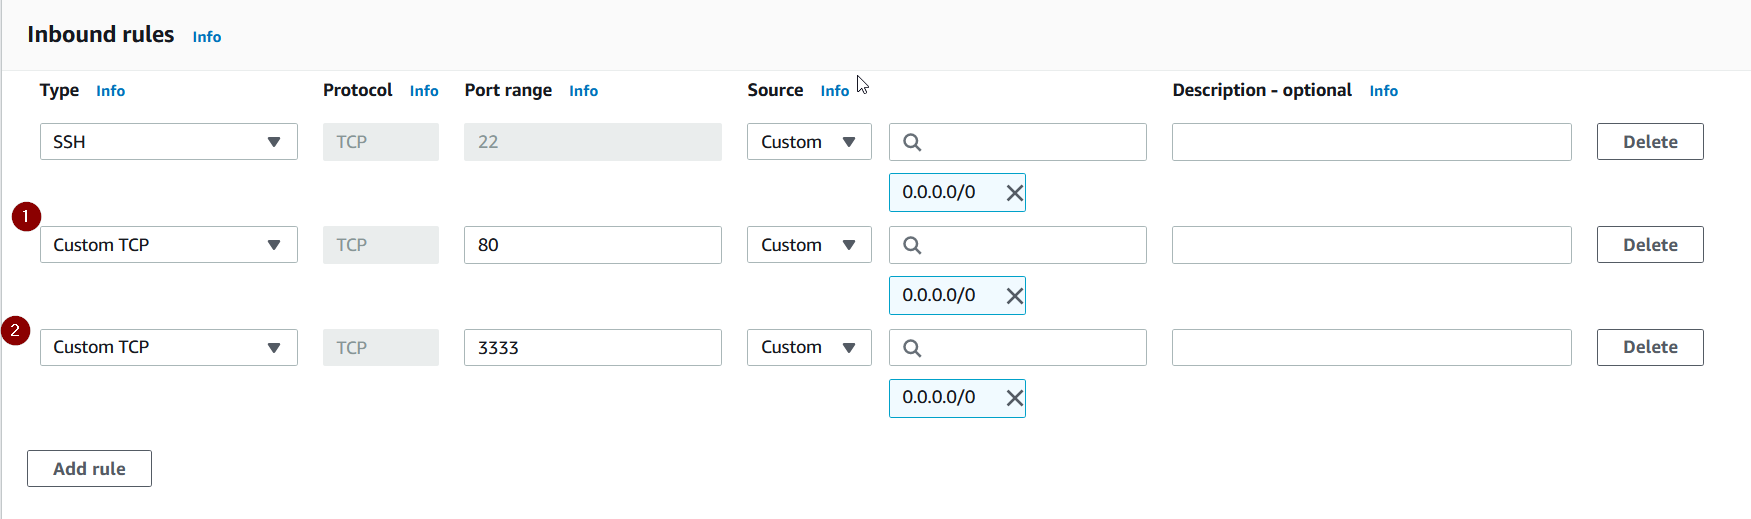
We can edit inbound rules to add two new rules (Custom TCP) which opens port 80 and 3333 and allows traffic to flow through. In the CIDR input, select 0.0.0.0/0
Creating a Phishing campaign in Gophish
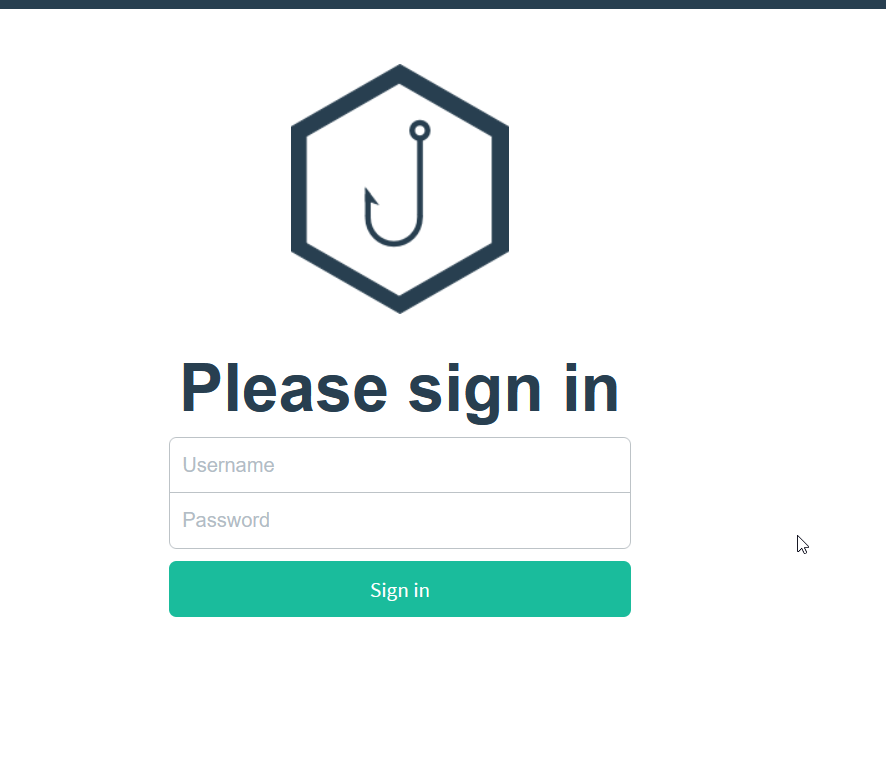
Save the rule and after some time let’s check if we could access our gophish instance. Yeyyyyy, now it’s accessible. Make sure you are using https instead of http and accept the ssl warning and you’ll be presented here.
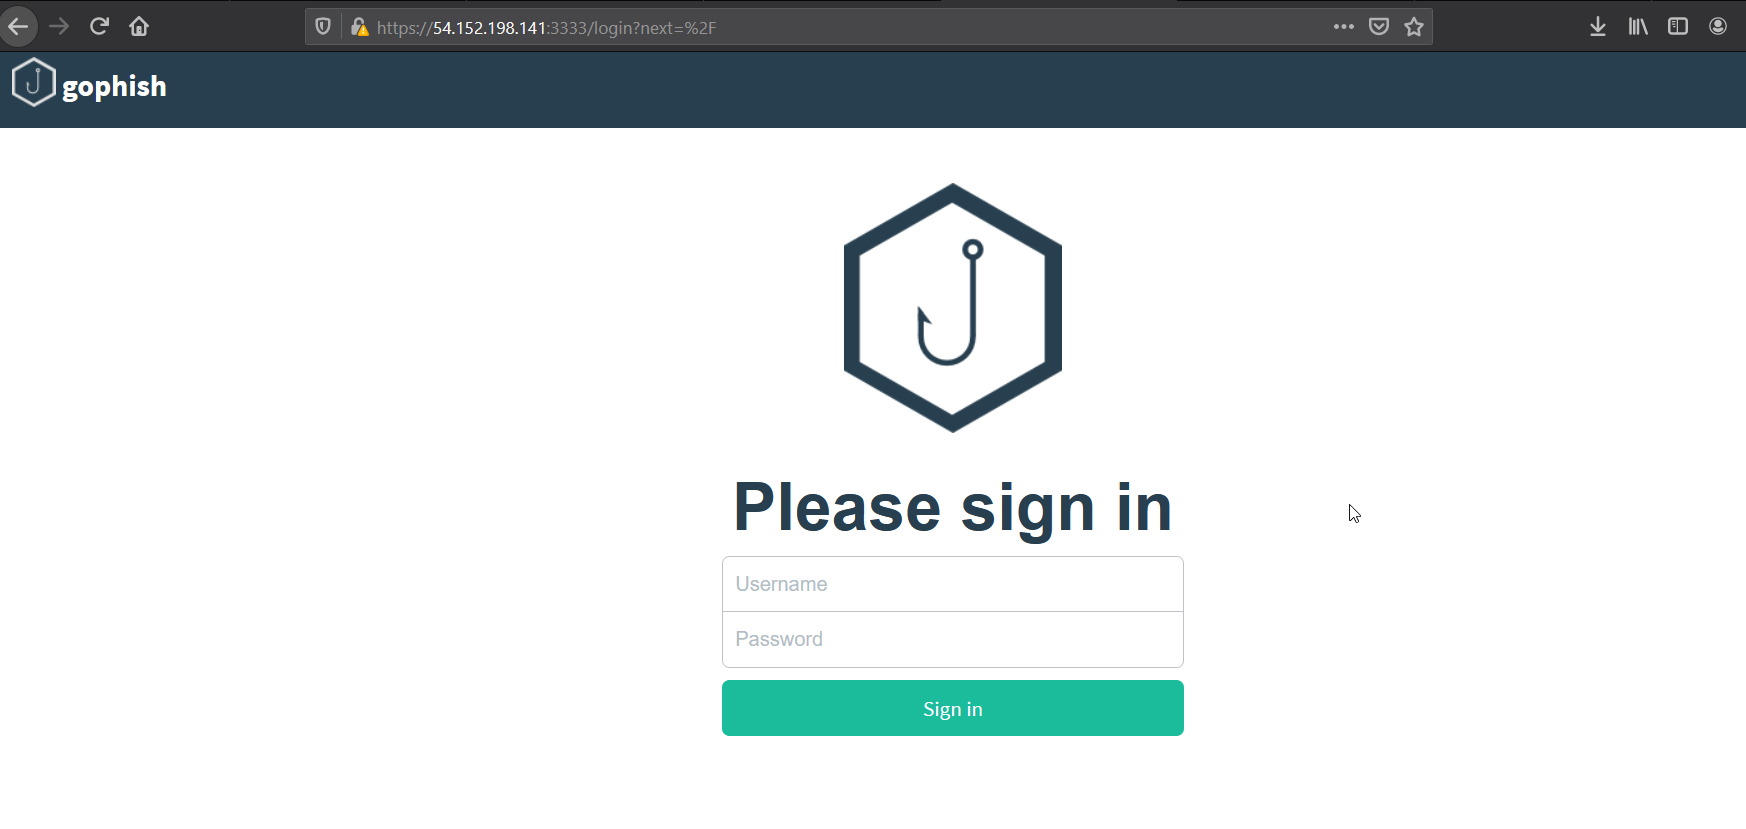
In the earlier version of Gophish the default creds used to be admin : gophish but in recent version the gophish instance generates a random password the first time we run the gophish instance. If you go back to your gophish log, you could see the random password it created.

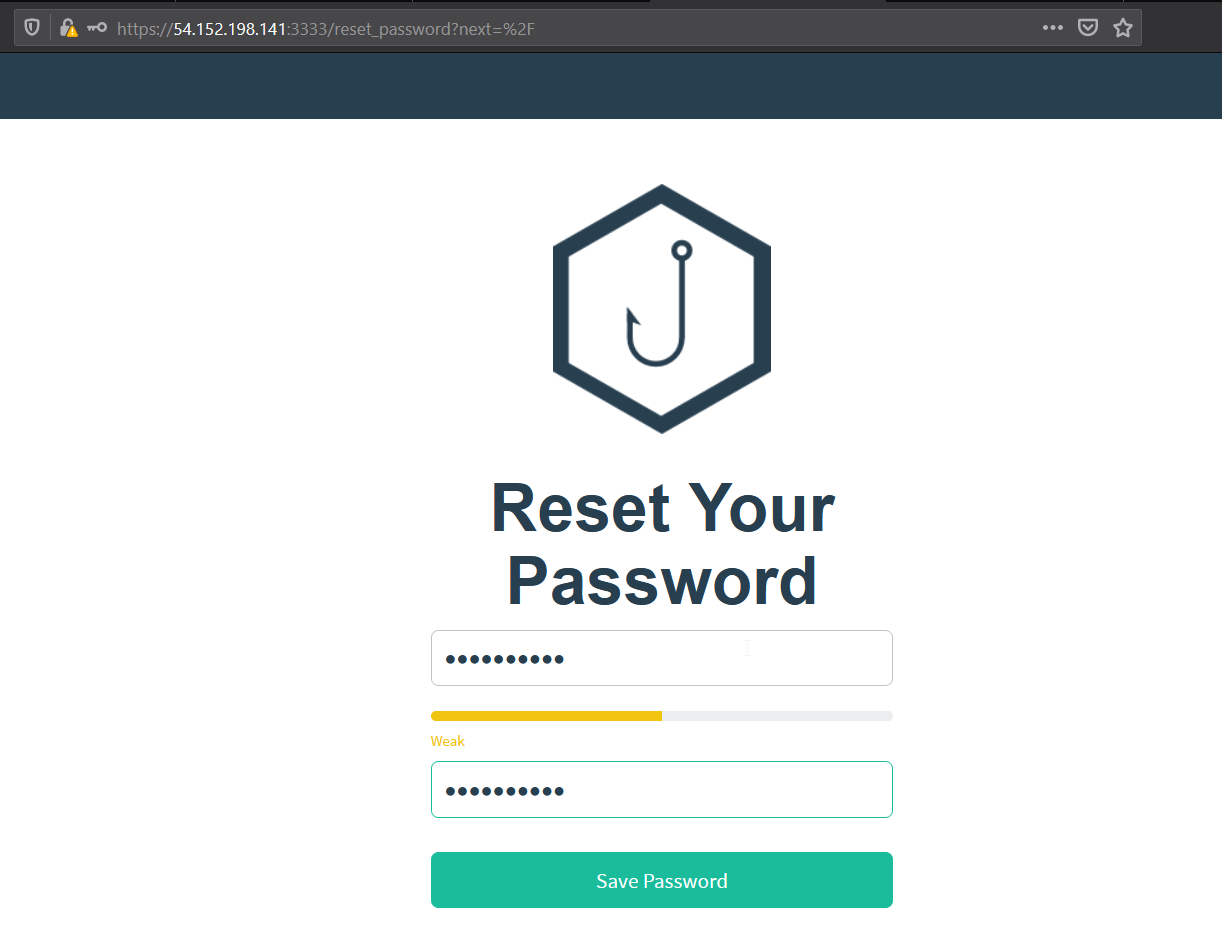
We need to use that password with admin user after which we’ll be asked to set the new password.
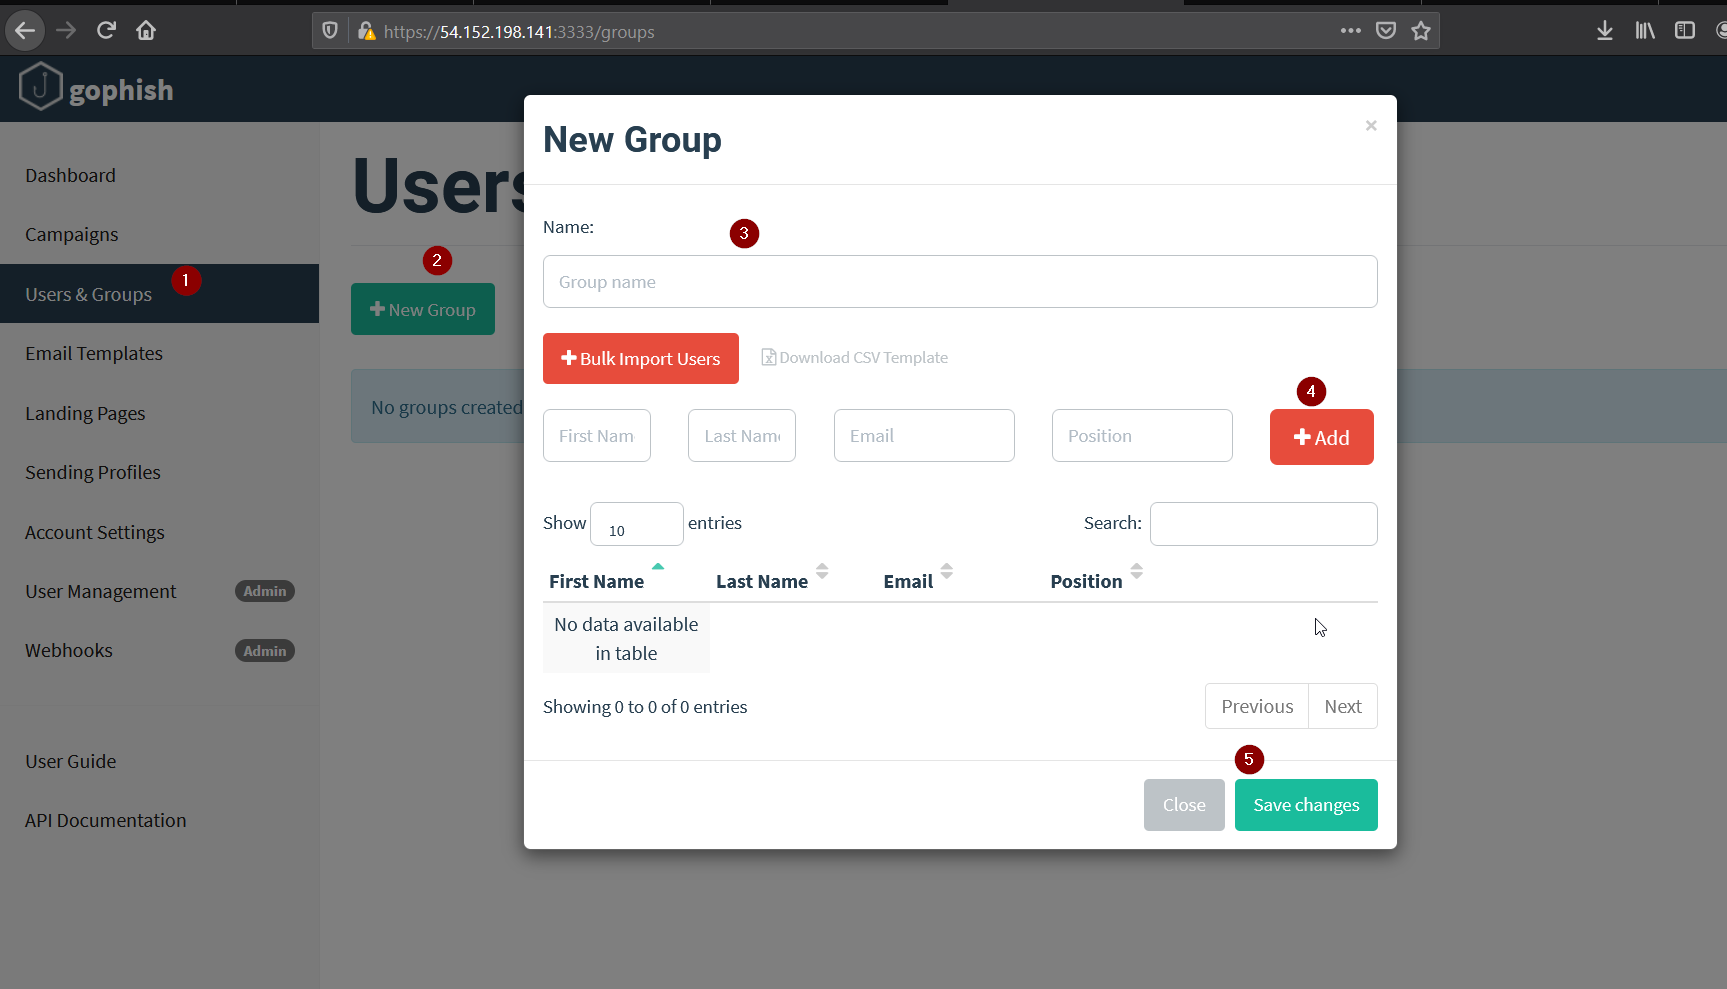
We’ll create a new group first where we’ll add one user for now.
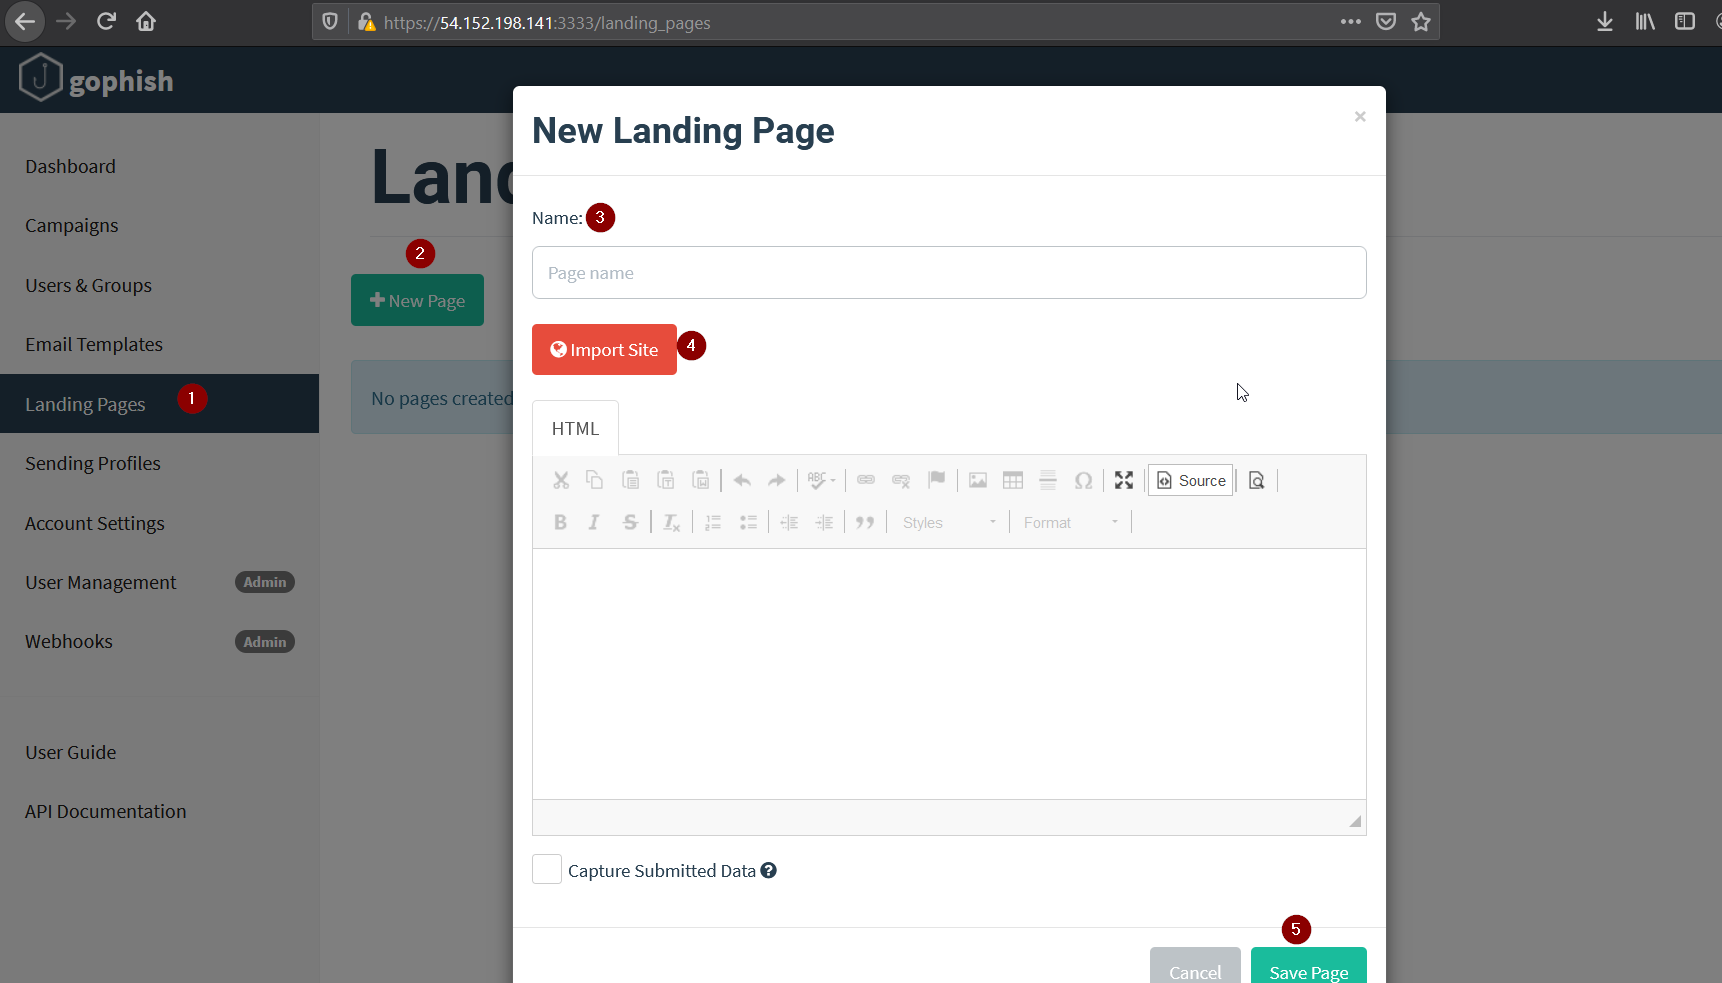
Then we’ll create our landing page. I have imported the gmail login page.
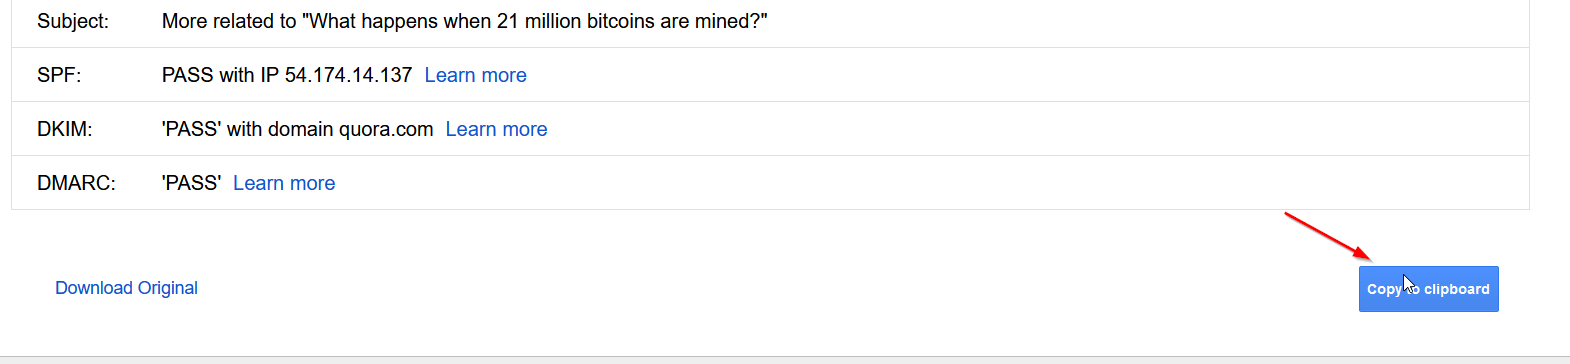
Then we’ll create Email Template. I will copy one mail which I have in my mail id.

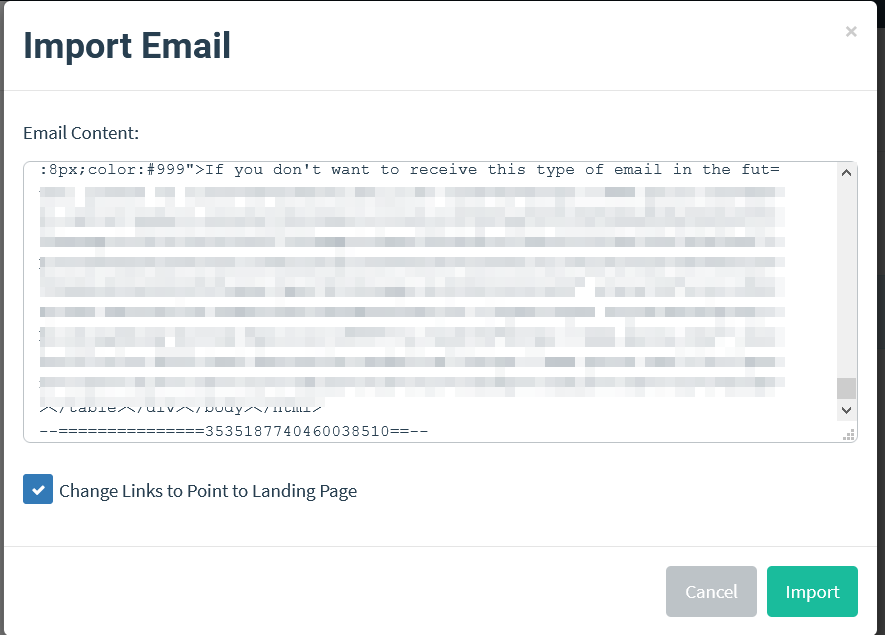
And then paste the html code in the Import Email input.
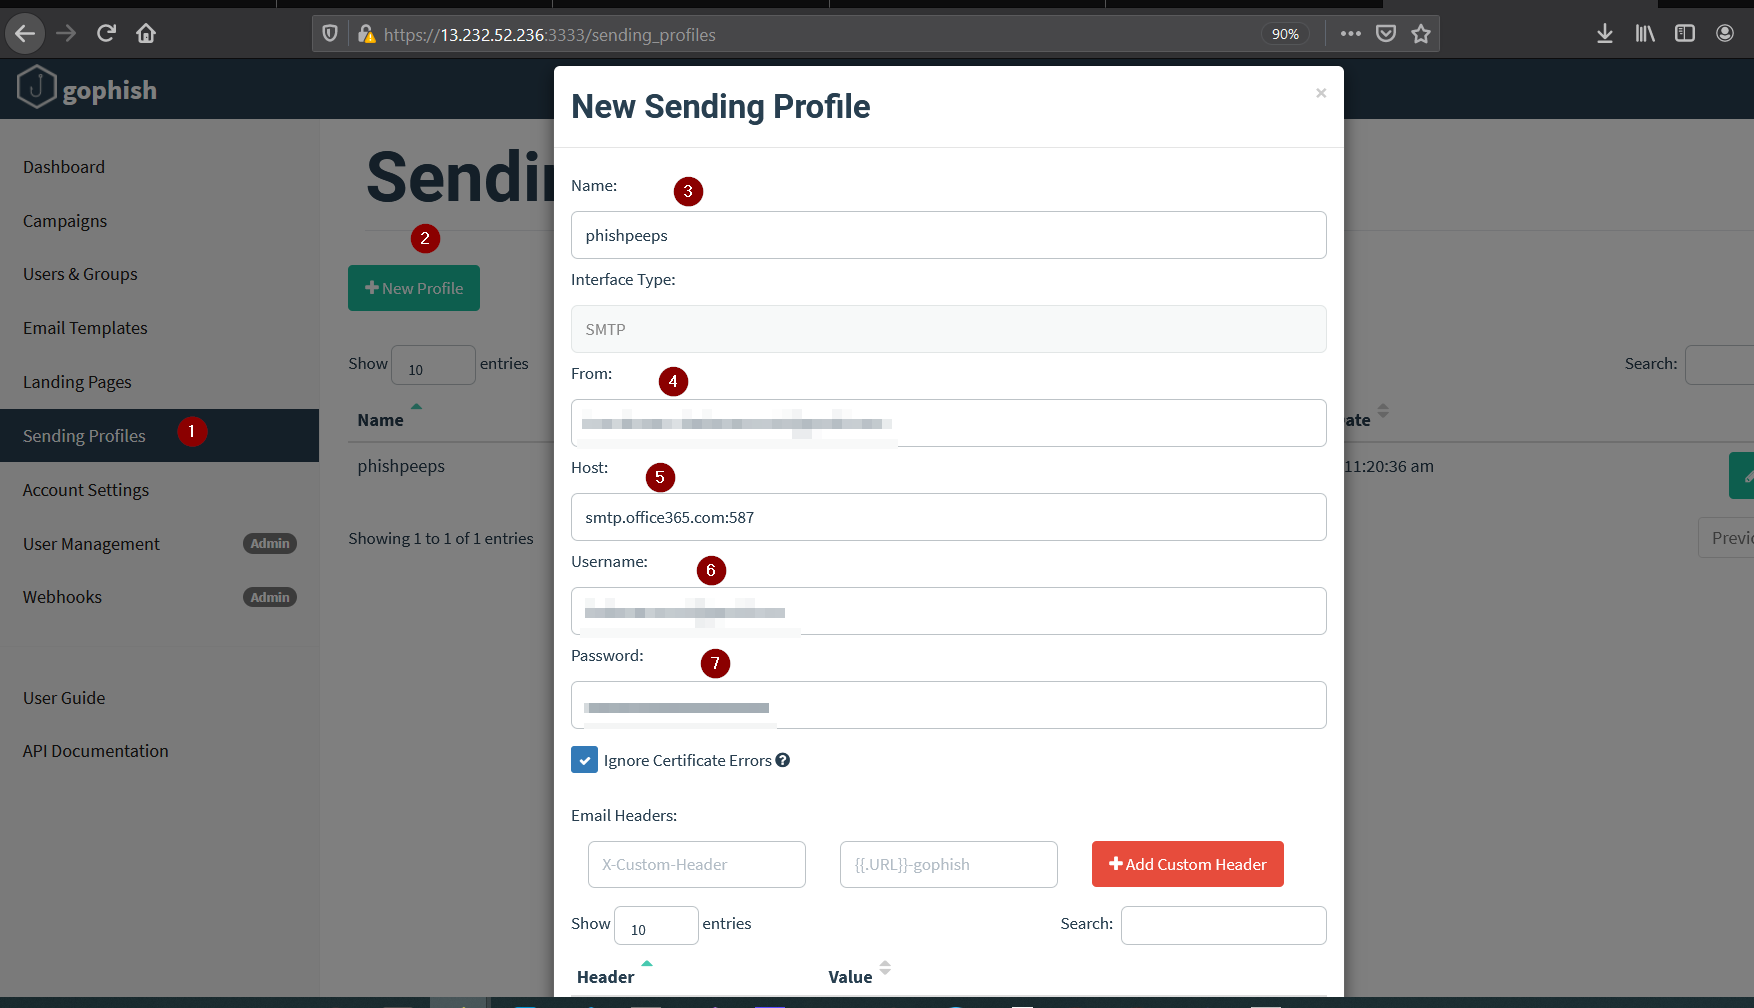
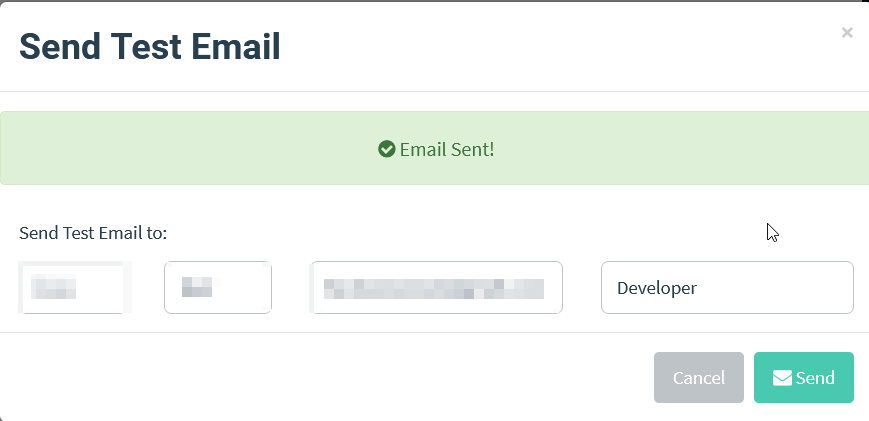
Now we need to create a sending profile where we’ll fill our smtp server. In my case, I am using the outlook, you can use your custom domain if you have any. I was having problem with gmail server but outlook worked for me. You can click on Send Test to send a test mail to confirm if your smtp server is working.
Now let’s create our campaign.
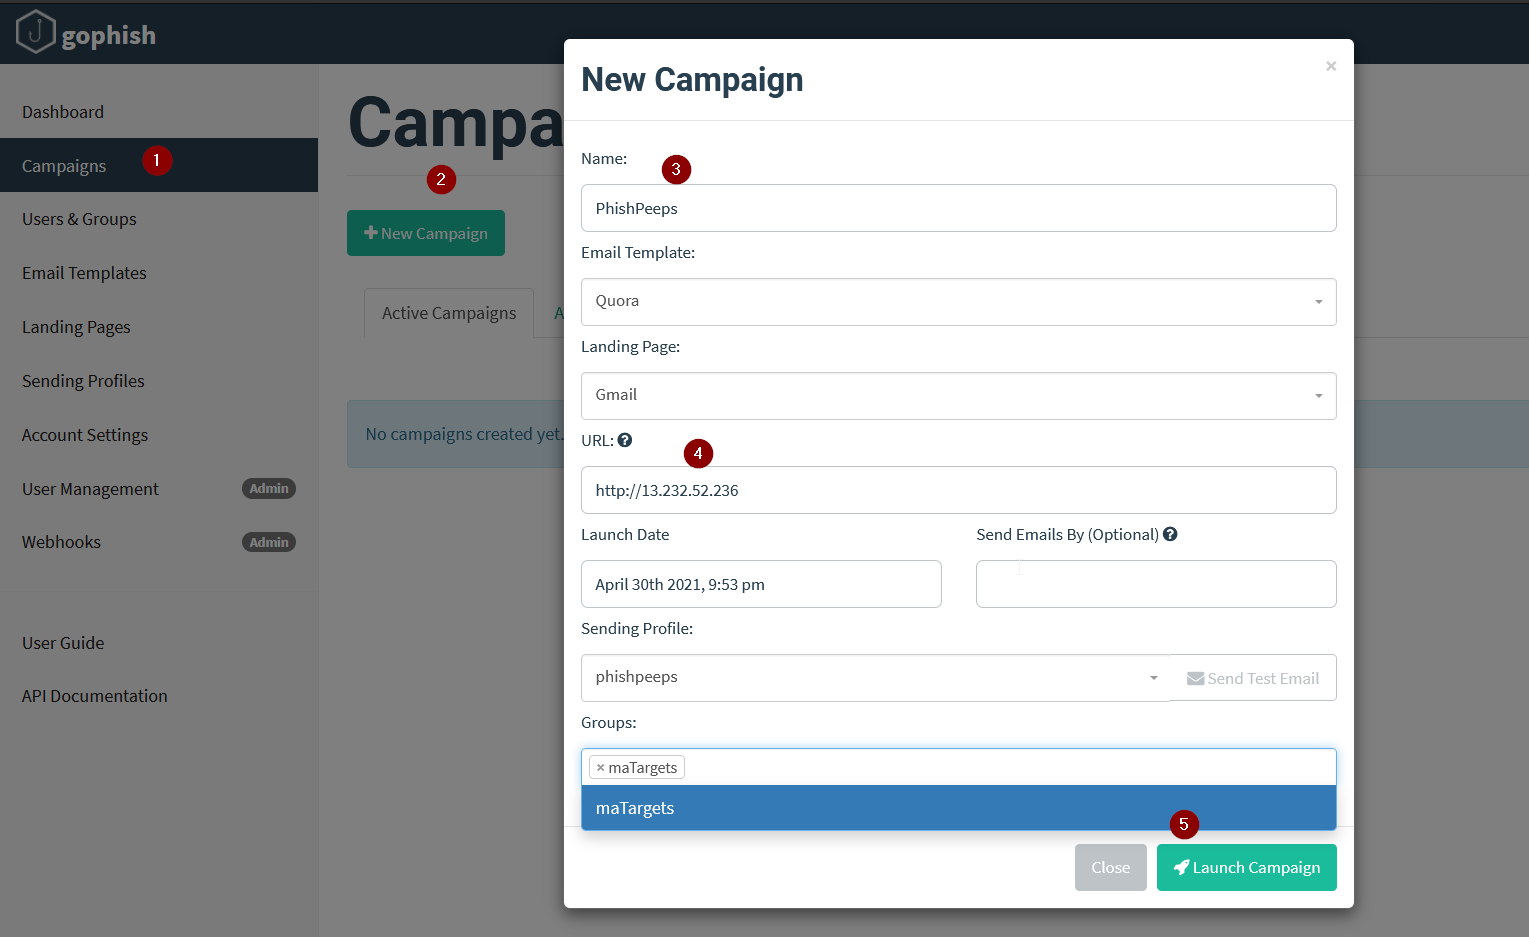
Everything is obvious, in the url input we are specifying the ip address where our phishing page will be hosted.
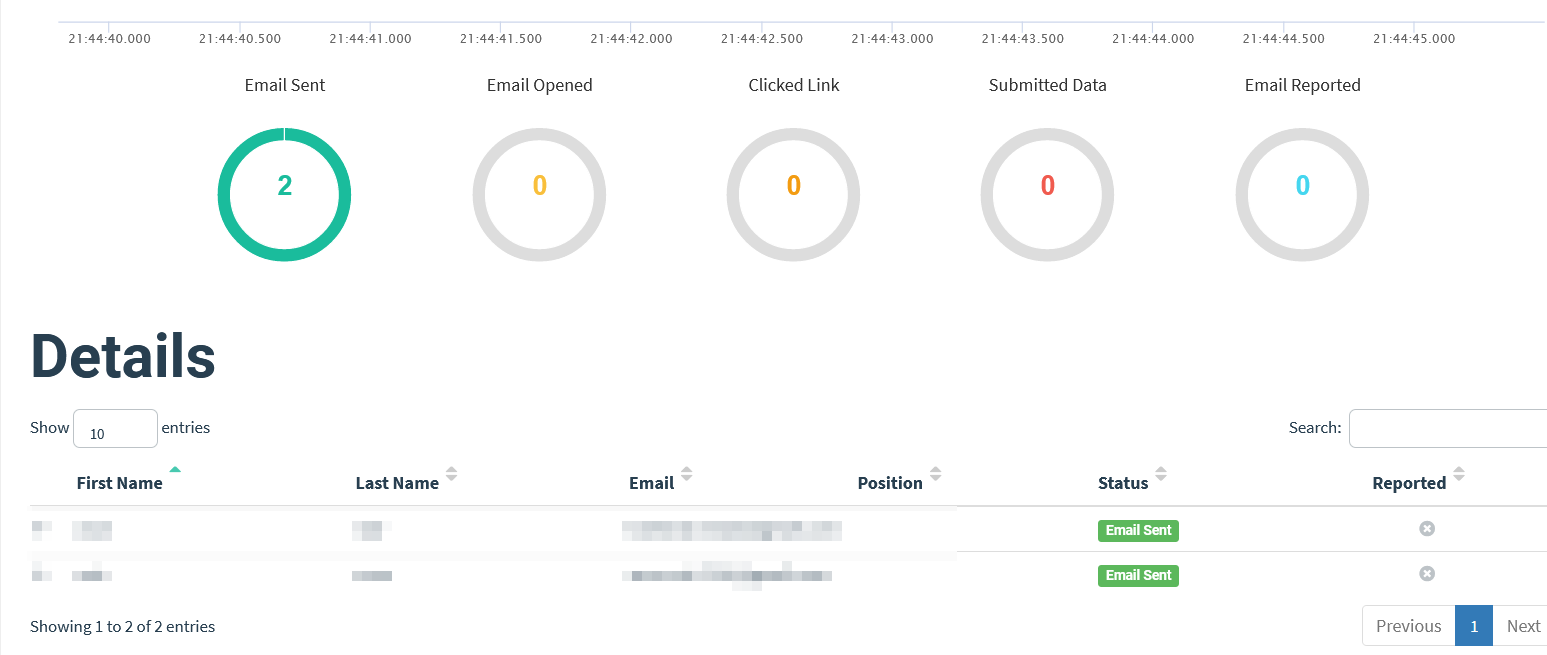
After you have launched your campaign, you can see the status.
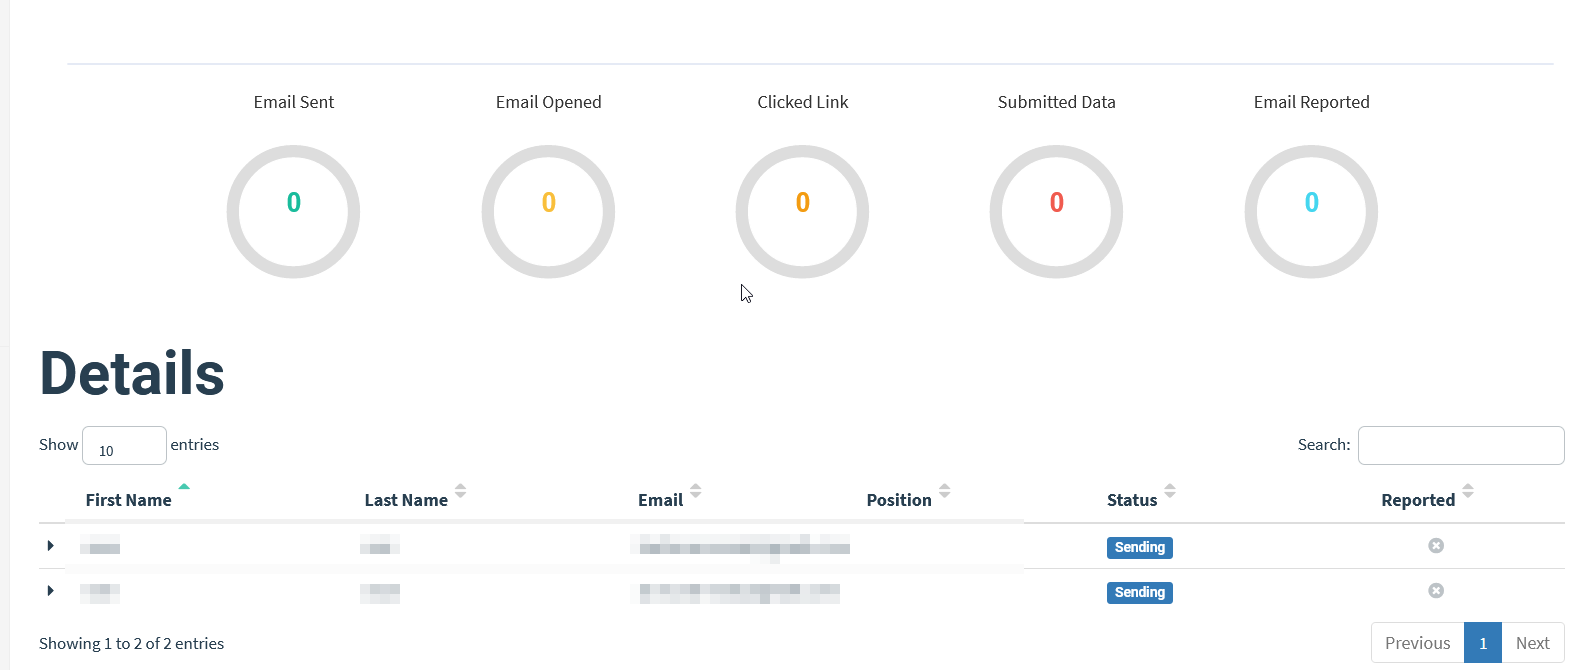
After a while we can see that the phishing mails have been sent.
Let’s act as a target and open the mail.
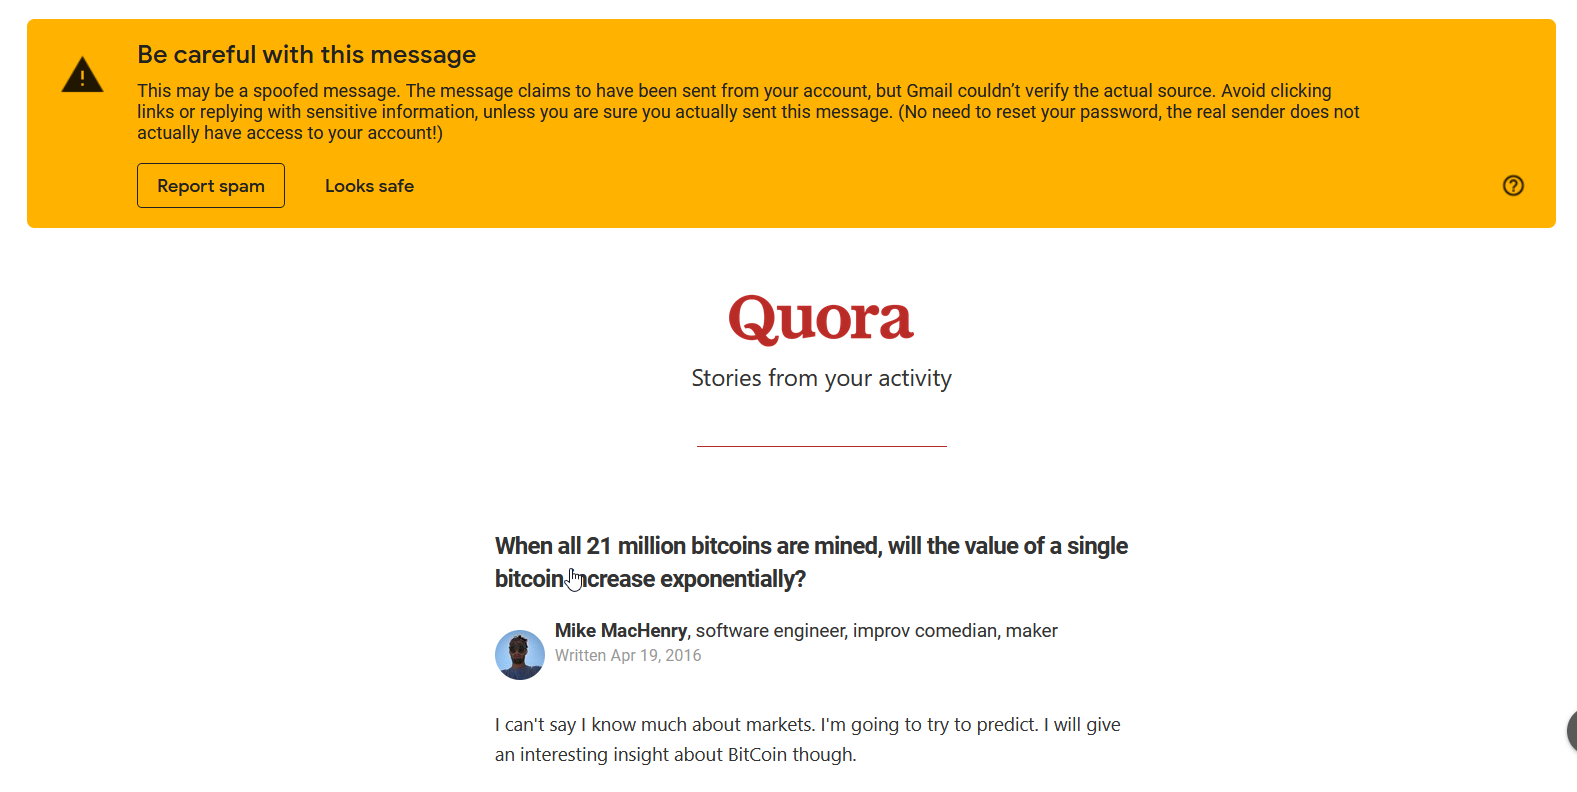
mmmmm i got the mail but it’s detected as phishing mail. Fooling mail servers to make our phishing mail look like legit mail is an another tutorial/blog in itself. So, I will leave it for maybe next blog.
All the links in that mail is point to our phishing site(gmail). Let’s open the link and enter our credentials.
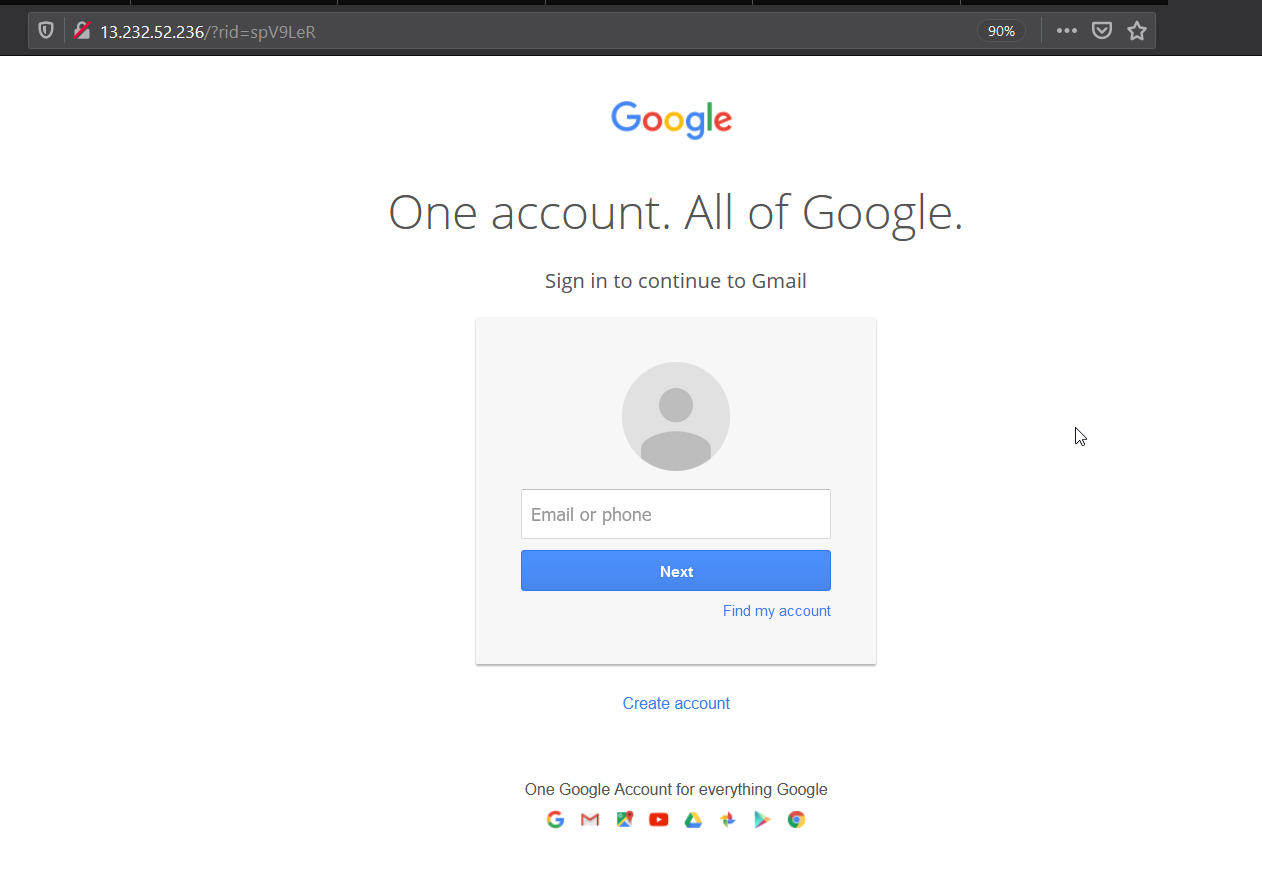
It looks exact replica of the gmail login except for the url part :P which can be also be setup properly.
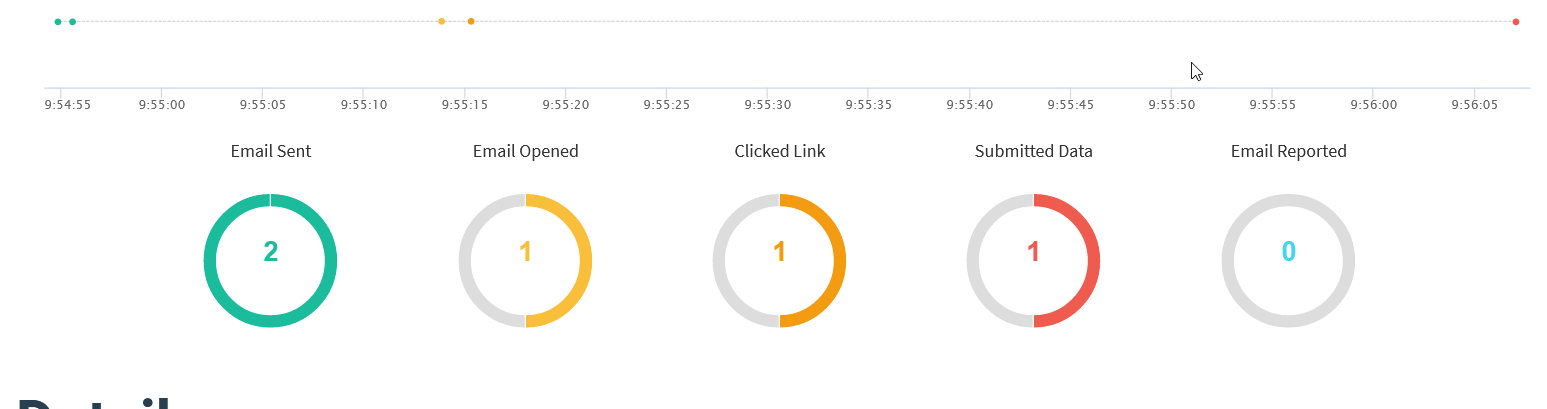
Anyways, let’s enter the credentials and if we go back to the Dashboard, we can see our campaign results.
Automation Approach
Automating setting up gophish on EC2 with terraform
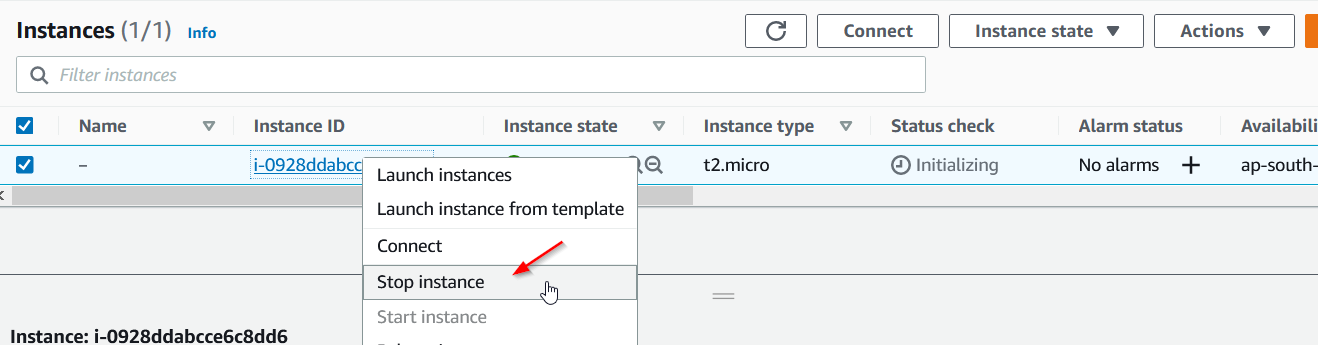
The setting up gophish on AWS EC2 instance part ends here. Now we’ll see how we could automate everything from creating and starting an instance till downloading and running the gophish on our ec2 with terraform. Before moving forward, we’ll first delete the ec2 instance we created manually.

You can all download terraform from the officlal hashicorp website : https://www.terraform.io/downloads.html
In my case I am going to be using the terraform on my Windows machine. You can see if terraform has been installed by running
1
terraform --version

If you are also using Windows machine then you need to edit the PATH environment to point to the location where terraform is installed.
Terraform is an open-source infrastructure as code software tool created by Hashicorp. It can be used to provision cloud resources by using a declarative language called HCL (Hashicorp Configuration Language).
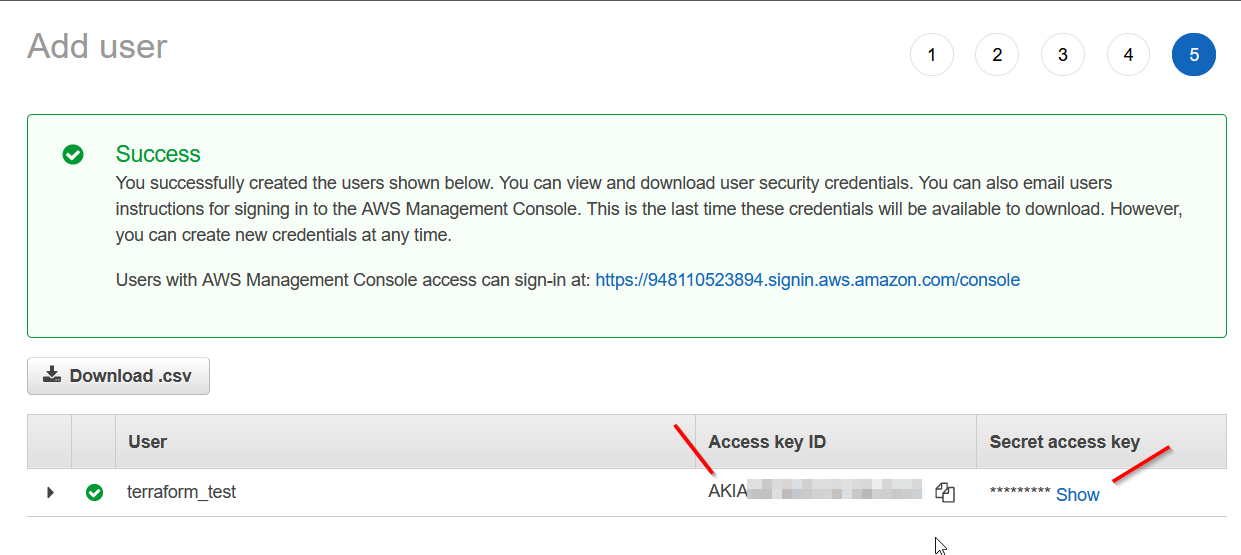
Before we start creating our configuration file for terraform, we need to create a user with programmatic acess whose access key terraform can use while provision the cloud resources.
Go to IAM > Users > Add users
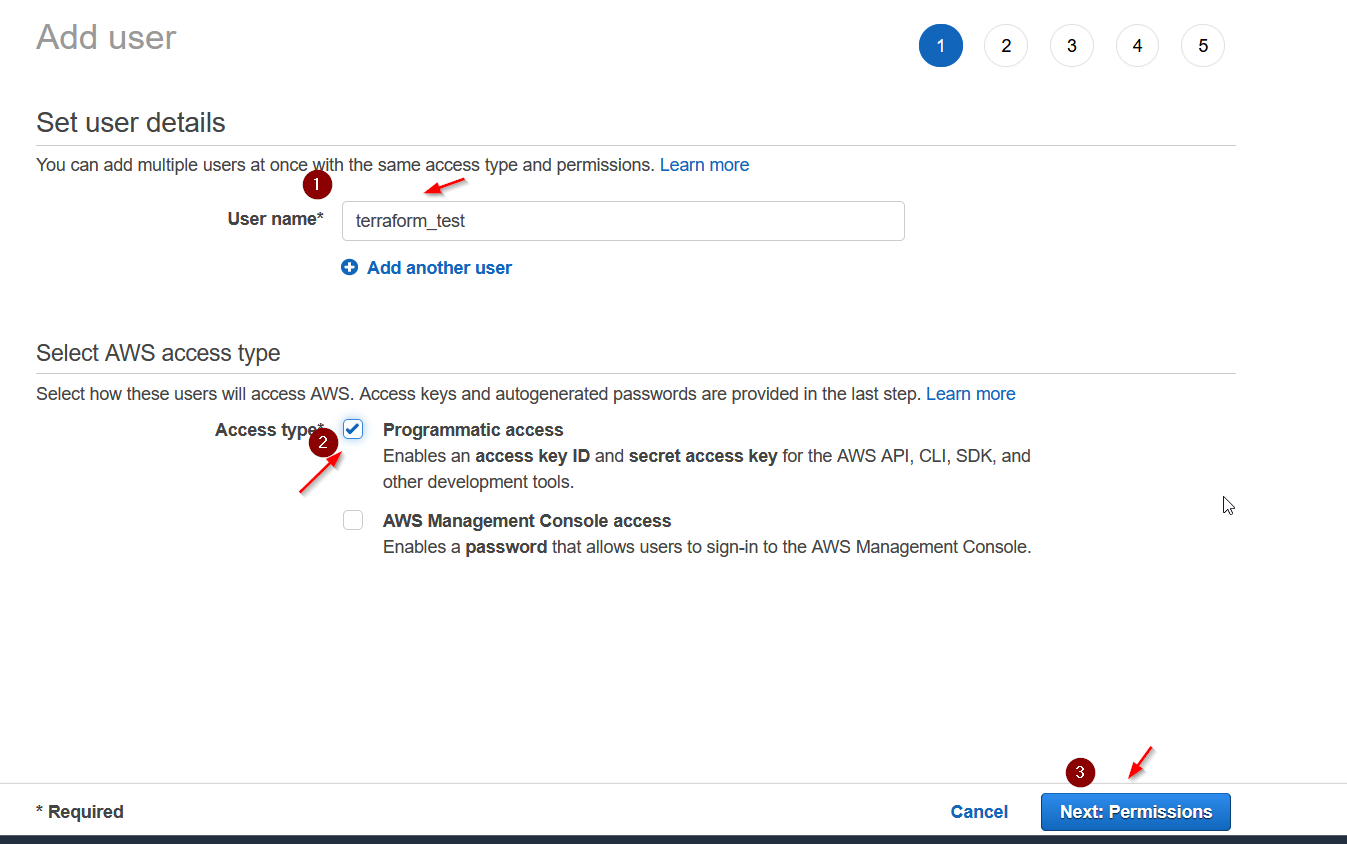
Make sure you have the Programmatic Access box selected. Go to next step where we need to add the AdministratorAccess policy to this user.
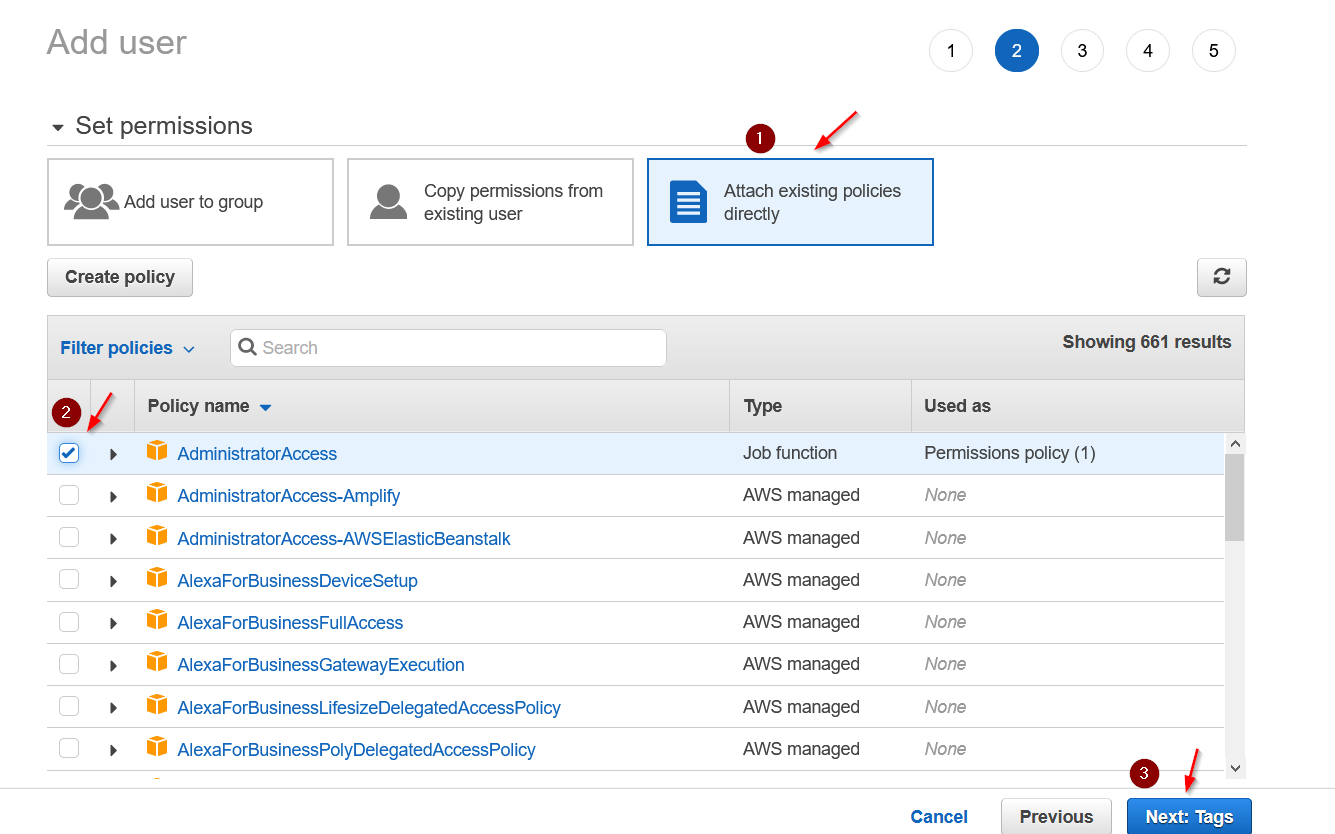
We can skip the next step where it asks to add the tag. Review and then create user.
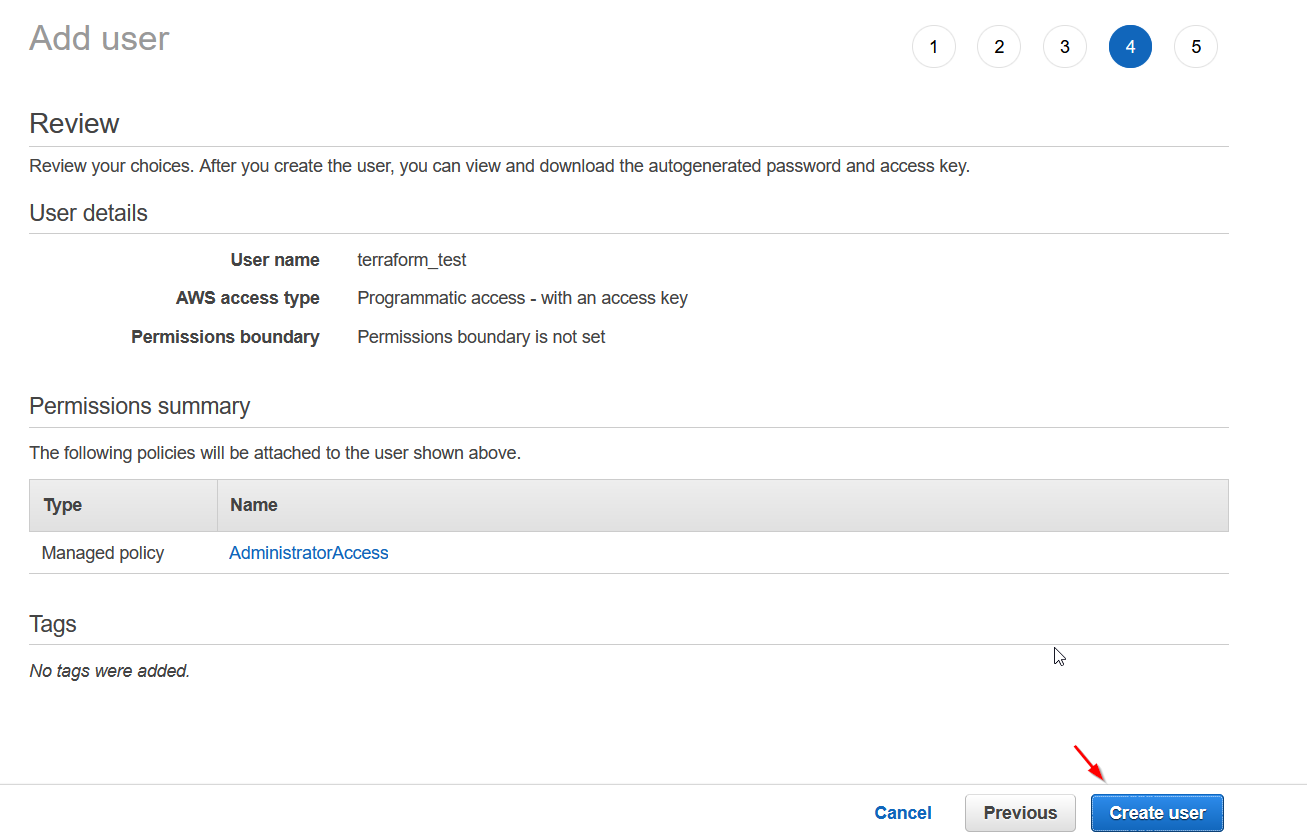
Copy the access key and secret key you got somewhere safe since we need to put it in the terraform configuration.
I won’t be going into detail of every syntax of terraform. You can look into the official documentation if you want to know more about any particular syntax.
Let’s start creating our terraform file. Since terraform can be used to provision on multiple cloud platforms (AWS, Azure, GCP, Alibaba cloud to name a few), we first need to speicy which provider we are using in our configuration file.
1
2
3
4
5
provider "aws" {
  region     = "us-east-1"
  access_key = "AKIA...[snip]"
  secret_key = "/Q...[snip]"
}
And then next step is to create a security group resource where’ll add ingress rules to open specific ports for the gophish. Here we are saying the same thing i.e., to allow traffice from and to port 22,80 and 3333 from all IP Addresses.
1
2
3
4
5
6
7
8
9
10
11
12
13
14
15
16
17
18
19
20
21
22
23
24
25
26
27
28
29
30
31
32
33
34
35
36
37
38
39
40
41
42
43
44
45
46
47
48
49
50
resource "aws_security_group" "main" {
  egress = [
    {
      cidr_blocks      = [ "0.0.0.0/0", ]
      description      = ""
      from_port        = 0
      ipv6_cidr_blocks = []
      prefix_list_ids  = []
      protocol         = "-1"
      security_groups  = []
      self             = false
      to_port          = 0
    }
  ]
 ingress                = [
   {
     cidr_blocks      = [ "0.0.0.0/0", ]
     description      = ""
     from_port        = 22
     ipv6_cidr_blocks = []
     prefix_list_ids  = []
     protocol         = "tcp"
     security_groups  = []
     self             = false
     to_port          = 22
  },
  {
     cidr_blocks = [ "0.0.0.0/0", ]
     description = "gophish 80"
     from_port = 80
     ipv6_cidr_blocks = []
     prefix_list_ids = []
     protocol = "tcp"
     security_groups = []
     self = false
     to_port = 80
  },
  {
     cidr_blocks = [ "0.0.0.0/0", ]
     description = "gophish 3333"
     from_port = 3333
     ipv6_cidr_blocks = []
     prefix_list_ids = []
     protocol = "tcp"
     security_groups = []
     self = false
     to_port = 3333
  }
  ]
}
Next we need to add aws_key_pair resource to ssh into the instance if or when we want. I will require to generate ssh keys which can be done using ssh-keygen
Copy the public key into the same directory where the terraform configuration file will live since we need to tell terraform to put the public into the instance so that we can ssh into it using our private key.
1
2
3
4
resource "aws_key_pair" "ssh-key"{
    key_name = "ssh-key"
    public_key = "${file("id_rsa.pub")}"
}
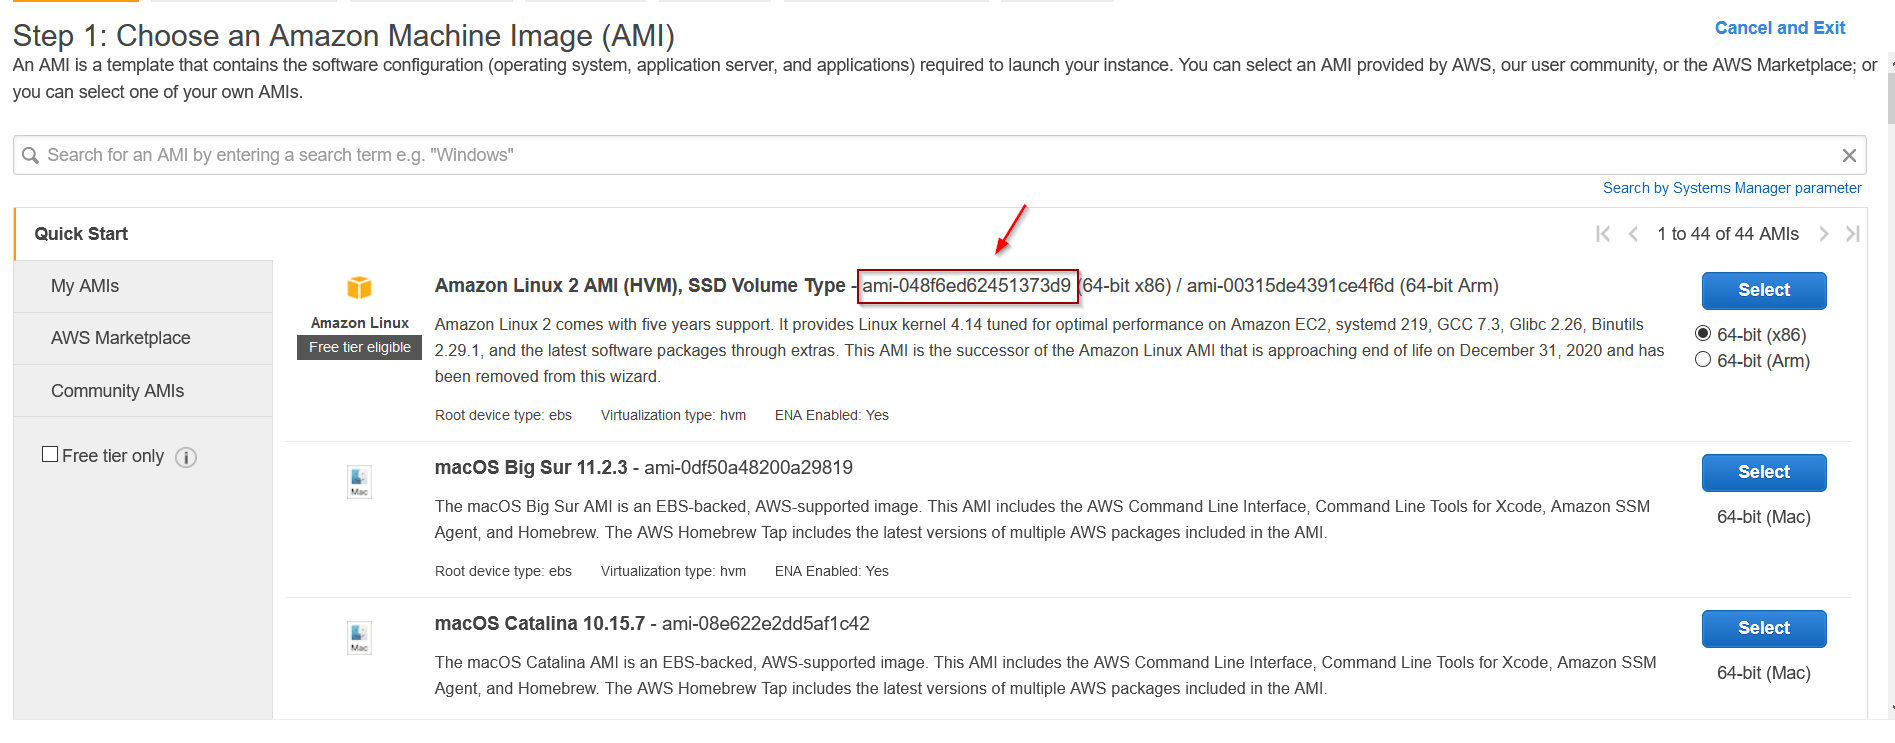
Final step is to create our aws_instance resource. Before that we’d require the ami id. If you go the Instances > launch Instance, you’ll find the ami id.
Next we need to create a simple bash script which we have to run as soon as the instance is created and started by terraform. What this bash script will do is download gophish, unzip it, modify the config.json and then will simply run. I have added the comments for each line.
1
2
3
4
5
6
7
8
#!/bin/bash

cd /opt    # change directory to /opt
wget https://github.com/gophish/gophish/releases/download/v0.11.0/gophish-v0.11.0-linux-64bit.zip    # download the gophish zip
unzip gophish-v0.11.0-linux-64bit.zip       # unzip the gophish zip file
sed -i 's/127\.0\.0\.1/0\.0\.0\.0/g' config.json   # replate 127.0.0.1 with 0.0.0.0
chmod +x ./gophish   # set executable bit on gophish program
./gophish            # finally just run the program
We need to convert it to base64 and provide it in the terraform configuration file and then terraform wiill run this script on the instance when it’s started.
1
2
base64 -w 0 script.sh
IyEvYmluL2Jhc2gKCmNkIC9vcHQKd2dldCBodHRwczovL2dpdGh1Yi5jb20vZ29waGlzaC9nb3BoaXNoL3JlbGVhc2VzL2Rvd25sb2FkL3YwLjExLjAvZ29waGlzaC12MC4xMS4wLWxpbnV4LTY0Yml0LnppcAp1bnppcCBnb3BoaXNoLXYwLjExLjAtbGludXgtNjRiaXQuemlwCnNlZCAtaSAncy8xMjdcLjBcLjBcLjEvMFwuMFwuMFwuMC9nJyBjb25maWcuanNvbgpjaG1vZCAreCAuL2dvcGhpc2gKLi9nb3BoaXNoCg==
1
2
3
4
5
6
7
8
9
10
11
12
resource "aws_instance" "ec2_instance" {
  ami           = "ami-048f6ed62451373d9"
  instance_type = "t2.micro"

  key_name = "${aws_key_pair.test-key.key_name}"
  tags = {
        Name = "Gophish-VM"
  }

  vpc_security_group_ids = [aws_security_group.main.id]
  user_data_base64 = "IyEvYmluL2Jhc2gKCmNkIC9vcHQKd2dldCBodHRwczovL2dpdGh1Yi5jb20vZ29waGlzaC9nb3BoaXNoL3JlbGVhc2VzL2Rvd25sb2FkL3YwLjExLjAvZ29waGlzaC12MC4xMS4wLWxpbnV4LTY0Yml0LnppcAp1bnppcCBnb3BoaXNoLXYwLjExLjAtbGludXgtNjRiaXQuemlwCnNlZCAtaSAncy8xMjdcLjBcLjBcLjEvMFwuMFwuMFwuMC9nJyBjb25maWcuanNvbgpjaG1vZCAreCAuL2dvcGhpc2gKLi9nb3BoaXNoCg=="
}
As can be seen, we have provided our base64 version of bash script to the user_data_base64 variable. So, our final terraform configuration file will look something like this. You can name terraform HCL file anything, just it has to end with .tf extension.
1
2
3
4
5
6
7
8
9
10
11
12
13
14
15
16
17
18
19
20
21
22
23
24
25
26
27
28
29
30
31
32
33
34
35
36
37
38
39
40
41
42
43
44
45
46
47
48
49
50
51
52
53
54
55
56
57
58
59
60
61
62
63
64
65
66
67
68
69
70
71
72
73
74
provider "aws" {
  region     = "us-east-1"
  access_key = "AKIA...[snip]"
  secret_key = "/Q...[snip]"
}

resource "aws_security_group" "main" {
  egress = [
    {
      cidr_blocks      = [ "0.0.0.0/0", ]
      description      = ""
      from_port        = 0
      ipv6_cidr_blocks = []
      prefix_list_ids  = []
      protocol         = "-1"
      security_groups  = []
      self             = false
      to_port          = 0
    }
  ]
 ingress                = [
   {
     cidr_blocks      = [ "0.0.0.0/0", ]
     description      = ""
     from_port        = 22
     ipv6_cidr_blocks = []
     prefix_list_ids  = []
     protocol         = "tcp"
     security_groups  = []
     self             = false
     to_port          = 22
  },
  {
     cidr_blocks = [ "0.0.0.0/0", ]
     description = "gophish 80"
     from_port = 80
     ipv6_cidr_blocks = []
     prefix_list_ids = []
     protocol = "tcp"
     security_groups = []
     self = false
     to_port = 80
  },
  {
     cidr_blocks = [ "0.0.0.0/0", ]
     description = "gophish 3333"
     from_port = 3333
     ipv6_cidr_blocks = []
     prefix_list_ids = []
     protocol = "tcp"
     security_groups = []
     self = false
     to_port = 3333
  }
  ]
}

resource "aws_key_pair" "ssh-key"{
    key_name = "ssh-key"
    public_key = "${file("id_rsa.pub")}"
}

resource "aws_instance" "ec2_instance" {
  ami           = "ami-048f6ed62451373d9"
  instance_type = "t2.micro"

  key_name = "${aws_key_pair.ssh-key.key_name}"
  tags = {
        Name = "Gophish-VM"
  }

  vpc_security_group_ids = [aws_security_group.main.id]
  user_data_base64 = "IyEvYmluL2Jhc2gKCmNkIC9vcHQKd2dldCBodHRwczovL2dpdGh1Yi5jb20vZ29waGlzaC9nb3BoaXNoL3JlbGVhc2VzL2Rvd25sb2FkL3YwLjExLjAvZ29waGlzaC12MC4xMS4wLWxpbnV4LTY0Yml0LnppcAp1bnppcCBnb3BoaXNoLXYwLjExLjAtbGludXgtNjRiaXQuemlwCnNlZCAtaSAncy8xMjdcLjBcLjBcLjEvMFwuMFwuMFwuMC9nJyBjb25maWcuanNvbgpjaG1vZCAreCAuL2dvcGhpc2gKLi9nb3BoaXNoCg=="
}
First we need to initialize terraform in our current directory.
1
terraform init
Then just to see how our changes will get reflected on the cloud, we can run.
1
terraform plan
Once everything looks ,we can run
1
terraform apply
It would ask us to type yes for the confirmation and if everything goes smooth, we’ll see something like this.
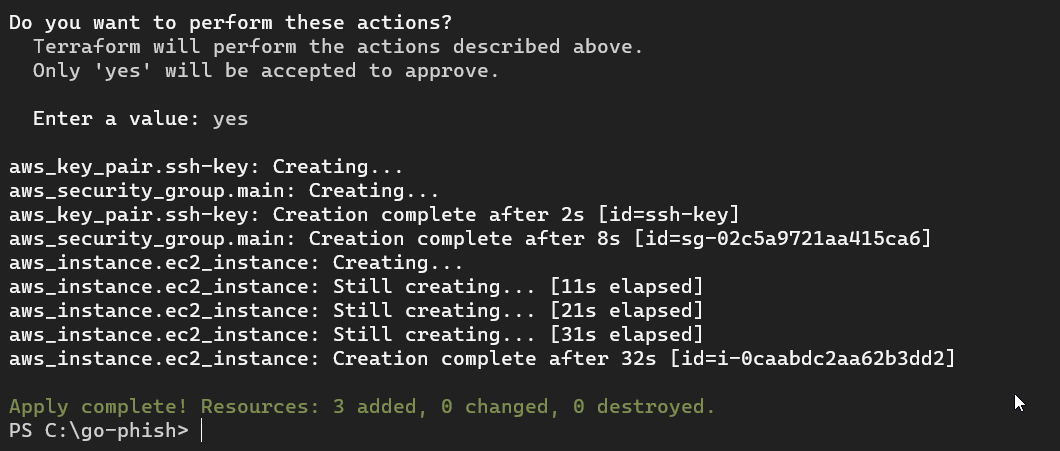
If we refresh our instances page, we can see that our instance has been created and running.

If we try to visit the port 3333 of the public IP of this instance, we can see that our gophish is running there.
We can also ssh into our instance.
As can be seen our changes have been reflected.
To destroy everything with did with terraform, you can simply run.
1
terraform destroy
It’ll then bring your AWS into a state it was before running the terraform apply.
You can follow the same terraform configuration file to automate and setup anything on ec2 instance or be it any virutal machines on azure or gcp or any other cloud which terraform supports.
Final Note: I am by no means an expert in Cloud or Red Teaming, If you think I said anything incorrect anywhere, feel free to reach out to me and correct me, I would highly appreciate that. And finally thank you very much for taking your time to read this post.