
Introduction
Konnichiwa my dear readers, I trust it’s been a while since my last update. I’m thrilled to be back, and I’m excited to delve into an intriguing, yet undeniably significant aspect of malware development and evasion today.
This blog post is comprehensive and may initially seem overwhelming. If you find it challenging to grasp everything at once, don’t worry. I recommend exploring other related blog posts, which I’ve listed below for your convenience. Diversifying your sources often helps connect the dots, and over time, everything will fall into place.
Heads up, readers! This blog post is all about the world of Windows. We’re not venturing into macOS, Linux, or any other operating systems today. This post is the first in a series. I’ve crafted it with beginners in mind to ensure clarity and ease of understanding.
You know all those things we use to keep our online world safe? Yeah, I’m talking about stuff like antivirus software, EDR products, Anti game cheat engines, those kinds of things. They’re pretty great, right? Always looking out for us, always guarding our systems and data from the bad guys. But here’s a crazy thought… what if they’re not as bulletproof as we think?
That’s right, we’re about to peel back the layers on a pretty wild concept in Evasion – it’s called ‘Hooking and Unhooking.’ Sounds kind of mysterious, doesn’t it? And yeah, it can get a bit technical, but stick with me.
Now, before we dive in, just a heads up – we’re here to learn about this stuff so we can better protect our systems, not to give the bad guys any bright ideas. We’re gonna look at how this hooking and unhooking stuff works, check out some real-world examples, and chat about ways to fight back against these sneaky tactics.
Another heads up, folks: Hooking isn’t the only trick up the sleeves of EDRs and AVs when battling malware. They’ve got other moves like kernel callbacks, ETW, ETWti, memory scans, and a bunch of tactics to collect telemetries. So, don’t give me grief if you’ve only done unhooking on your EDR and it’s still spotting your malware. Eheh!
Guarding the Gates: How AVs and EDRs Use Hooking Against Malware
Antivirus (AV) software and Endpoint Detection and Response (EDR) systems use hooking techniques in various ways to identify, monitor, and counteract malicious activities. Just as game anti-cheat systems utilize hooking to thwart cheating, AVs and EDRs use hooking to get a vantage point over potential threats. If you are interested in diving deeper into detection methods used by AVs and EDRs? Check out my previous blog post
Malware often relies on specific system calls and API functions to execute malicious activities (like file creation, registry modification, or network communications). AV and EDR solutions can hook these calls to monitor and potentially block suspicious or unauthorized actions. Way back, kernel hooking was kind of a go-to for a lot of software, including security tools. But, as with everything tech, times change. Enter Microsoft with their Kernel Patch Protection, nicknamed PatchGuard, for 64-bit versions of Windows, starting with good old Vista. PatchGuard’s job? Keep pesky software from messing with the kernel, making most kernel hooking a no-go. Of course, there were those who found sneaky ways around it, but Microsoft usually came up with a counter-move pretty quick. Then there’s this whole driver signing thing. In layman’s terms? If you’ve got a driver (like the ones you’d use for kernel-level hooking), it needs a digital autograph saying it’s legit. If it doesn’t have that signature, Windows ain’t having it.
Because of all these hoops, many EDRs and AVs thought, “Maybe kernel hooking isn’t the way.” Instead, they leaned into using the approved routes, like kernel callbacks, ETW, or hooks that chill in the user-mode.
EDR systems often use a sophisticated approach from kernel space to keep an eye on processes. Specifically, they harness kernel callbacks - with a focus on the PsSetCreateProcessNotifyRoutineEx callback. This callback gives the EDR a heads-up whenever a new process is initiated. At this time, the EDR injects its userland DLL module into the freshly started process. This DLL then hooks specific functions, allowing the EDR to continuously monitor their behaviors. 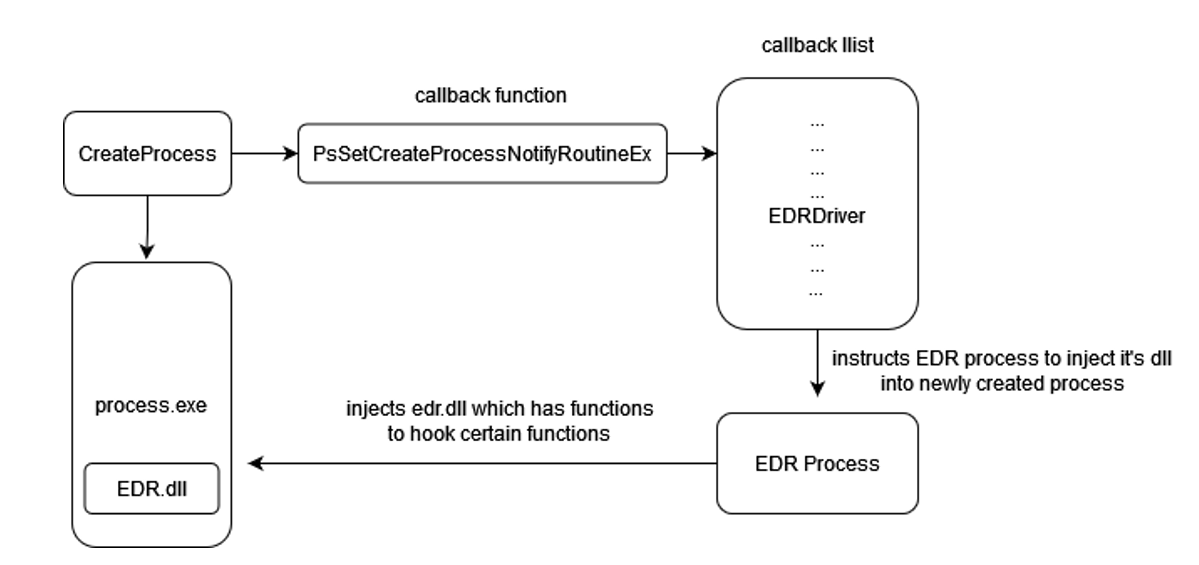
Alright, Enough with the preliminaries! Let’s dive deeper and unpack what we’ve covered. We’ll kick things off by exploring the different process execution modes in Windows.
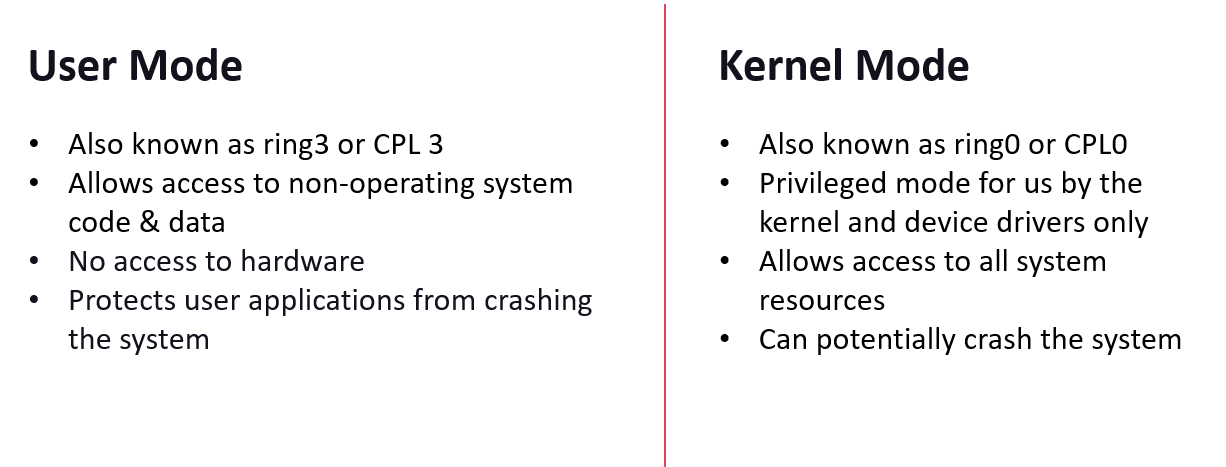
Balancing Power and Protection: Kernel Mode and User Mode in Windows
When we talk about modern operating systems like Windows, there’s this nifty separation between what we call User Mode and Kernel Mode. Think of your computer as a big, bustling city.
User Mode is like the city’s downtown area. It’s where all the day-to-day action happens. Apps chill here, they’re restricted in what they can do, and they can’t mess with the city’s infrastructure. It’s kinda like how you can’t just decide to reroute traffic or mess with city utilities.
Now, Kernel Mode? That’s the city’s control center. It’s where all the big decisions are made and where all the heavy machinery sits. From here, the OS can interact directly with the hardware, manage resources, and pretty much oversee the whole show. It’s where the magic happens. But with great power comes great responsibility. A hiccup here can cause citywide chaos (think traffic jams and power outages).
So, why this separation? It’s all about keeping the city (or your computer) running smoothly and safely. Apps in the downtown area can’t just waltz into the control center. They need to make a formal request, kinda like applying for a city permit. This ensures that our digital city remains secure and efficient.
Applications running in User Mode can’t directly access the system’s hardware or access the core resources. They need to rely on the operating system to act as a bridge for such interactions. Here’s how the process unfolds:
When a User Mode application has a task that involves reaching out to the hardware or privileged resources, it makes what we call a “system call”. This is basically the app knocking on the operating system’s door, saying, “Hey, I need to do this thing, but I can’t on my own. Can you help?”
The operating system, always ready to assist, switches its cap from User Mode to Kernel Mode. Once it’s in Kernel Mode, it has all the permissions and the tools it needs to talk directly to the hardware.
With the right permissions, the operating system gets the task done, whether that’s reading from a disk, sending data over the internet, or something else entirely.
After wrapping up the task, the operating system slips back into User Mode and hands over the results to the application that made the request.
It’s worth noting that the operating system isn’t just blindly doing whatever the applications ask. It’s always on the lookout, checking that the requests from apps are legit and won’t cause any trouble. Think of it as a bouncer at a club, ensuring that no one’s causing a ruckus or breaking the rules.
In this way, the operating system ensures that our apps can do their jobs while keeping the whole system safe and sound.
APIs’ Adventure from Userland to Kernel Territory
The Windows API (Application Programming Interface) provides developers with a suite of functions to interact with the operating system. When an API call is made, there’s often a layered sequence of calls that eventually transition from user mode to kernel mode. The CreateFileA function, which is used to open or create a file, is a good example of this as shown below.

Let’s break down how a CreateFileA call flows:
API Layer: When you, as a developer, make a call to
CreateFileAin your application, you’re initially invoking a function provided by the Windows API. This function resides in user mode and is part of libraries likekernel32.dll.Wrapper Layer: This user-mode API doesn’t directly perform the action of creating or opening the file. Instead, it’s a wrapper that performs any necessary preprocessing and then calls a lower-level function to handle the main work. For
CreateFileA, the preprocessing might include converting the ANSI filename to a Unicode (wide character) format because the Windows OS internally uses Unicode. After the conversion, it might then callCreateFileW(the wide-character version of the API).Transition to Kernel Mode: To actually interact with the file system (a privileged operation), the request must be passed to kernel mode. This transition is achieved using a mechanism like a system call or interrupt. The
NtCreateFilefunction, which resides inntdll.dllbut is really a gateway to kernel-mode, is the next stop for ourCreateFilerequest.Kernel Mode Operations: Once in kernel mode, the Windows kernel and its drivers handle the rest. The kernel’s I/O manager will cooperate with the appropriate file system driver (e.g., NTFS) to execute the file operation. It’s in this realm that the actual file is opened or created.
Returning Results: Once the task is accomplished, the kernel passes the results (like a file handle or error code) back up the chain. The transition is made back to user mode, and the results are relayed through the same hierarchy but in reverse. The calling application eventually receives the outcome of its
CreateFileArequest.
So, in essence, what seems like a simple call to open a file is a coordinated dance between various components, transitioning between user space and kernel space, ensuring both functionality and security.
Below is an example of 32 bit dispatching code when you run the code on 64 bit: 
Above it might look confusing but the fundamental thing it’s doing is transitioning from 64-bit (long mode) to compatibility mode to execute 32-bit code, and then transitioning back. This is made possible because x86-64 CPUs support running 32-bit code through this compatibility mode and this technique is referred as Heaven’s Gate in Windows Programming, if you would like to read more about it, I would recommend going through this Blog
In case of 64 bit, the transition looks like below: 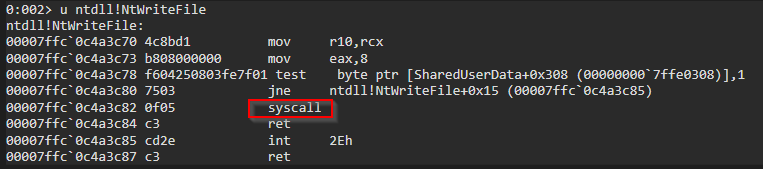
Below I have written a simple code which we’ll be using to see the usermode to kernel mode transitioning in IDA.
1
2
3
4
5
6
7
8
9
10
11
12
13
14
15
16
17
18
19
20
21
22
23
24
25
26
27
28
29
30
31
32
33
34
35
36
37
38
39
#include <stdio.h>
#include <windows.h>

int main() {
    HANDLE hFile;
    DWORD dwBytesWritten;

    // Create or open the file
    hFile = CreateFileA(
        "lol.txt",                 // name of the file
        GENERIC_WRITE,             // open for writing
        0,                         // do not share
        NULL,                      // default security
        CREATE_ALWAYS,             // overwrite existing
        FILE_ATTRIBUTE_NORMAL,     // normal file
        NULL                       // no attr. template
    );

    if (hFile == INVALID_HANDLE_VALUE) {
        printf("Could not open file (error %d)\n", GetLastError());
        return 1;
    }

    // Write data to the file
    if (!WriteFile(
        hFile,                    // open file handle
        "hi, howzzza doing",      // data to write
        17,                       // number of bytes to write
        &dwBytesWritten,          // number of bytes that were written
        NULL                      // no overlapped structure
    )) {
        printf("Could not write to file (error %d)\n", GetLastError());
        CloseHandle(hFile);
        return 1;
    }

    CloseHandle(hFile);
    return 0;
}
So, it’s a simple C code which uses two Windows APIs i.e., CreateFile and WriteFile. Upon execution it just creates a file with name lol.txt with content “hi, howzzza doing” 
Let’s open it in our favorite IDA debugger/decompiler. I have set the breakpoint at the CreateFileA and started the debugger as shown below. 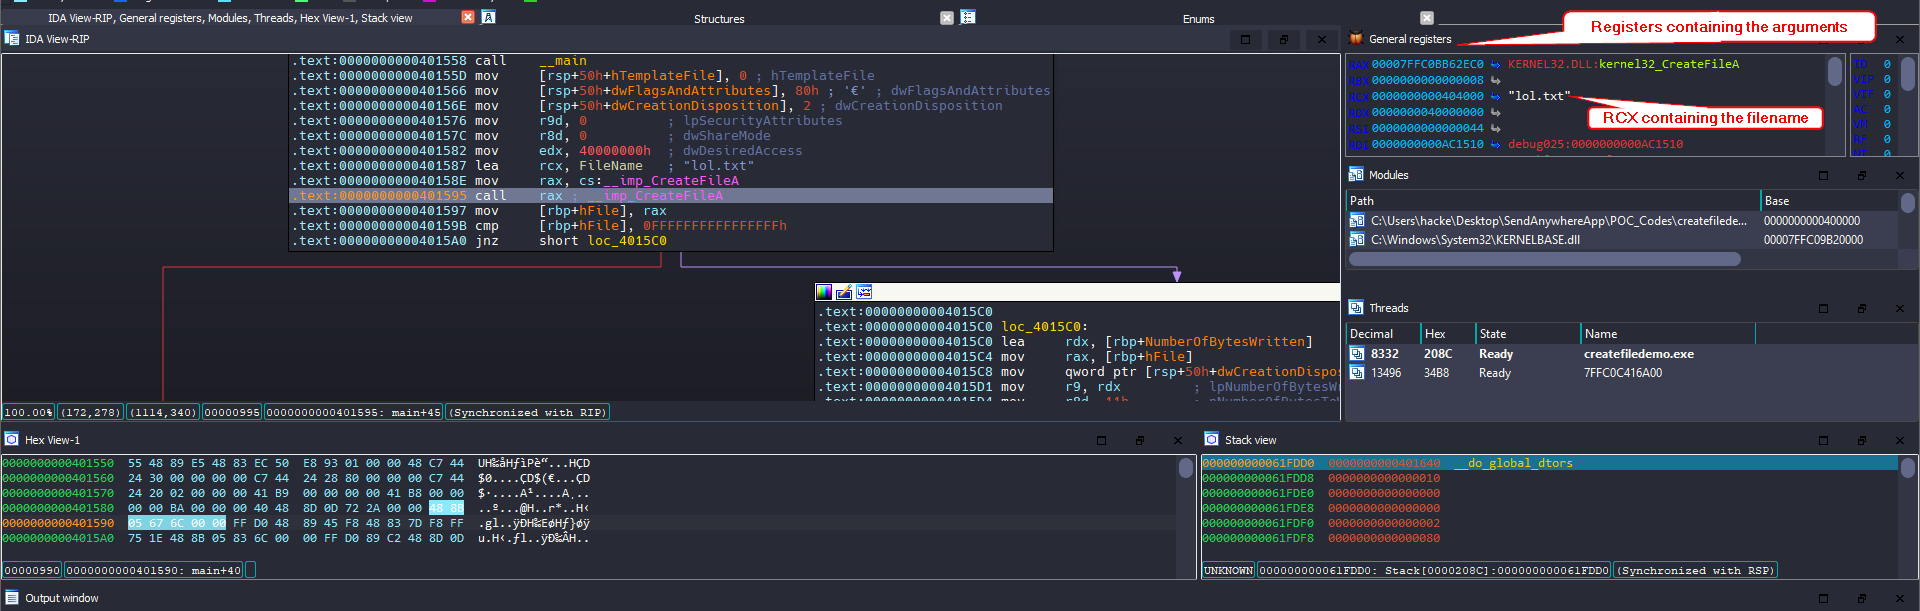
The purple line that follows takes to the code section that gets executed upon successful CreateFileA event, otherwise the execution will be followed by the red line block. That being said, we have hit our breakpoint, I’ll press F7 to step into the CreateFileA function block and you can see we have landed inside kernel32.dll as shown below. 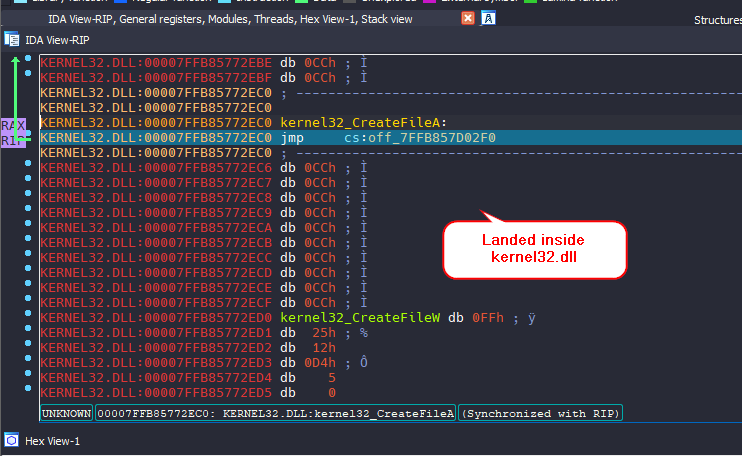
If we once again step into , we will land inside kernelbase.dll. What this means is that the actual code to CreateFile is implemented inside the kernelbase.dll
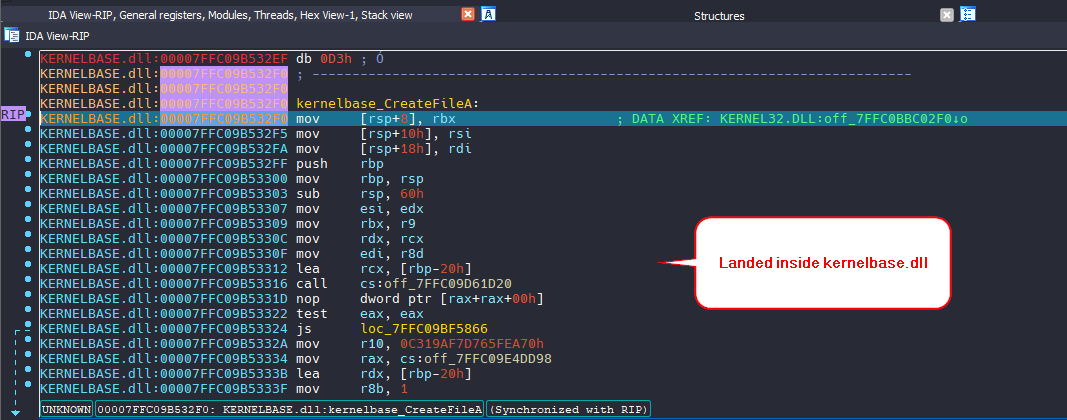
Let’s open the kernelbase.dll into our IDA to understand the flow better. 
You’ll see that it is calling a lot of functions like RtlInitAnsiStringEx which we don’t care as it deals with making sure the strings that we have passed to the function is correct and at some point it will get converted to the Unicode version. You’ll notice that at some point, you’ll have call to CreateFileInternal 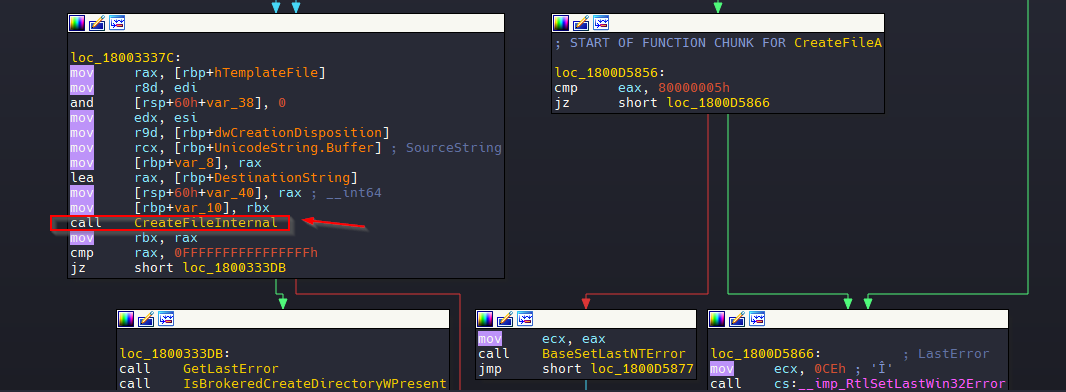
Let’s go inside the function and you’ll notice that it’s a huge function but at some point below you’ll find that it’s calling the NtCreateFile 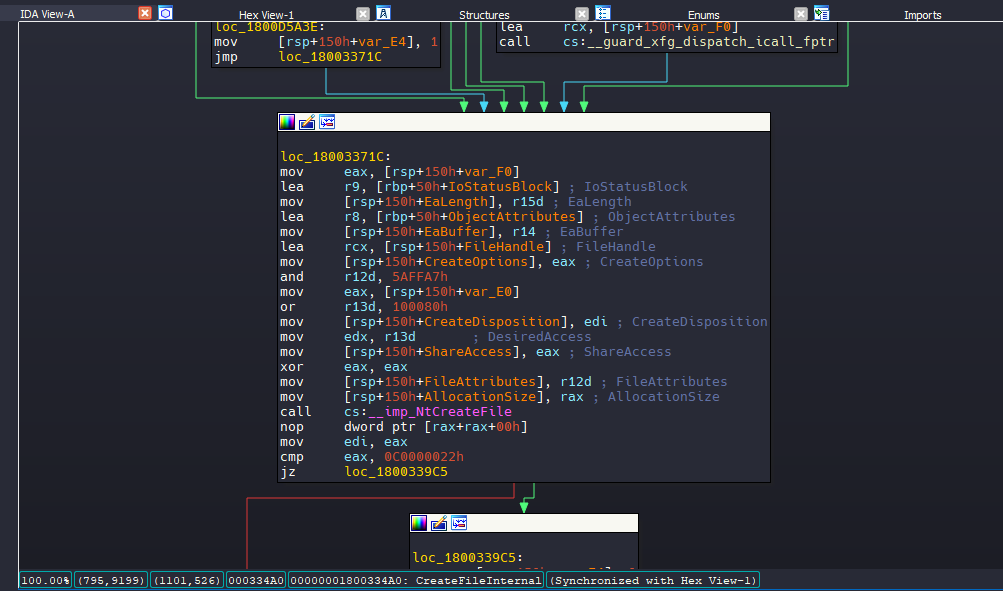
Let’s load the ntdll.dll into IDA this time to see NtCreateFile in detail. 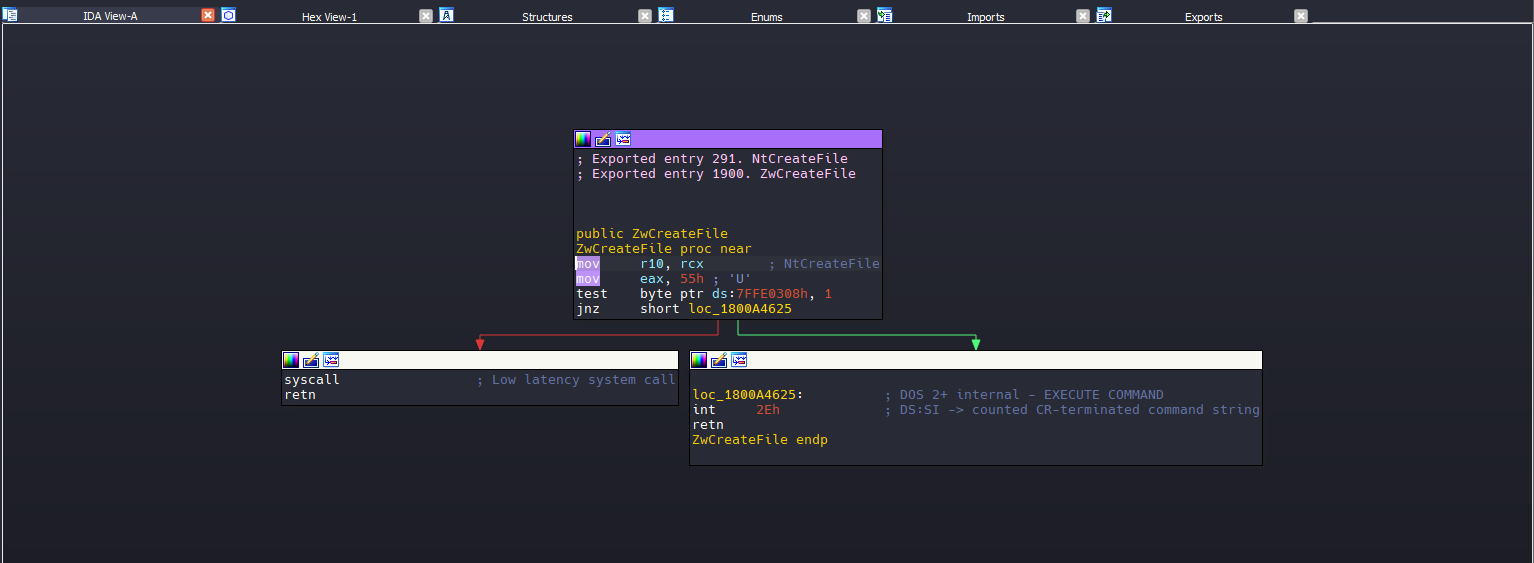
Alright, we’ve ventured deep into the inner workings of Windows with the CreateFile to syscall transition in IDA. Having that foundation, we’re perfectly positioned to dive into our next main topic of Hooking.
Inside the Hook: Manipulating Functions the Cool Way
Alright, we’ve journeyed through the intricacies of Windows processes and witnessed the seamless transition from userland APIs right down to the kernel using our trusty debugger. You might be thinking, ‘What’s hooking got to do with what we just went over?’ Well, quite a lot! Hooking is a technique that can intercept and modify the behavior of functions like CreateFile, making it an essential topic for anyone wanting to understand the full spectrum of how software interacts, both benignly and maliciously, with the OS.
Hooking is a versatile technique, with various methods tailored to specific needs. Some prevalent types include:
Inline Function Hooking: This method targets the
.textregion of the program being hooked. Notably, Microsoft’s hooking library, known as ‘detours’, utilizes this technique.Virtual Method Table (VMT) Hooking: This approach focuses on the
.dataregion, specifically where the virtual table address is stored. The virtual table itself comprises addresses of various functions.Import/Export Address Table Hooking: By adjusting addresses in the Import Address Table, this technique effectively hooks the target.
Vectored Exception Handler (VEH) Hooking: This method is unique as it doesn’t rely on patching instructions or addresses. While its implementation is complex, it stands out due to its stealthy nature and the distinct indicators of compromise (IOCs) it generates.
For the scope of this blog post, our primary focus will be on inline function hooking. However, future articles may delve into the intricacies of other hooking methods.”
We’ll hook into specific functions to observe how these hooks appear in the debugger, and we’ll even tinker around to alter our application’s behavior. Moving forward, we’ll start by using Frida for our hooking endeavors. Before we dive deep into manual methods, let’s harness the power of Frida, turning it into our mini-EDR. It’ll not only hook specific functions but also give us a nudge whenever our code decides to call upon those functions.
Before we jump into hooking or altering an API’s behavior, it’s crucial to first grasp the application’s behavior, especially regarding which API functions it’s calling. We have a few routes here: we can pop our code into a debugger and scrutinize the import table, or we can leverage tools like API Monitor. This handy tool doesn’t just show us the called APIs in real-time but also reveals the arguments passed to them. 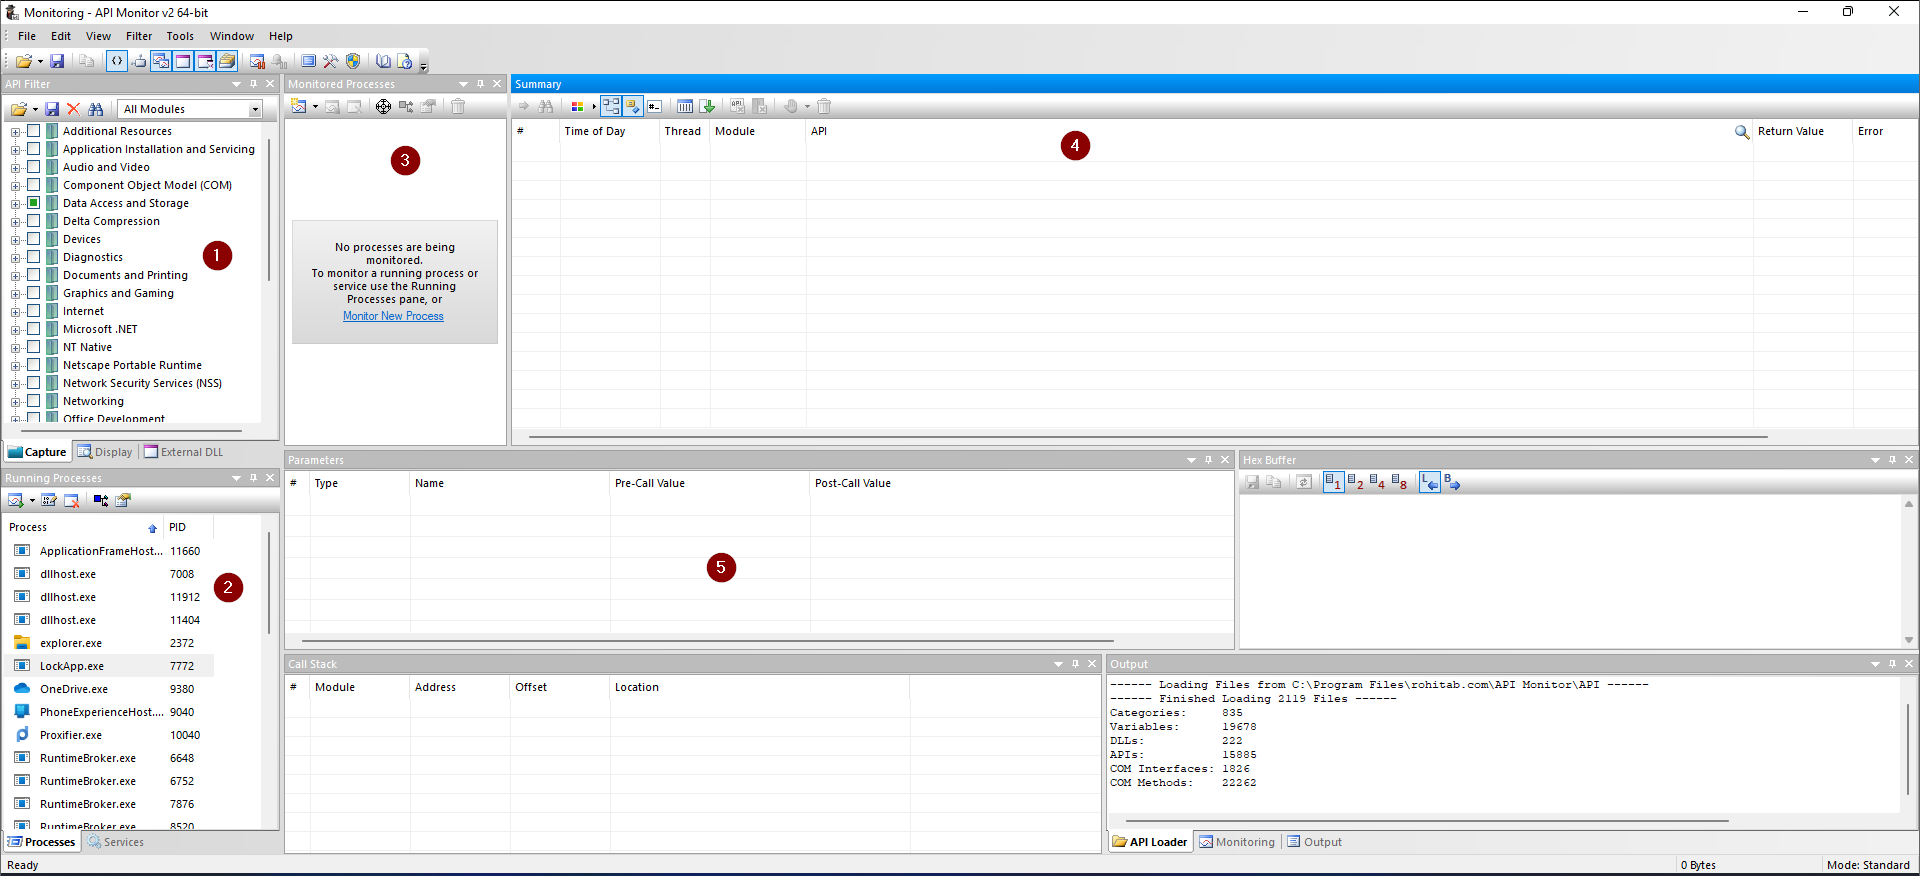
When you launch the API Monitor tool, here’s the lay of the land:
- First Tab: This is where you choose the module for which you want to monitor APIs. For this example, I’ve picked the ‘Data Access and Storage’ module, specifically aiming to keep an eye on the
CreateFileand related APIs. - Second Tab: This displays all the currently running processes.
- Third Tab: Here, you’ll find a list of processes that are under monitoring.
- Fourth Tab: A log of all the API calls shows up here.
- Fifth Tab: This delves deeper, showing the parameters for any API call you select from the fourth tab.
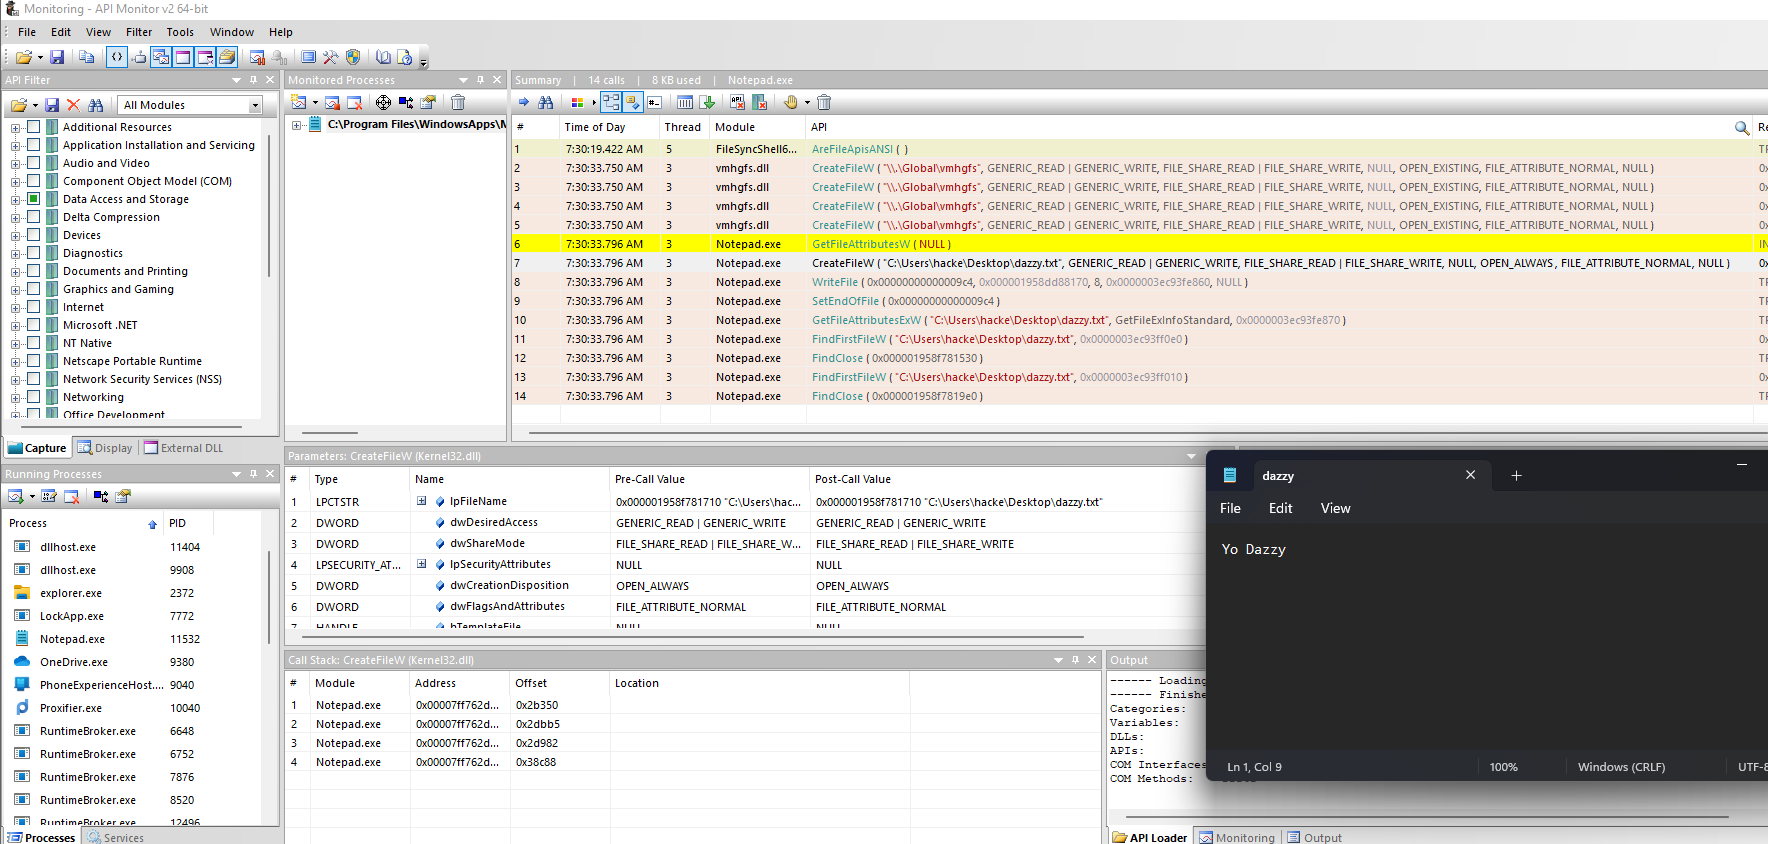
In the example above, I fired up Notepad and began tracking it with API Monitor. The moment I attempted to save my text, voilà! The CreateFileW and several other APIs sprang into action. 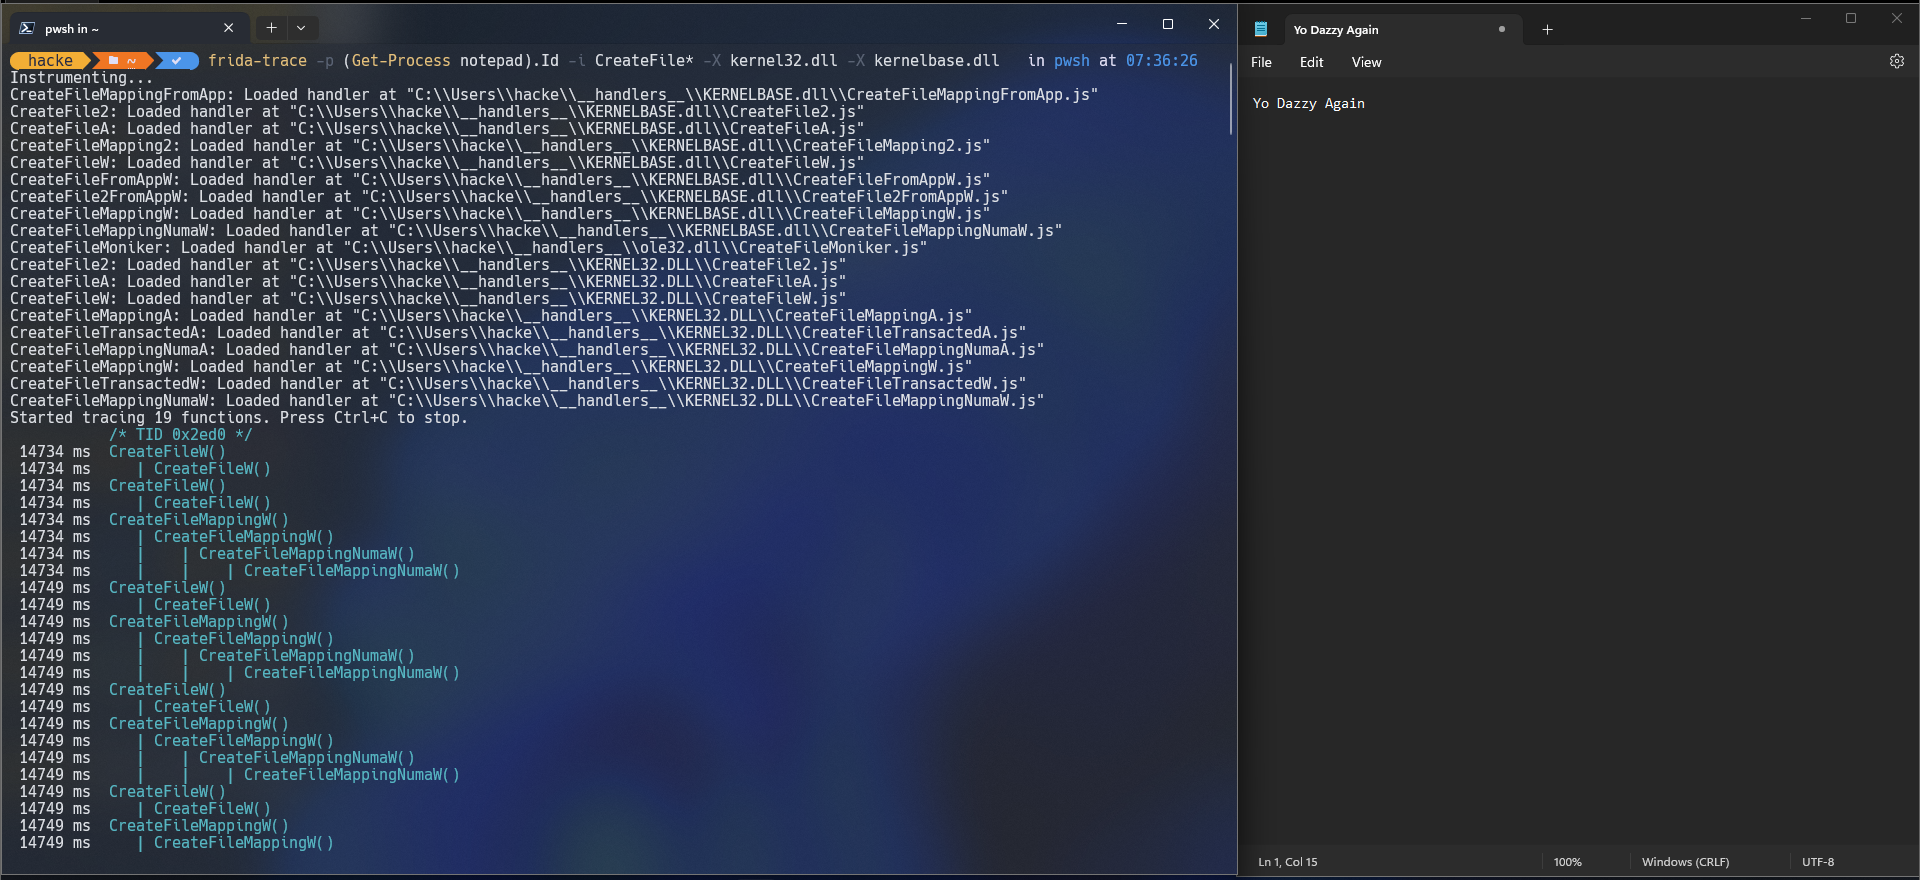
As evident from above, when I kickstarted frida-trace to scout for API calls beginning with CreateFile* on the Notepad process, it began listing those calls right away. Bonus? By default, it generates a JavaScript file – a ready-to-use Frida script. With it, we can delve into parameters or even tweak the API’s functionality. Let’s see how this script looks like. These are all the folders and files created the first time we run frida-trace tool. 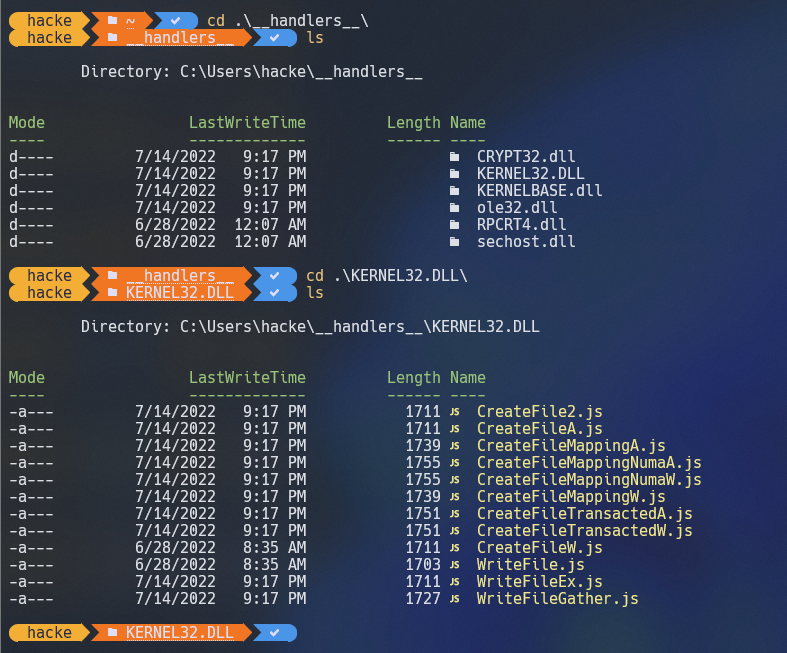
We are interested in the CreateFileA and the contents of it look like below. 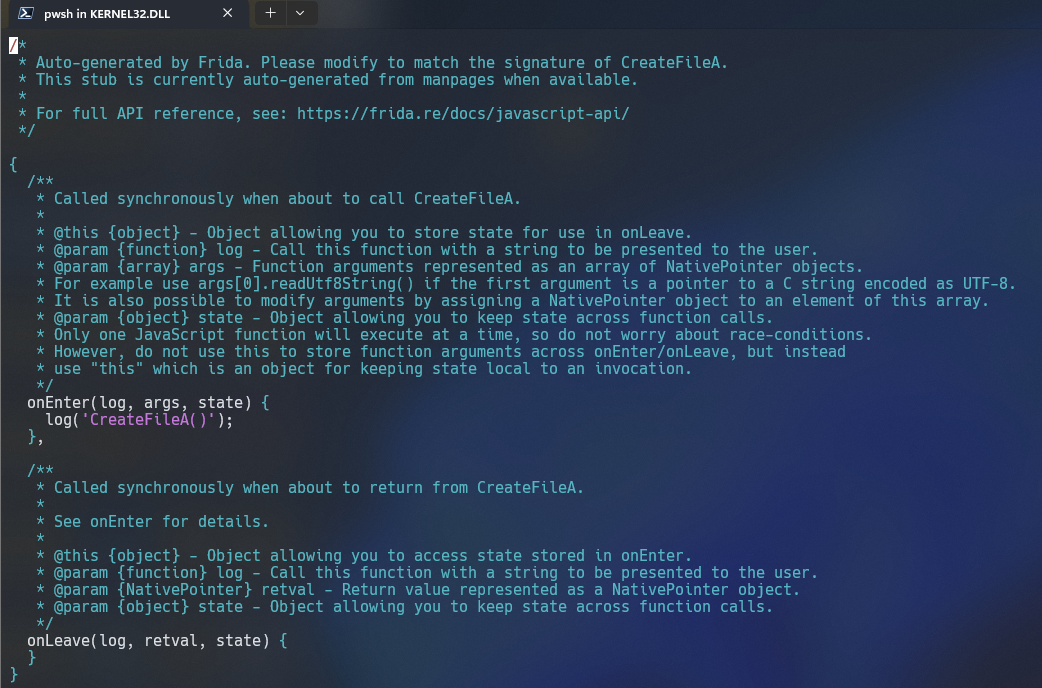
From what we can observe, the default behavior simply logs to the screen every time CreateFileA is invoked. We know that CreateFileA is going to call CreateFileW, so let’s modify that script instead. Let’s modify it a bit to also print the arguments to that API whenever it was called.
We can utilize the official msdn documentation to see how the arguments to CreateFileW looks like 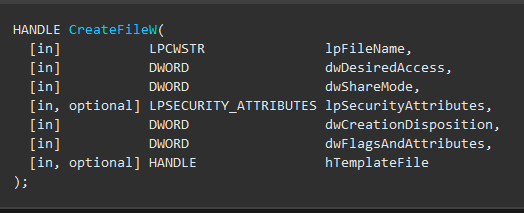
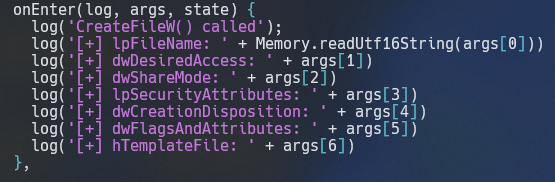 In the script, we’re tapping into the
 CreateFileW function to monitor its calls and print its arguments. Let’s dissect this script step-by-step:
onEnter(log, args, state):
onEnteris a callback triggered right before the hooked function (CreateFileAin this case) executes.logis a function we can use to print messages to the console.argsis an array that contains the arguments passed to the hooked function.statecan be used to store data between theonEnterandonLeavecallbacks, though it’s not utilized in this specific script.
log(‘CreateFileW() called’):
- This line just prints a message to the console whenever
CreateFileWis invoked.
- This line just prints a message to the console whenever
log(‘[+] lpFileName: ‘ + Memory.readUtf16String(args[0])):
lpFileNameis the name of the file or device to be created or opened.Memory.readUtf16String(args[0])reads the string argument (in UTF-16 format) passed toCreateFileAwhich is the file or device name.
From here, the script is pretty straightforward. If you’re curious about the other parameters or arguments for CreateFileW, I’d recommend checking out its official documentation right here: Microsoft’s Documentation on CreateFileW. It provides a comprehensive breakdown of each parameter and its potential values.
As you’ll notice in the image below, when we run frida-trace now, it doesn’t just tell us the function was called – it also reveals the specific arguments that were passed to it. This level of detail can be incredibly insightful! 
Alright folks, buckle up! We’re about to take our journey up a notch. From this point forward, I’ll be introducing you to a slick tool named Fermion. Think of it as the cool, stylish cousin of Frida—a front-end interface that makes the whole process smoother. And yeah, it’s pretty rad! 😎 There are minor syntax differences in the syntax for the Fermion, we are now doing pointer resolution for the function we want to hook and using send() method to log to the screen instead of log(). Let’s first do the same thing we had done with frida-trace.exe i.e., hooking CreateFileW inside notepad.exe 
Once the instrumentation has started, in the log tab, the specific API calls will start to show up. 
Alright, folks, it’s throwback time! Remember our old friend createfiledemo.c? Let’s bring it back to the spotlight. This time, we’re going to hook CreateFileA from it. And to spice things up, we’ll get a behind-the-scenes look at how Frida works its magic with the trusty Windbg debugger. 
I’ve added a getchar() to the code, allowing us to pause the program. This gives us a chance to observe the CreateFileA function both before and after the hooking is performed. It’s a useful way to see the effects of our modifications in real-time. 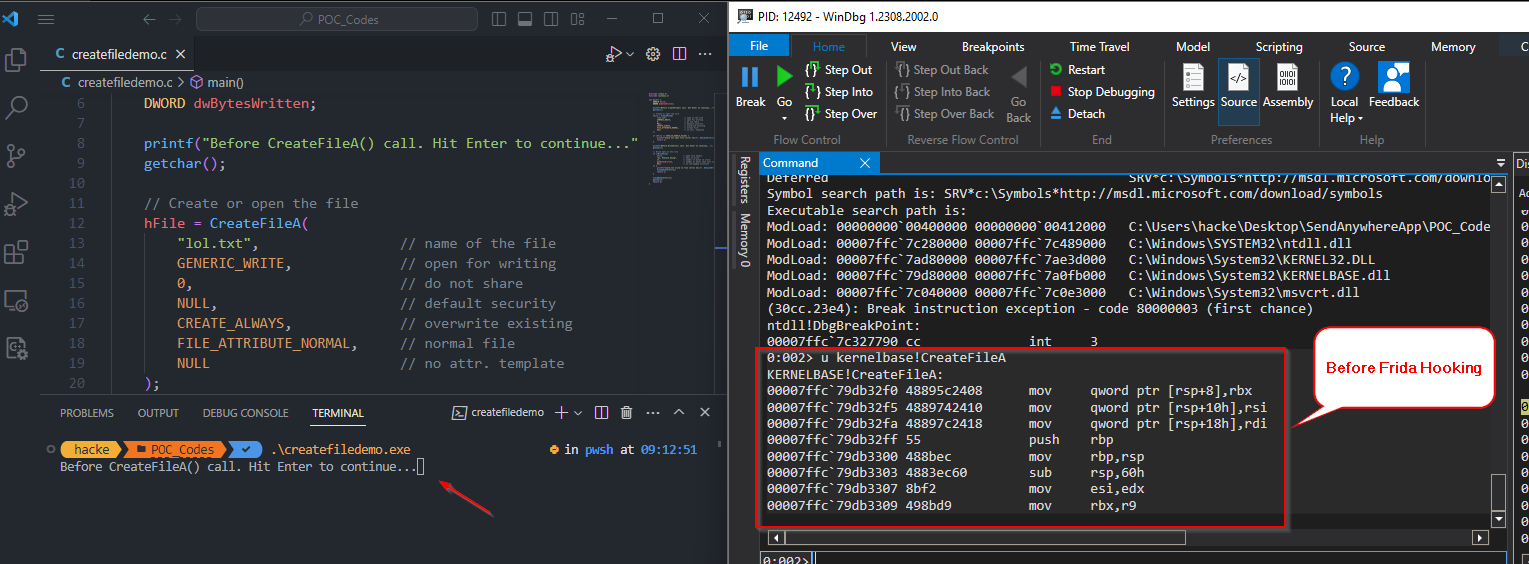
After hooking with frida, the modified assembly code for CreateFileA looks like below. Once hooked, this is how the hooked CreateFileA looks like: 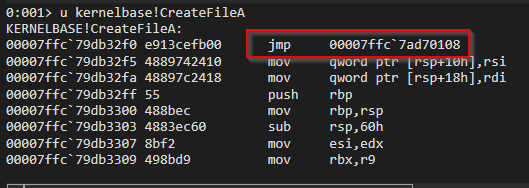
Now let’s attach x64dbg into the createfiledemo.exe process and analyze it a bit. If you go the Memory Map tab, you can see the frida-agent.dll being loaded into the process 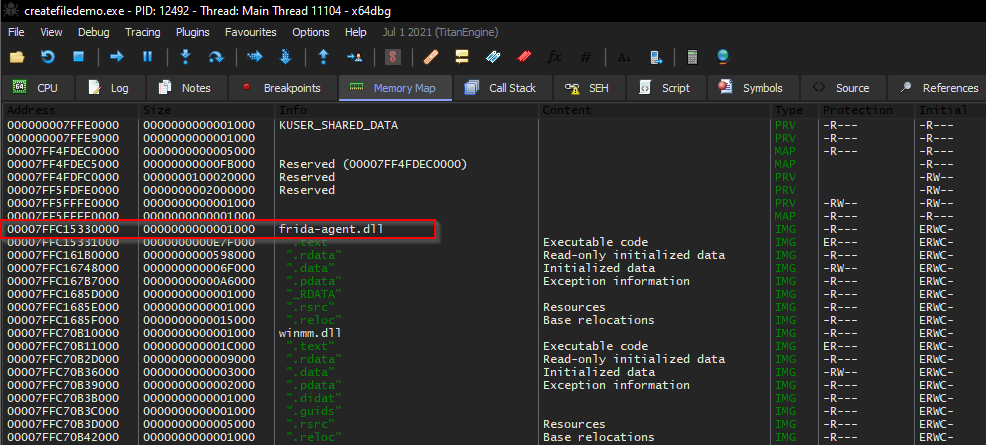
You could have also verified the same using the windbg lm command. Now let’s go to the CreateFileA in the kernelbase.dll module and set a breakpoint there. 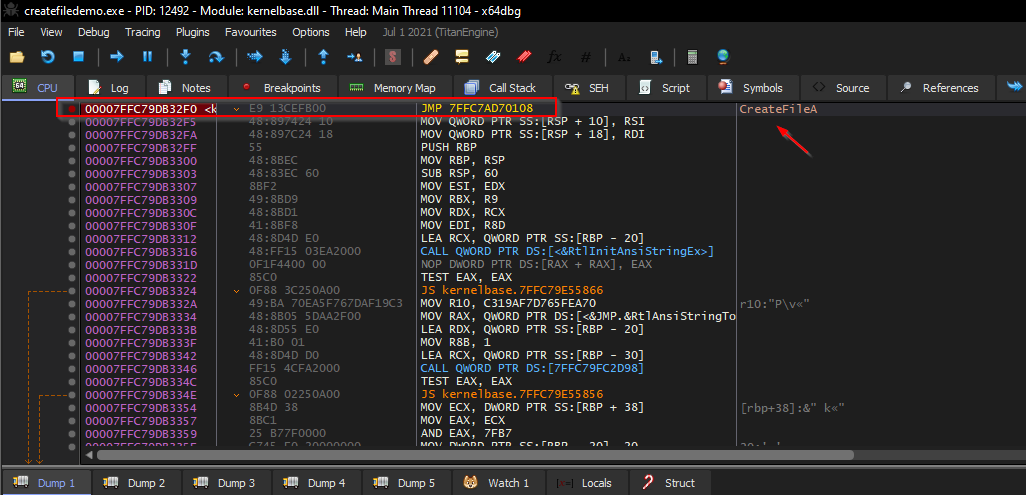
Now let’s continue running the program and wait for the breakpoint to hit. You’ll observe that now we are into the frida-agent code section which does the actual hooking. 
Our breakpoint has been hit and we can see all the arguments to the CreatefileA in the registers tab, let’s keep stepping into see where are we getting landed. 
Next, we’ll delve into another example. Instead of just displaying the arguments on the screen, we’ll also alter the API function’s behavior. For this demonstration, I’ll use the MessageBox API. However, feel free to experiment with any API you’re interested in modifying.
1
2
3
4
5
6
7
8
9
10
11
12
13
14
#include <windows.h>
#include <stdio.h>

int main()
{
     MessageBoxA(NULL, "MessageBox 1", "MessageBoxA", MB_OK);

     printf("Press any key to continue");
     getchar();

     MessageBoxA(NULL, "MessageBox 2", "MessageBoxA", MB_OK);

     return 0;
}
Let’s take a look at a basic example that uses the MessageBoxA API to display two message boxes sequentially on the screen. When executed, this code will display the first message box. After closing it and pressing any key in the console, the second message box will appear. 
In the above example, we merely displayed the arguments passed to the MessageBoxA API within Frida’s output. Now, let’s adapt our Frida script to modify the MessageBoxA API so that it displays a different message.
1
2
3
4
5
6
7
8
9
10
11
12
13
14
15
16
var pMessageBoxA = Module.findExportByName("user32.dll", "MessageBoxA");

var newMessage = null;

Interceptor.attach(pMessageBoxA, {
    onEnter: function (args) {
        send("\n[+] Called MessageBoxA");
        send("[*] hWnd      : " + args[0]);
        send("[*] lpText    : " + args[1].readAnsiString());
        send("[*] lpCaption : " + args[2].readAnsiString());
        send("[*] uType     : " + args[3]);

        newMessage = Memory.allocAnsiString("HACKED MESSAGEBOX");
        args[1] = newMessage;
    }
});
In the line newMessage = Memory.allocAnsiString("HACKED MESSAGEBOX");, we’re essentially telling Frida to allocate memory for a new Ansi string and set its value to “HACKED MESSAGEBOX”. This is how we dynamically create and store our modified string for later use.
From the image above, it’s evident that the second time the message box popped up, it displayed our custom string. That’s the magic of Frida – letting us modify behavior on-the-fly during runtime.
Diving deeper, let’s explore the manual side of things. Instead of relying solely on tools, we’ll get our hands a bit dirty. We’re going to craft a simple DLL. When injected into a process, this DLL will essentially overwrite a specific API function, altering its behavior to our liking. This method, often called DLL injection, is one of the foundational techniques in the world of hooking.
hook.c
#include <windows.h>
#include <stdio.h>

BOOL hooked = FALSE;
SIZE_T bytesWritten;
char messageBoxOriginalBytes[6] = {};

FARPROC messageBoxAaddr = NULL;

int __stdcall hookedMessageBox(HWND hWnd, LPCSTR lpText, LPCSTR lpCaption, UINT uType) {
    // unpatch
    WriteProcessMemory(GetCurrentProcess(), (LPVOID)messageBoxAaddr, messageBoxOriginalBytes, sizeof(messageBoxOriginalBytes), &bytesWritten);

    lpText = "HACKED";

    return MessageBoxA(NULL, lpText, lpCaption, uType);
}

void hook()
{
    if (!hooked) {
        SIZE_T bytesRead;

        messageBoxAaddr = GetProcAddress(LoadLibraryA("user32.dll"), "MessageBoxA");
        ReadProcessMemory(GetCurrentProcess(), messageBoxAaddr, messageBoxOriginalBytes, 6, &bytesRead);

        SIZE_T dwSize = 7;
        CHAR patch[6] = { 0 };
        CHAR *addr = (CHAR*)messageBoxAaddr;
        DWORD dwOld;

        VirtualProtect((VOID*)messageBoxAaddr, dwSize, PAGE_EXECUTE_READWRITE, &dwOld);

        void *hookedMessageBoxAddr = &hookedMessageBox;
        memcpy_s(patch, 1, "\x68", 1); // push hookedMessageBoxAddr; ret
        memcpy_s(patch + 1, 4, &hookedMessageBoxAddr, 4);
        memcpy_s(patch + 5, 1, "\xc3", 1);

        // patch the MessageBoxA
        WriteProcessMemory(GetCurrentProcess(), (LPVOID)messageBoxAaddr, patch, sizeof(patch), &bytesWritten);
    }

    hooked = TRUE;
}

BOOL APIENTRY DllMain(HINSTANCE hInstDLL, DWORD  fdwReason, LPVOID lpReserved)
{
    switch (fdwReason)
    {
    case DLL_PROCESS_ATTACH:
        hook();
        break;
    case DLL_THREAD_ATTACH:
    case DLL_THREAD_DETACH:
    case DLL_PROCESS_DETACH:
        break;
    }
    return TRUE;
}
Let’s try to break the above code:
BOOL hooked = FALSE;
SIZE_T bytesWritten;
char messageBoxOriginalBytes[6] = {};
FARPROC messageBoxAaddr = NULL;
These global variables are:
hooked: Used to check if the MessageBoxA function is already hooked.bytesWritten: Stores the number of bytes written using theWriteProcessMemoryfunction.messageBoxOriginalBytes: Used to store the original bytes of theMessageBoxAfunction, enabling unhooking later.messageBoxAaddr: Pointer to the location ofMessageBoxAfunction in memory.- hookedMessageBox Function: This is the hook function that will replace the original
MessageBoxA. Before showing the message, it:- Restores the original bytes of
MessageBoxA(unhook). - Modifies the message to display to “HACKED”.
- Calls the original
MessageBoxA.
- Restores the original bytes of
hook Function: This function sets up the hook. It:
- Checks if the function is already hooked using the
hookedvariable. - Gets the address of
MessageBoxAin memory. - Saves the first 6 bytes of the original
MessageBoxA. - Modifies memory protection of the
MessageBoxAfunction to make it writable. - Creates a patch that will make the original function jump to
hookedMessageBoxwhen called and writes this patch over the originalMessageBoxAfunction (push hookedMessageBoxAddr; ret)
- Checks if the function is already hooked using the
In essence, when the DLL is loaded, the hook function will make it so that any subsequent calls to MessageBoxA from the hosting process will always display a message box with "HACKED", before restoring the function to its original state.
For our demonstration, we’ll utilize the classic DLL Injection technique to inject our DLL into a target process. This method essentially involves a sequence of steps: initiating with OpenProcess to get a handle, followed by VirtualAllocEx for memory allocation within the process, then WriteProcessMemory to place our DLL into that memory, and finally, CreateRemoteThread to kickstart the execution of our DLL within the process’s context.
Next, let’s take a look by examining the MessageBoxA function within the windbg debugger—both before and after our hook is applied. The below image shows the original MessageBoxA function before hooking. 
Once you inject the DLL and resume the program’s execution, WinDbg will provide a notification about the DLL being loaded 
You can also verify the loaded DLLs using the lm command in WinDbg. 
Now, let’s examine the appearance of the MessageBoxA API post-hooking. 
From the above image, it’s evident that the first instruction of the MessageBoxA API has been replaced with the push and ret instructions. Now, let’s proceed and let the program run.
From the above results, it’s evident that we successfully injected our hook.dll into the message.exe process. Consequently, we managed to alter the MessageBoxA argument, displaying our custom ‘HACKED’ message.
That wraps up our exploration for this post. In our upcoming blog entry, we’ll delve into the art of unhooking, focusing on undoing the modifications made by tools like Frida, and discussing various other unhooking techniques. Stay tuned!
Further Resources
1
2
3
4
5
- https://mr.un1k0d3r.world/portal/
- https://www.mdsec.co.uk/2020/12/bypassing-user-mode-hooks-and-direct-invocation-of-system-calls-for-red-teams/
- https://blog.nviso.eu/2022/08/05/finding-hooks-with-windbg/
- http://phrack.org/issues/65/10.html#article
- https://www.codeproject.com/Articles/2082/API-hooking-revealed